
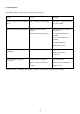
Specifications


4.1 Starting the machine
• Fully unwind the supply cord from the
handle and plug into a convenient socket
outlet. The neon indicator on the handle
should light showing that power is
available.
• With the handle set at a convenient
working height and with both left and right
hands on the handle, depress both
interlock buttons with the thumbs and
squeeze both switch triggers to start the
machine (Fig.2). Ensure transport wheels
are not touching the floor during start-up
and operation (Fig 3).
• Once the machine has started the
interlock buttons should be released.
• To stop the machine release both switch
triggers.
4.2 Polishing
• Fit polishing brush or drive disc and pad
suitable for the surface to be polished.
(see Accessories).
• Apply polish to the floor in accordance
with the manufacturer’s instructions.
• Do not keep the machine rotating on one
spot for more than 3 seconds, as this
could cause overheating and damage the
floor surface.
4.3 Scrubbing and Shampooing
• For scrubbing or shampooing the solution
tank must be fitted as described (see
Fitting the solution tank).
• Fit a brush or drive disc and pad suitable
for the surface to be cleaned. (see
Accessories).
• Fill the solution tank with water and an
appropriate measure of detergent.
• IMPORTANT - Use only cleaning agents
suitable for automatic machines i.e. low
foaming, and follow the chemical
manufactuers’ directions regarding use,
handling, disposal and health and safety
provisions. Using other chemical products
(e.g. chlorinated products) can damage or
destroy the machine
• Before starting the machine release a
liberal amount of cleaning solution from
the tank to the floor. The flow of solution
from the tank is controlled by moving the
left hand lever. Releasing the lever stops
the flow.
• Proceed to operate the machine in the
normal manner, releasing more cleaning
solution from time to time as required.
• Do not keep the machine rotating on one
spot for more than 3 seconds, as this
could cause overheating and damage the
floor surface.
• Dirty water should not be allowed to
accumulate on the floor, it should be
removed to prevent dirt from settling. We
suggest using a wet vacuum cleaner for
this purpose.
• When scrubbing/shampooing is complete,
unplug the machine from the power
supply, empty the solution tank and clean
and dry the machine.
• IMPORTANT - Dispose of unused
cleaning solution in accordance with the
manufacturer’s directions.
4.4 Fitting the solution tank
NOTE - The solution tank is supplied as an
optional accessory item, complete with
attachments and fitting instructions.
• Move the handle to the upright position
and clamp the tank support bracket to the
handle tube in the specified position
(Fig.4). (Refer to the instructions supplied
with the tank).
• Take the solution tank and loop the control
cord over the left hand operating lever and
tie off to a suitable length. Rest the
solution tank on the support bracket with
the handle tube in the groove on the back
of the tank.
• To secure the tank in position, engage the
locking bar on the back of the tank.
• Adjust the length of the control cord by the
spring loaded cord lock to ensure there is
no tension on the cord when the flow
control lever is not being used.
• Take the plastic tube supplied and push
into the connector on the underside of the
solution tank, and the other end onto the
tube on the rop of the motor housing.
4.5 Removing the solution tank
• Pull off plastic tube from machine base.
• Raise locking bar on back of tank.
• Lift off tank and detach chain ring from
lever.
5 Storage
Always unplug and wipe down and dry the
machine after use. The machine should
normally be stored with the handle in the
fully upright position.
Wrap supply cord around the handlebar and
cable winder ensuring that the plug is not
trailing on the floor. Store the machine in a
dry indoor area only.
Never store the machine with a pad or brush
fitted as this causes distortion, and results in
instability during operation.
6 Maintenance
WARNING - Before undertaking
maintenance operations or adjustments
switch off machine and unplug from the
electricity supply.
The machine requires minimum
maintenance apart from the following
checks by the operator.
• Supply cord - Regularly inspect sheath,
plug and cord anchorage for damage or
loose connection.
• Body of the machine - Clean with a
damp cloth.
• Air vents - Check for dust accumulation
around the air inlet and outlet vents of the
motor cooling-air system and clean if