
Specifications


c) Follow this process to fill and pressurize the system:
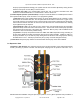
Step 1. Connect hoses (garden hose fittings) to fill (bottom) and drain (top) ports on pump.
Step 2. Open the valves on both the drain and fill ports and turn the isolation valve between the fill/
drain ports to the closed position (horizontal). Open the auto air vents on the highest point of the
system (normally collector outlet).
Step 3. Start the fill process, first with water to flush/clean the system. If the lines have many soldered
connections it is advisable to flush the system first with a TSP solution to clean the piping before
flushing with water. Continue filling until no more air bubbles are visible from the drain hose.
Step 4. Clear out the water in the system using compressed air. It is advisable to measure the volume
of expelled water, as this can confirm how much heat transfer fluid is required, and what sized metal
bucket may need to be used under the PRV drain pipe. Connect the expansion tank to the pump
station.
Step 5. Change the fill hose to the heat transfer fluid and fill the system draining any remaining water
into the flush bucket. Once the heat transfer fluid starts to emerge (bright color) from the drain hose
place the drain hose into the heat transfer fluid container and circulate for 15 minutes. Open and close
the isolation valve once and run the circulation pump for at least 30 seconds to eliminate all air.
Step 6. Once the system is free of air, close the drain port.
Step 7. Continue to run the fill pump until the desired pressure is reached (40-50psi), then close the fill
port, open the ball valve (return to vertical orientation) and turn off the fill pump. Monitor the pressure
gauge for for at least 15min for a drop in pressure that would indicate leaks in the system.
Step 8. Manually start the system pump (P1) using the Manual Testing function of the controller. Set
pump to speed 3 and run for 5 minutes. If required re-pressurize the system by turning on the fill pump
and opening the fill valve.
Step 9. Check pump and flow rate, adjusting as required.
NOTICE
Before connecting the pump station and completing the fill and pressurisation, pressure test
the collector loop with compressed air in accordance with standard plumbing practices.
This is important to ensure no leaks are present in the roof space, attic etc.
Apricus Solar Collector Installation & Operation Manual - USA
Copyright © 2011 – Apricus Inc Doc: A7-05.4.12-PB Page 60 of 129