
Specifications


7.10. Draining System
a) If servicing the collector or any part of the solar loop or the storage tank, the system should be drained of
fluid.
WARNING
Only drain the system once the solar collector is below 113
°
F (45
°
C). Draining the system
while the system is hot could result in release of high pressure, hot fluid which could cause
serious injury.
WARNING
If the installer/contractor leaves the site at any time a clear sign should be mounted on the
front of the pump station and/or storage tank that reads: “This equipment is currently
being maintained. Under no circumstances should any valves be opened or closed
or the power supply to any equipment be restored.” Opening closed isolation valves
could release high pressure water that is potentially hot enough to cause serious scalding.
b) DRAINING COLLECTOR LOOP:
Step 1. Cover the solar collector to prevent exposure to sunlight. At least 30 minutes is required to
allow the collector temperature to drop. Another option is to complete the work before sunrise, or after
sunset.
Step 2. Once collector temperature has dropped to below 113
°
F (45
°
C) turn the solar controller to OFF
mode so the pump and boosting does not turn on, but leave controller powered on.
Step 3. Connect garden hose to drain port and run pipe to a bucket with capacity of at least 4 gallons
for a standard domestic installation. Check the MSDS of the heat transfer fluid for guidelines of
disposal methods and in all cases dispose of fluid in accordance with relevant local, state and federal
regulations. See Appendices 11-18 for more information on heat transfer fluids.
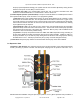
Step 4. Turn off the isolation valve with RED handle between the Drain and Fill valves.
Step 5. Connect air compressor to Fill valve. Open Drain valve and purge fluid out using the
compressed air. Not all fluid will be able to be purged, with some left in the piping below the level of
the pump station. If removing the pump station, or any other piping that is likely to still contain some
fluid, take care to avoid any spillage. Any spillage should
be quickly cleaned up in line with manufacture’s MSDS
recommendations found in Appendix 11-18
Step 6. Once the system is fully drained maintenance
work can be completed. Refill and pressurize in
accordance with instructions in section 7.9.
7.11. Controller Setup and Operation
a) Controller Programming: Following these steps to
complete initial programming of the controller.
Step 1. Plug controller into protected outlet or
uninterrupted power supply (UPS). The controller will
startup in OFF mode. Pumps and valve will not operate
until Operation Mode is changed to Automatic.
Step 2. From the Navigation Menu select the Service
Menu. Program the controller date and time function.
Step 3. Program the remaining controller functions to accommodate your system design. Sample
system designs with suggested controller setting are presented in section 10.
Step 4. If more advanced systems or control functions are needed, refer to the controller manual
Apricus Solar Collector Installation & Operation Manual - USA
Copyright © 2011 – Apricus Inc Doc: A7-05.4.12-PB Page 61 of 129