Clickfree DVD Backup User Guide for Microsoft Windows users
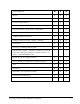
Feature / function M P O EULA N N N Password protection N N N backup complete folders N N Y choosing categories for BU / RSTR (like HD/Xformer) N N Y choosing locations / types & sizes / embedded Y Y N all filetypes selected by default N N Y multiple computers per DVD N N N multiple backups per DVD – adding / updating N N N undo restore N N N browsing / searching backed-up files N N Y Search entire computer - exclusions for Windows folders & removable media (true
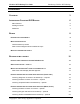
Clickfree DVD Backup User Guide Introducing Clickfree DVD Backup Contents CONTENTS 3 INTRODUCING CLICKFREE DVD BACKUP 6 Main Features 6 Package contents 6 Definitions 7 BASICS 8 HOW DOES CLICKFREE WORK? 8 WHAT GETS BACKED UP? 8 Clickfree backs up content 8 What content categories does Clickfree back up? 8 WHAT DO I NEED BEFORE I START? BACKING UP MY CONTENT 9 10 HOW DO I START USING MY CLICKFREE DVD BACKUP? 10 ZERO EFFORT BACKUP – REALLY! 11 WHAT IF CLICKFREE DOESN’T START UP A
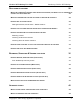
Clickfree DVD Backup User Guide Introducing Clickfree DVD Backup RESTORING MY CONTENT 26 WHAT IF MY COMPUTER’S INTERNAL HARD DRIVE STOPS WORKING, OR I WOULD LIKE TO TRANSFER MY CONTENT TO A NEW COMPUTER? 26 WHAT DO I NEED BEFORE I CAN USE CLICKFREE TO RESTORE MY CONTENT? 26 HOW DO I GET MY CONTENT BACK? 26 What gets restored, and to where – Default restore? 26 HOW DO I LET CLICKFREE RESTORE DECIDE WHAT TO RESTORE AND WHERE? 27 HOW DO I CHANGE HOW CLICKFREE RESTORES CONTENT? 30 Restoring conten
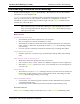
Clickfree DVD Backup User Guide Introducing Clickfree DVD Backup HOW DO I CHOOSE INDIVIDUAL FILE EXTENSIONS FOR BACKUP? (OFFICE) 42 HOW DO I CHOOSE INDIVIDUAL FILE EXTENSIONS FOR BACKUP? (MUSIC, PHOTO) 43 WHAT IF I DON’T ENOUGH CLICKFREE BACKUP DVDS? 44 WHAT ARE ‘FACTORY SETTINGS’ AND HOW DO I USE THEM? 45 HOW DO I ADD/REMOVE/EDIT FILETYPES? (OFFICE ONLY) 45 HOW DO I CHOOSE ANOTHER DRIVE AND/OR FOLDER TO RESTORE TO? 47 LEGAL STUFF Copyright © 2009 Storage Appliance Corporation.
Clickfree DVD Backup User Guide Introducing Clickfree DVD Backup Introducing Clickfree DVD Backup Thank you for buying the Clickfree DVD Backup – the easiest way to keep the valuable information on your computer safe. Clickfree is an easy-to-use computer backup system that automatically searches for and backs up content stored on your computer. No hardware configuration or software installation is required. The backup procedure begins once the Clickfree DVD has been inserted into your DVD drive.
Clickfree DVD Backup User Guide Introducing Clickfree DVD Backup DEFINITIONS Just to make sure that the user guide is clear, we’re going to define a couple of terms that are used throughout the guide. Administrator “Administrator” is a special login name for the user who can make system-wide changes to the computer, has full control, and can access all of the files on the computer. Most home users are automatically the Administrator of their computer.
Clickfree DVD Backup User Guide Basics Basics HOW DOES CLICKFREE WORK? All you need to do to keep your projects, photos, videos, music etc. safe is to put the Clickfree DVD Backup into the DVD drive in your computer and let it work! No need to install software or to configure anything. Your computer knows when the Clickfree DVD has been inserted, and it runs the program automatically each time. You can back up as many computers as you like with the Clickfree DVD Backup.
Clickfree DVD Backup User Guide • • • • • • • • • • • Basics {P} Photos – including common graphic formats such as JPEG and RAW {P} Video – for example, AVI, MPEG, Shockwave Flash {M} Music – including CD audio, MP3, MIDI {O} Emails – including Thunderbird, Eudora, and those from Microsoft Office {O} Text Documents – usually from word-processing programs such as Microsoft Word, Open Office, and WordPerfect {O} Spreadsheets – for example, Microsoft Excel, Open Office, and Lotus 123 {O} Presentations – for
Clickfree DVD Backup User Guide Backing up my content Backing up my content HOW DO I START USING MY CLICKFREE DVD BACKUP? Note: ♦ Screenshots in this section show mostly Office Backup screens – the screens for Music and Photo backup are almost identical. To start using your Clickfree DVD Backup: 1. Make sure that your computer is switched on and has finished starting up. 2. Log in, if that is what you normally do. 3. Insert a Clickfree DVD into your DVD drive. 4.
Clickfree DVD Backup User Guide Backing up my content ZERO EFFORT BACKUP – REALLY! Unless you stop the countdown by clicking a button, at the end of the countdown period Clickfree starts the backup. • If you want to let Clickfree decide what needs to be backed up from where, then you’re done: just relax and let Clickfree work. Without any effort on your part, Clickfree is safeguarding your valuable content! For details, see “What gets backed up?” on page 8.
Clickfree DVD Backup User Guide Backing up my content 5. If you have enough Clickfree Backup DVDs, click I’m Ready – Start Backup. Important: Before you backup your files, you must ensure that you have as many Clickfree Backup DVDs as are needed: if the backup requires more than one DVD, you need to use a Clickfree Backup DVD every time that the program tell you to change DVDs. If you don’t have enough Clickfree Backup DVDs for a backup, see “What if I don’t enough Clickfree Backup DVDs?” on page 44.
Clickfree DVD Backup User Guide Backing up my content Administrator.” 1. Log out. 2. Eject the Clickfree DVD. 3. Log in again as Administrator. 4. Insert the Clickfree DVD again. The backup then starts automatically. • Your computer settings may prevent Clickfree from running automatically because “Autorun” is turned off. To fix this problem, follow these steps. You only need to do this once, not every time you use Clickfree.
Clickfree DVD Backup User Guide Backing up my content What do the Cancel, Next, and Back buttons do? As you go from one step to the next to back up content, the screens you see usually have buttons for Cancel, Next >, and Back>. Cancel abandons the changes you have made and returns you to the Manage Settings and PCs screen. Next > accepts the decisions you have made so far, then moves on to the next step and the next decision.
Clickfree DVD Backup User Guide Backing up my content CHOOSING CATEGORIES OF CONTENT TO BE BACKED UP – REQUIRED 3. All of the categories are selected by default. Choose the categories of content to be backed up, for example, Text Documents, Presentations, and Financial. • • Note: To include a category, for example, Presentations, in the backup, make sure that the box to the left of the category name is checked . If it isn’t, click the box to check it.
Clickfree DVD Backup User Guide Backing up my content again. Each folder with a + beside it can also be expanded. Note: • You can now choose the individual folders you want to be searched by adding and removing checkmarks in the checkboxes. For example, to search only the folder with the Help and Manual projects, uncheck the My Documents checkbox, then check only My HelpAndManual Projects: • Do the same for My Computer. You must choose a location – you cannot leave all locations unchecked. 2.
Clickfree DVD Backup User Guide Backing up my content you already chose. • • To add the entire My Documents folder to the backup, make sure that the checkbox is checked . To see details of a folder under My Documents, click the + to the left of the checkbox. This expands My Documents to show the folders that it contains, and changes the + to a -. Click the – when you want to collapse the folder again. Each folder with a + beside it can also be expanded.
Clickfree DVD Backup User Guide Backing up my content It adds up the sizes of all of the content it finds, then adds the sizes of the files in the complete folders you also chose, and tells you how many files of what types it found, and how many DVDs are needed for the backup: ^TPHx_BU_CFSearches01 5. If you have enough Clickfree Backup DVDs, click I’m Ready – Start Backup.
Clickfree DVD Backup User Guide Backing up my content At the end of the backup, a Backup Summary screen is displayed: The Backup Summary screen shows you how many files in each category were backed up and the amount of space they take up on the DVD. When you see the Backup Summary screen, simply click Close, then OK, then eject the Clickfree DVD and store it in a safe place. Note: Before backing up any content, Clickfree tells you how many DVDs will be needed.
Clickfree DVD Backup User Guide ♦ Backing up my content To review or change what gets backed up: 1. Follow steps 1 to 4 of the procedure “How do I start using my Clickfree DVD Backup?” on page 10 2. Before the countdown reaches zero, click Options. You can now choose the locations to search for content, what types and sizes of files get backed up, and whether files embedded in compressed files and email messages should be included. CHOOSING LOCATIONS TO SEARCH FOR CONTENT – OPTIONAL 1.
Clickfree DVD Backup User Guide ♦ Backing up my content To look only in certain folders: • Choose Search selected folders only then select folders from My Documents and My Computer in the folder selection box that appears. • To search the entire My Documents folder, make sure that the checkbox is checked . • To see details of a folder under My Documents, click the + to the left of the checkbox. This expands My Documents to show the folders that it contains, and changes the + to a -.
Clickfree DVD Backup User Guide Backing up my content CHOOSING FILE TYPES AND SIZES TO BE BACKED UP – OPTIONAL 3. Click Types and Sizes: Note: For Music, only one type is shown: Music. 1. All of the files types are selected by default. Choose the types of files to be backed up: Photos, Raw Files, Videos. • • Note: To include a type, for example, Photos, in the backup, make sure that the box to the left of the type name is checked . If it isn’t, click the box to check it.
Clickfree DVD Backup User Guide Backing up my content 5. Choose whether Clickfree should search for content • • inside compressed files (for example, zip files) inside email messages 6. Click OK. 7. If you have enough Clickfree Backup DVDs, click I’m Ready – Start Backup.
Clickfree DVD Backup User Guide Backing up my content 8. (Music) Continue with step 13. 9. (Photo only PERHAPS MOVE THIS TO ADVANCED) If you click one of the (view/change) links, Clickfree displays the photos you selected as thumbnails (miniature versions) for your review, with all of the photos selected (checkboxes at top right of each photo checked): You can select folders at the left of the screen to view their contents. 10.
Clickfree DVD Backup User Guide Backing up my content At the end of the backup, a Backup Summary screen is displayed: The Office Backup Summary screen shows you how many files in each category were backed up and the amount of space they take up on the DVD. The Music and Photo Backup Summary screen shows you how many files in each folder were backed up, and displays thumbnails of each photo in the selected folder.
Clickfree DVD Backup User Guide Restoring my content Restoring my content WHAT IF MY COMPUTER’S INTERNAL HARD DRIVE STOPS WORKING, OR I WOULD LIKE TO TRANSFER MY CONTENT TO A NEW COMPUTER? All computer hard drives fail eventually, sometimes without warning. Occasionally, computers suffer damage that affects the hard drive. Sometimes, laptop computers get lost or stolen. Sometimes, also, you may delete content by mistake.
Clickfree DVD Backup User Guide Restoring my content your computer’s hard drive. For details, see: • • “How do I let Clickfree restore decide what to restore and where?” on page 27 “How do I change how Clickfree restores content?” on page 30 HOW DO I LET CLICKFREE RESTORE DECIDE WHAT TO RESTORE AND WHERE? Note: Screenshots in this section show mostly Office Backup screens – the screens for Music and Photo backup are almost identical.
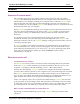
Clickfree DVD Backup User Guide Restoring my content 6. Since you are going to restore your files, click Restore Files: 7. To restore all of your content, simply click Restore All. 8. Since you are letting Clickfree decide where to restore files to, simply click Start Restore. As Clickfree restores your content, it shows you what is happening – how far it has gotten in the process. If your backup consists of more than one DVD, Clickfree tells you when to change disks.
Clickfree DVD Backup User Guide Restoring my content 9. You can choose to: • • • • • • Keep both copies of this one file – click Keep Both. Clickfree renames the backedup file by adding ‘ (2)’ to the end of the file name, then restores the renamed file. Keep both copies of all same-name files – check Do this for all duplicate files and click Keep Both. Clickfree, without asking you , renames the remaining backed-up files by adding ‘ (2)’ to the ends of the file names, then restores the renamed files.
Clickfree DVD Backup User Guide Restoring my content HOW DO I CHANGE HOW CLICKFREE RESTORES CONTENT? By making choices at several steps in the restore process you can affect which content is restored and where it is restored to. RESTORING CONTENT ♦ To change how Clickfree restores content: 1. Follow steps 1 to 6 of the previous section “How do I let Clickfree restore decide what to restore and where?” on page 27: 2. What you do next depends on whether you want to restore all or only some of your files.
Clickfree DVD Backup User Guide Restoring my content selected – their checkboxes are checked. 4. For each folder whose content you do not want to restore, click the checkbox to unselect the folder. This unselects all of the files in that folder. Or you can click the checkbox beside a file to unselect each file that you do not want to restore. 5. When you are finished selecting and unselecting files and folders, click OK >. You can now choose where the restored content will be restored to.
Clickfree DVD Backup User Guide Restoring my content 7. Click Start Restore. As Clickfree restores your content, it shows you what is happening – how far it has gotten in the process. If your backup consists of more than one DVD, Clickfree tells you when to change disks. Before it overwrites an existing file on your computer with one of the same name from the backed-up files, Clickfree asks if you want to replace the existing file with the samename file from the backup: 8.
Clickfree DVD Backup User Guide Restoring my content If two files have the same size (KB) and same date and time modified, it is likely to be safe to skip. When the restore is finished, Clickfree puts a link on your desktop pointing to where it restored the files to. 9. Click Close then eject the Clickfree DVD Backup and store it in a safe place. Note: Your content has not been deleted from your Clickfree backup: it is still safe on the DVD Backup.
Clickfree DVD Backup User Guide Restoring my content to a folder other than the original location, your program may not be able to find them. If your program displays an error message telling you that it cannot find its files, or if the program starts up but your data is missing, you will need to move the files to the proper folder. Unfortunately, this is different for every application and you may need to consult the program’s Help or user guide to find out where the files need to be moved to.
Clickfree DVD Backup User Guide Browsing, Searching & Viewing Browsing, Searching & Viewing your files HOW DO I BROWSE, SEARCH & VIEW? (OFFICE ONLY) From the Backup Summary screen you can: • • • Browse your backup(s) for files Search your backup(s) for files View backed-up files If you insert a DVD that contains backed-up Office files, after the program starts up you see this screen: ♦ To browse and search for files: Click View. The Backup Summary screen is displayed.
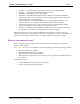
Clickfree DVD Backup User Guide • Browsing, Searching & Viewing page 38 Click the Search Files tab, and follow ”How do I search for my backed-up files” on page 39 HOW DO I PLAY OR EMAIL MUSIC? (MUSIC ONLY) If you insert a DVD that contains backed-up Music files, after the program starts up you see this screen: ♦ To browse and play music files: 1. Click View/Play: 2. Click the name of a folder on the left of the screen. The music files in the folder appear on the right. 3.
Clickfree DVD Backup User Guide ♦ Browsing, Searching & Viewing To browse and view photos: 1. Click View: The photo viewer shows “thumbnails”, or miniature views of your photos. 2. Click the name of a folder on the left of the screen. The music files in the folder appear on the right.
Clickfree DVD Backup User Guide ♦ Browsing, Searching & Viewing To use a photo as wallpaper: 3. Click the photo. Make sure that only one photo is selected. 4. Click Wallpaper. The photo replaces whatever wallpaper you were using: ♦ To print photos: 1. Select the photos. 2. Click Print @ Home and select the Print Style: 3. Set the Printer Options, and click Print. ♦ To email photos: 1. Select the photos. 2.
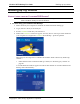
Clickfree DVD Backup User Guide Browsing, Searching & Viewing To find out more about what you can do with the files that are displayed, see “What can I do with files from browse and search ” on page 41. HOW DO I SEARCH FOR MY BACKED-UP FILES? (OFFICE ONLY) If you clicked the Search Files tab, the Search screen looks like this: You can enter search factors to find the files you want.
Clickfree DVD Backup User Guide Browsing, Searching & Viewing 2. Use the combination of File Type, File Date, and File Name that you think should match the file(s) you want to find: These selections are combined so that only files that match all of them are found – in this case only files in the category Artwork and Drawings, and created/last changed within the last year, and with names starting with ‘inuk’.
Clickfree DVD Backup User Guide Browsing, Searching & Viewing For information about what you can do with the files that are displayed, see “What can I do with files from browse and search ” on page 41.
Clickfree DVD Backup User Guide Advanced topics Advanced topics WHAT IF THERE IS MORE THAN ONE USER ON MY COMPUTER? This matters only if each user has a separate user login name for the computer. If every user logs in with the same user name, all of their content is backed up and restored at the same time whoever is logged in. When Clickfree runs, it can only back up the content that you can access from your login, and restore content to locations you have access to.
Clickfree DVD Backup User Guide ♦ Advanced topics To select one or more file types in a category: 1. Click the + to the left of the checkbox. This expands the category list to show the file types that make up that category, and changes the + to a -: 2. You can now choose the individual types of file you want to include in the backup by adding and removing checkmarks in the checkboxes. You collapse the category again by clicking the - . 3.
Clickfree DVD Backup User Guide ♦ Advanced topics To select one or more file types in a category: 5. Click the + to the left of the checkbox. This expands the category list to show the file types that make up that category, and changes the + to a -: 6. You can now choose the individual types of file you want to include in the backup by adding and removing checkmarks in the checkboxes. You collapse the category again by clicking the - . 7.
Clickfree DVD Backup User Guide • Advanced topics Repeat these steps until you can fit your backup on the number of Clickfree Backup DVDs you have, and click I’m Ready – Start Backup WHAT ARE ‘FACTORY SETTINGS’ AND HOW DO I USE THEM? Factory settings can be used in Clickfree in two places: • When choosing categories and file types to be backed up – see “Choosing categories of content to be backed up” on page 15 Use Factory Settings for categories and files types means that all categories and the corres
Clickfree DVD Backup User Guide ♦ To add a file type: 1. Click Add File Type: 2. Type the extension for the new file type, and click Save. The new file type is added to Custom Extensions: ♦ To remove a file type: 3. Click a file type in Custom Extensions, and click Remove File Type: 4. Click Yes. The file type is removed from Custom Extensions: Copyright © 2009 Storage Appliance Corporation.
Clickfree DVD Backup User Guide ♦ Advanced topics To change a file type: 1. Click a file type in Custom Extensions, and click Edit File Type: 2. Type the new extension for the file type, and click Save. The file type in Custom Extensions is modified. 3. When you are finished working with custom extensions, click Next > and continue with choosing locations to be searched.
Clickfree DVD Backup User Guide Advanced topics 2. To change the folder, click Change Folder and select the folder you want. As usual, click + to expand a folder, - to collapse the folder again. 3. To create a new subfolder, click New Folder, type the folder name, and click OK. 4. Click Next >. Copyright © 2009 Storage Appliance Corporation.
Clickfree DVD Backup User Guide Legal stuff Legal stuff Clickfree and the Clickfree logo are trademarks or registered trademarks of Storage Appliance Corporation. Other product names used in this guide are recognized as trademarks or registered trademarks of their owners.