Clickfree Portable Backup Drive User Guide for Microsoft Windows users
Clickfree Portable Backup Drive User Guide Table of Contents Contents INTRODUCING CLICKFREE PORTABLE BACKUP DRIVE 5 Main Features 5 Package contents 6 Definitions 6 BASICS 8 HOW DOES CLICKFREE WORK? 8 WHAT GETS BACKED UP? 8 Clickfree backs up content 8 Does Clickfree back up all of my content every time? 9 What content categories does Clickfree back up? 9 WHAT DO I NEED BEFORE I START? BACKING UP MY CONTENT 9 10 HOW DO I START USING MY CLICKFREE PORTABLE BACKUP DRIVE? 10 ZERO EFF
Clickfree Portable Backup Drive User Guide Table of Contents RESTORING MY CONTENT 22 WHAT IF MY COMPUTER’S INTERNAL HARD DRIVE STOPS WORKING, OR I WOULD LIKE TO TRANSFER MY CONTENT TO A NEW COMPUTER? 22 WHAT DO I NEED BEFORE I CAN USE CLICKFREE TO RESTORE MY CONTENT? 22 HOW DO I GET MY CONTENT BACK? 22 What gets restored, and to where? 22 HOW DO I LET CLICKFREE RESTORE DECIDE WHAT TO RESTORE AND WHERE? 23 HOW DO I CHANGE HOW CLICKFREE RESTORES CONTENT? 27 Restoring content 28 Choosing the co
Clickfree Portable Backup Drive User Guide ADVANCED TOPICS Table of Contents 44 WHAT IF THERE IS MORE THAN ONE USER ON MY COMPUTER? 44 WHAT IF I HAVE MORE THAN ONE COMPUTER? 44 How is backup different when I have more than one computer? WHAT IF I USE MORE THAN ONE PORTABLE BACKUP DRIVE? How do I make multiple backups? 44 46 47 WHAT ARE ‘FACTORY SETTINGS’ AND HOW DO I USE THEM? 47 CLICKFREE TOOLS 47 Master Reset 48 Updating Clickfree software 49 Interface language 50 REMINDER AND THE CLIC
Clickfree Portable Backup Drive User Guide Introducing Clickfree Portable Backup Drive Introducing Clickfree Portable Backup Drive Thank you for buying the Clickfree Portable Backup Drive – the easiest way to keep the valuable information on your computer safe. Clickfree is an easy-to-use computer backup system that automatically searches for and backs up content stored on your computer. No hardware configuration or software installation is required.
Clickfree Portable Backup Drive User Guide Introducing Clickfree Portable Backup Drive Photo Viewer • Conveniently view backed-up photos in thumbnail and expanded view PACKAGE CONTENTS Your Clickfree backup package contains: • • • one Clickfree Portable Backup Drive one USB cable to attach the Portable Backup Drive to your computer one quick start guide DEFINITIONS Just to make sure that the user guide is clear, we’re going to define a couple of terms that are used throughout the guide.
Clickfree Portable Backup Drive User Guide Introducing Clickfree Portable Backup Drive photos, letters, emails, tax information etc. In this guide we refer to this data as content. File Information used by your computer and stored in a specific place on your hard drive. A file may be content, a program or part of a program, or information a program uses in some way. Sometimes the relationship between content and file is clear: a photo or a letter is usually a single file.
Clickfree Portable Backup Drive User Guide Basics Basics HOW DOES CLICKFREE WORK? All you need to do to keep your projects, photos, videos, music etc. safe is to plug Clickfree in to your computer and let it work! No need to install software or to configure anything. Your computer knows when Clickfree has been plugged in, and it runs the backup program automatically each time it is connected. You can back up as many computers as you like with the Clickfree Portable Backup Drive.
Clickfree Portable Backup Drive User Guide Basics DOES CLICKFREE BACK UP ALL OF MY CONTENT EVERY TIME? The first time you back up your computer Clickfree backs up all of the content it finds, which might take some time – it just depends on how much you have. Each time you use Clickfree after that, it only backs up the new or changed content, so it will be much quicker.
Clickfree Portable Backup Drive User Guide Backing up my content Backing up my content HOW DO I START USING MY CLICKFREE PORTABLE BACKUP DRIVE? ♦ To start using your Clickfree Portable Backup Drive: 1. Make sure that your computer is switched on and has finished starting up. 2. Log in, if that is what you normally do. 3. Attach the Clickfree Portable Backup Drive to your computer by connecting one end of the USB cable to the drive and the other end to a USB port on your computer.
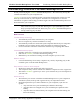
Clickfree Portable Backup Drive User Guide Backing up my content When Clickfree starts to run, a Welcome window appears and shows the number of seconds left before the backup starts automatically: Note: The View Files and Restore buttons do not appear until you have backed up content on your Portable Backup Drive. ZERO EFFORT BACKUP – REALLY! Unless you stop the countdown by clicking a button, at the end of the countdown period Clickfree starts the backup.
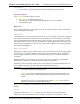
Clickfree Portable Backup Drive User Guide Backing up my content The Backup Summary screen shows you how many files in each category were backed up this time (New column) and from all backups, including this one (Total column). The Space Used column shows the amount of space that files from all backups take up on the Portable Backup Drive. When you see the Backup Summary screen, simply unplug the Clickfree Portable Backup Drive and store it in a safe place. Copyright © 2009 Storage Appliance Corporation.
Clickfree Portable Backup Drive User Guide Backing up my content WHAT IF CLICKFREE DOESN’T START UP AUTOMATICALLY? There could be a couple of reasons why Clickfree does not run when you plug in the Clickfree Portable Backup Drive: • • If you are connecting the Portable Backup Drive to a USB hub (which could be in your monitor or keyboard), the hub may not provide enough power for a Portable Backup Drive.
Clickfree Portable Backup Drive User Guide Backing up my content WHAT IF THE VISTA AUTOPLAY WINDOW APPEARS? In Windows Vista, if the AutoPlay window appears: 1. Check Always do this for software and games. 2. Click Start ClickFree Backup. You only need to do this once, not every time you use Clickfree.
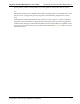
Clickfree Portable Backup Drive User Guide ♦ Backing up my content To review or change what gets backed up: 1. Follow steps 1 to 4 of the procedure “How do I start using my Clickfree Portable Backup Drive?” on page 10. 2. Before the countdown reaches zero, click Options. The Manage Settings and PCs screen is displayed: 3. Now click Change Backup Settings. Copyright © 2009 Storage Appliance Corporation.
Clickfree Portable Backup Drive User Guide Backing up my content CHOOSING CATEGORIES OF CONTENT TO BE BACKED UP – REQUIRED 4. All of the categories are selected by default. Choose the categories of content to be backed up, for example, Text Documents, Photos, and Videos. • • To include a category, for example, Photos, in the backup, make sure that the box to the left of the category name is checked . If it isn’t, click the box to check it. You can add and remove the checkmark by clicking in the box.
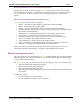
Clickfree Portable Backup Drive User Guide ♦ Backing up my content To look only in certain folders: • Choose Search selected folders only then select folders from My Documents. and My Computer. • To search the entire My Documents folder, make sure that the checkbox is checked . • To see details of a folder under My Documents, click the + to the left of the checkbox. This expands My Documents to show the folders that it contains, and changes the + to a -.
Clickfree Portable Backup Drive User Guide Backing up my content 7. When you have made your choices, click Next >. CHOOSING COMPLETE FOLDERS TO BE BACKED UP – OPTIONAL 8. Choose complete folders to be backed up in addition to categories and locations. The folders you choose here are completely copied - all of their files, are backed up regardless of file type. Complete folders are backed up in addition to the file types in the locations you already chose.
Clickfree Portable Backup Drive User Guide • Backing up my content Do the same for My Computer. 9. When you have made your choices, click Next >. 10. Click Done then Close to continue with the countdown. You can click Start at this time to go to the backup right away without waiting for the rest of the countdown.
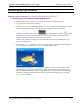
Clickfree Portable Backup Drive User Guide Backing up my content Clickfree backs up your content If there is enough space on your Portable Backup Drive, Clickfree then backs up the content and complete folders you chose to your Portable Backup Drive: At the end of the backup, a Backup Summary screen is displayed: The Backup Summary screen shows you how many files in each category were backed up this time (New column) and from all backups, including this one (Total column).
Clickfree Portable Backup Drive User Guide Backing up my content WHAT IF THERE IS NOT ENOUGH SPACE ON MY CLICKFREE PORTABLE BACKUP DRIVE? While Clickfree is searching for content to back up, it adds up the amount of disk space needed and compares that with the free space on the Portable Backup Drive.
Clickfree Portable Backup Drive User Guide Restoring my content Restoring my content WHAT IF MY COMPUTER’S INTERNAL HARD DRIVE STOPS WORKING, OR I WOULD LIKE TO TRANSFER MY CONTENT TO A NEW COMPUTER? All computer hard drives fail eventually, sometimes without warning. Occasionally, computers suffer damage that affects the hard drive. Sometimes, laptop computers get lost or stolen. Sometimes, also, you may delete content by mistake.
Clickfree Portable Backup Drive User Guide Restoring my content computer’s hard drive where they will not replace the files you already have. For details, see: • • “How do I let Clickfree restore decide what to restore and where?” on page 23 “How do I change how Clickfree restores content?” on page 27 HOW DO I LET CLICKFREE RESTORE DECIDE WHAT TO RESTORE AND WHERE? You can allow Clickfree to make the decisions about what to restore and to where, but you need to confirm what Clickfree plans to do.
Clickfree Portable Backup Drive User Guide Restoring my content 5. Before the countdown gets to zero, click Restore. The Restore Summary screen appears. 6. Before you click Restore All to restore all of your content, or select categories to be restored, look at the computer name in the Restore From box: .
Clickfree Portable Backup Drive User Guide Restoring my content 9. Since you are going to restore all of your content, simply click Restore All. Note that all of the categories that have backed-up content are checked off in the Select Category column. 10. Click Next >. 11. Since you are letting Clickfree restore files to their original locations, simply click Next >. Clickfree confirms how many files will be restored, and where they are going to be restored to.
Clickfree Portable Backup Drive User Guide Restoring my content 12. Now just click Start Restore. As Clickfree restores your content, it shows you what is happening and how far it has gotten in the process. 13. Before it overwrites an existing file on your computer with one of the same name from the backed-up files, Clickfree asks if you want to replace the existing file with the one from the backup: 14. You can choose to: • • • • • • Keep both copies of this one file – click Keep Both.
Clickfree Portable Backup Drive User Guide Restoring my content If two files have the same size (KB) and same date modified, it is likely safe to skip. If you skip any files, Clickfree completes “with exceptions”. For details see “Restore completed with exceptions” on page 33. 15. When all of your content has been restored, Clickfree tells you that it is done, and, if it has replaced files on your computer, gives you a chance to undo the restore.
Clickfree Portable Backup Drive User Guide Restoring my content RESTORING CONTENT ♦ To change how Clickfree restores content: 1. Follow steps 1 to 5 of the previous section “How do I let Clickfree restore decide what to restore and where?” on page 23. The Restore Summary screen appears: 2. Before you click Restore All to restore all of your content, or select categories to be restored, look at the computer name in the Restore From box: .
Clickfree Portable Backup Drive User Guide Restoring my content CHOOSING CATEGORIES OF CONTENT TO BE RESTORED 6. Note that all of the categories that contain files (with the number of files in parentheses after the category name) have checkboxes that you can check off in the Select Category column. For each category whose content you want to restore, click the checkbox to select the category. 7. Click Next >. You can also choose to restore content of individual file types within each category.
Clickfree Portable Backup Drive User Guide • Restoring my content If you want to restore your files to a location where they will not overwrite existing files on your hard drive, click Select the locations to restore my files , and continue with step 9. 9. Click Next >. 10. Assuming that there is enough space on your C: drive (as shown here), click Next >.
Clickfree Portable Backup Drive User Guide Restoring my content 11. Click Start Restore. As Clickfree restores your content, it shows you what is happening and how far it has gotten in the process. Before it overwrites an existing file on your computer with one of the same name from the backed-up files, Clickfree asks if you want to replace the existing file with the samename file from the backup: 12. You can choose to: • • • • • • Keep both copies of this one file – click Keep Both.
Clickfree Portable Backup Drive User Guide Restoring my content If two files have the same size (KB) and same date modified, it is likely to be safe to skip. If you skip any files, Clickfree completes “with exceptions”. For details see “Restore completed with exceptions” on page 33. When all of your content has been restored, Clickfree tells you that it is done, and, if it has replaced files on your computer, gives you a chance to undo the restore.
Clickfree Portable Backup Drive User Guide Restoring my content look at the computer name in the Restore From box: . If your Portable Backup Drive contains backed-up files from the computer that you are using, the Restore From box contains the name of this computer, and the files that will be restored come from this computer. ♦ To restore files that were backed up on another computer: 1.
Clickfree Portable Backup Drive User Guide • Restoring my content Click the link to see what files were not restored: ^TPHD_RST_Change09 HOW DO I UNDO A RESTORE? Whenever you restore files to their original locations, Clickfree gives you a chance to undo the restore, in case you have mistakenly overwritten a file. ♦ To undo the effects of a restore: 1. Click Click here to undo …. The restored files are replaced on your computer by the files that were there before the restore.
Clickfree Portable Backup Drive User Guide Restoring my content HOW DO I FIND FILES THAT WERE RESTORED If Clickfree restored your files to a folder that was not their original location, Clickfree puts an icon on your desktop so that you can quickly and easily get to the restored content: ♦ To find files that were restored: Double-click the icon to open a Windows Explorer at the folder where your content was restored. You can now use Explorer to move the files to a more convenient folder.
Clickfree Portable Backup Drive User Guide Browsing, Searching & Viewing Browsing, Searching & Viewing my files From the Backup Summary screen you can: • • • Browse your backup(s) for files Search your backup(s) for files View backed-up files STARTING FROM THE WELCOME SCREEN ♦ To browse and search for files, or view photos: Before the countdown gets to zero, click View Files. The Backup Summary screen is displayed. FROM THE BACKUP SUMMARY SCREEN Copyright © 2009 Storage Appliance Corporation.
Clickfree Portable Backup Drive User Guide ♦ Browsing, Searching & Viewing To browse and search for files, or view photos: 1. In the Current PC box select the name of the computer whose files you want to search for/browse for/view. 2.
Clickfree Portable Backup Drive User Guide ♦ Browsing, Searching & Viewing To use a photo as wallpaper: 1. Click the photo. Make sure that only one photo is selected. 2. Click Wallpaper. The chosen photo becomes your computer Wallpaper: ♦ To print photos: 1. Select the photos. 2. Click Print @ Home and select the Print Style: 3. Set the Printer Options, and click Print. Copyright © 2009 Storage Appliance Corporation.
Clickfree Portable Backup Drive User Guide ♦ Browsing, Searching & Viewing To share photos: 1. Select the photos. 2. Click Share Photos: 3. Click facebook or myspace.com and log in. ♦ To email photos: 1. Select the photos. 2. Click Email: If you use Outlook or Outlook Express for your email, the email program opens a new blank message with the photos included as attachments. 3. Address and send the message as you would normally do. ♦ To open a photo: Double-click the photo.
Clickfree Portable Backup Drive User Guide Browsing, Searching & Viewing To find out more about what you can do with the files that are displayed, see “What can I do with files from browse, search and view photos” on page 42. HOW DO I SEARCH FOR MY BACKED-UP FILES? If you clicked the Search Files tab, the Search screen looks like this: You can enter search factors to find the files you want.
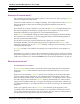
Clickfree Portable Backup Drive User Guide ♦ Browsing, Searching & Viewing To search for files: 1. Use the combination of File Type, File Date, and File Name that you think should match the file(s) you want to find: These selections are combined so that only files that match all of them are found – in this case only files in the category Photos, and created/last changed within the last year, and with names starting with ‘inuk’.
Clickfree Portable Backup Drive User Guide Browsing, Searching & Viewing 2. Click Search. Files that match all of your search factors are displayed. For information about what you can do with the files that are displayed, see “What can I do with files from browse, search and view photos” on page 42.
Clickfree Portable Backup Drive User Guide Browsing, Searching & Viewing • Delete selected files from the backup – to delete files from the backup and • Print this picture (only for photos in the View Photos screen) – takes you to the same Print Style screen as you see when you click Print @ Home, but this time to optionally exclude them from all later backups: print only one photo Copyright © 2009 Storage Appliance Corporation.
Clickfree Portable Backup Drive User Guide Advanced topics Advanced topics WHAT IF THERE IS MORE THAN ONE USER ON MY COMPUTER? This matters only if each user has a separate user login name for the computer. If every user logs in with the same user name, all of their content is backed up and restored at the same time regardless of who is logged in. When Clickfree runs, it can only back up the content that you can access from your login, and restore content to locations you have access to.
Clickfree Portable Backup Drive User Guide Advanced topics on page 10. 2. When you see the countdown, click Options. All of the computers that Clickfree has backed up on your Portable Backup Drive are shown at the left side of the screen, with the computer name underneath. When you click one of the computers, Clickfree shows: • • • ♦ the computer name the date and time of last backup the amount of space taken up by backed-up content for that computer To rename a computer: On the Options screen: 1.
Clickfree Portable Backup Drive User Guide ♦ Advanced topics To remove a computer: If you no longer want to keep content backed up from a computer (for example, you may no longer have that computer, and have already restored its content to another computer), you can free up space on your Portable Backup Drive by removing the old computer from Clickfree.
Clickfree Portable Backup Drive User Guide Advanced topics HOW DO I MAKE MULTIPLE BACKUPS? If you want to keep multiple backups of a computer, use multiple Portable Backup Drives for that computer. The first time you back up a computer onto any Portable Backup Drive, Clickfree makes a full backup. The next time you use the same Portable Backup Drive it backs up only new and changed content. So if you use a second Portable Backup Drive with the same computer, Clickfree starts off with a full backup again.
Clickfree Portable Backup Drive User Guide ♦ Advanced topics To use these tools: 1. Connect Clickfree to your computer as described in “How do I start using my Clickfree Portable Backup Drive?” on page 10. 2. When you see the countdown screen, click Options before the countdown reaches zero: 3. Click the Tools tab to show the available tools.
Clickfree Portable Backup Drive User Guide Advanced topics If you want to remove only the content that was backed up from one computer, see “To remove a computer” on page 46. 1. On the Tools screen click Master Reset. 2. If you really want to remove all backed-up content from Clickfree, check the checkbox and click Reset. Warning: Once you have reset Clickfree using the Master Reset there is no way to recover any backed-up content from the Portable Backup Drive.
Clickfree Portable Backup Drive User Guide ♦ Advanced topics To check manually for updates: 1. On the Tools screen click Update. Clickfree checks for available updates. If the software in your Clickfree Portable Backup Drive and your computer is up to date, click OK on the dialog that pops up.
Clickfree Portable Backup Drive User Guide Advanced topics REMINDER AND THE CLICKFREE ICON Clickfree can remind you to back up your files by installing a reminder program for you. Installing the reminder puts a handy icon in the bottom right corner of your screen. From this icon you can decide how often to be reminded to back up, can start a backup, and can display or hide a mini status window that shows when the last backup was done. REMINDERS ♦ To install reminders: 1.
Clickfree Portable Backup Drive User Guide Advanced topics 4. Click Install Reminder. The Clickfree icon is installed in the bottom right corner of your computer screen, and allows you to set, disable, or uninstall the reminder.
Clickfree Portable Backup Drive User Guide ♦ Advanced topics To temporarily disable reminders: 1. Right-click the Clickfree icon 2. in the bottom right corner of your computer screen: Click Exit: The icon disappears, and reminders are disabled until you next start your computer. ♦ To stop getting reminders: 1. Right-click the Clickfree icon 2. in the bottom right corner of your computer screen: Click Uninstall. The icon disappears, and reminders are permanently disabled.
Clickfree Portable Backup Drive User Guide ♦ Advanced topics To add a file type: 1. Click Add File Type: 2. Type the extension for the new file type, and click Save. The new file type is added to Custom Extensions: ♦ To remove a file type: 1. Click a file type in Custom Extensions, and click Remove File Type: Copyright © 2009 Storage Appliance Corporation.
Clickfree Portable Backup Drive User Guide Advanced topics 2. Click Yes. The file type is removed from Custom Extensions: ♦ To change a file type: 1. Click a file type in Custom Extensions, and click Edit File Type: 2. Type the new extension for the file type, and click Save. The file type in Custom Extensions is modified. 3. When you are finished working with custom extensions, click Next > and continue with choosing locations to be searched. Copyright © 2009 Storage Appliance Corporation.
Clickfree Portable Backup Drive User Guide Advanced topics HOW DO I CHOOSE INDIVIDUAL FILE TYPES FOR BACKUP? You already saw how to choose file categories for backup in “Choosing categories of content to be backed up – required” on page 16. You can also expand each category and select or unselect individual file types that make up that category.
Clickfree Portable Backup Drive User Guide Advanced topics HOW DO I CHOOSE INDIVIDUAL FILES FOR RESTORE? On the Restore Summary screen you can click checkboxes to select the category whose files you want to restore. You can also: • • • Select backed-up files within a category Browse through folders that contain backup files Search for backed-up files by file type, file date, and file name Files selected by each of these means are included in the restore. ♦ To select files within a category: 1.
Clickfree Portable Backup Drive User Guide ♦ Advanced topics To select files by browsing: 1. Click the Browse Files tab then click the + to expand the view. 2. Select the files to be restored, and click Next >. You are returned to the Restore Summary screen where you can make more selections. 3. If you are finished selecting files, click Next >. ♦ To select files by searching: 1. Click the Search Files tab. Copyright © 2009 Storage Appliance Corporation.
Clickfree Portable Backup Drive User Guide Advanced topics 2. Select the combination of File Type, File Date, and File Name that should find the files you want to restore: These selections are combined so that only files that match all of them are found – in this case only files in the category Photos, and created/last changed within the last year, and with names starting with ‘inuk’.
Clickfree Portable Backup Drive User Guide Advanced topics 3. Click Search. Files that match all of your search criteria are displayed. 4. Select the files to be restored, and click Next >. You are returned to the Restore Summary screen where you can make more selections. 5. If you are finished selecting files, click Next >.
Clickfree Portable Backup Drive User Guide Advanced topics 2. To change the folder, click Change Folder and select the folder you want. As usual, click + to expand a folder, - to collapse the folder again. 3. To create a new subfolder, click New Folder, type the folder name, and click OK. 4. Click Next >, and continue with “Choosing categories of content to be restored” on page 29.
Clickfree Portable Backup Drive User Guide Advanced topics HOW DO I ENABLE PASSWORD PROTECTION? You can enable password protection from the Backup Summary screen. ♦ To enable password protection: 1. Click Enable Security. 2. Type your password in both the New Password and Retype Password fields. 3. Optionally set a hint. See below for details. 4. Click OK.
Clickfree Portable Backup Drive User Guide Advanced topics remember it using the hint there is no way to recover any backed-up content from the Portable Backup Drive.
Clickfree Portable Backup Drive User Guide Advanced topics WHAT IF I FORGET MY PASSWORD? If you have forgotten your password, and cannot remember it from the hint you set when you enabled password protection, your only choice is to reset the Portable Backup Drive and lose all of your backed-up content. ♦ To reset the Portable Backup Drive 1. When prompted to type your password, click Forget My Password.
Clickfree Portable Backup Drive User Guide Legal stuff Legal stuff Clickfree and the Clickfree logo are trademarks or registered trademarks of Storage Appliance Corporation. Other product names used in this guide are recognized as trademarks or registered trademarks of their owners.