World-Class Auto Security TM AvantGuard II Owner's Manual
Table of Contents EXTREMELY IMPORTANT NOTICE . . . . . . . . . . . . . . . . . . . . . . WARNING . . . . . . . . . . . . . . . . . . . . . . . . . . . . . . . . . . How to Operate the Premier™ Remote Control . . . . . . . . . . . . . How to Disarm the System with the Remote Control . . . . . . . . . . How to Arm the System with the Remote Control . . . . . . . . . . . How to Panic the System . . . . . . . . . . . . . . . . . . . . . . . . .
EXTREMELY IMPORTANT NOTICE If the AvantGuard II’s control unit is removed from the vehicle for any reason, the supplied RED jumper wire MUST BE CONNECTED to pins #8 and #11 of the PIGTAIL connector. WARNING 1. The AvantGuard II is designed to be used only on a gasoline-powered, fuel-injected vehicle with automatic transmission.
How to Operate the Premier™ 4x8 Remote Control The Premier 4-button/8-channel, 4-billion code remote control provides incredibly high digital code security to give you the ultimate in protection against professional thieves using digital code scanners. Even a thief equipped with the most sophisticated scanning device would need more then 19 years to decipher your system’s security code.
How to Arm the System with the Remote Control 1. Press remote control button I/channel 1. 2. Simultaneously, several actions will take place to confirm remote disarming: • The siren will chirp twice providing audible confirmation from a distance. (If you prefer, you can turn off the chirp acknowledgements (see page 7 for details). • The parking lights will flash twice, providing visual confirmation from a distance. • The car doors will automatically lock.
Valet Mode Whenever your vehicle is to be serviced, washed or valet parked, you must use the valet mode to disarm the system and override its Smart AutoArming feature. How to Enable Valet Mode 1. Insert your key and turn the ignition to the “ON” position. 2. Flip the valet/program switch to its latched (non-momentary) position. 3. The LED will light in red and remain on, confirming the system is in valet mode. 4. You may now turn the ignition off and remove your key.
Smart AutoArming™ If you forget to arm your system with the remote control, it will arm itself automatically 30 seconds after the vehicle doors are closed. (The Multicolor LED will blink green for visual confirmation of the 30-second Smart AutoArming countdown). If you re-open any door(s) within the 30-second countdown, the AutoArming process will restart from the beginning once all doors are closed.
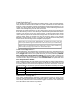
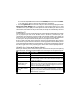
Prior Intrusion Attempt Alert If the alarm sounded while you were away, when you remotely disarm the system will issue three chirps and three flashes of the parking lights. You’ll note that the Multicolor LED will blink in red 1-7 times, pause for one second then repeat the cycle four more time. Count the number of red blinks in any one of the 5 cycles and use the table below to identify the trigger or sensor that detected the attempt.
b. To turn the chirps on: Flick the switch to its latched position, then back to center. c. You will hear 3 chirps to confirm chirp muting or restoration. 7. Turn the ignition off. You will hear 3 chirps to confirm exiting of program mode. One-Cycle Chirp Muting: This is particularly useful when parking in a quiet residential area. Just rapidly turn the ignition on and off. When you next arm, and later disarm, there will be no chirps. After that, the chirps are automatically restored.
Remote Engine Starting How to Remotely Start the Engine Remote control button II (channel 2) will remotely start (or shut down) the engine: 1. With the remote control microswitch in the up position, press and hold button II (channel 2) until you see your vehicle’s parking lights flash twice. (NOTE: A single flash indicates a fault condition, e.g., the transmission is not in “PARK”). 2. Once the engine starts, the parking lights will be on for as long as the engine is running. 3.
How to Engage AutoStart 1. Make sure that the gas tank is at least half full. To conserve battery power, make sure the air conditioner, radio and all other accessories are turned off. 2. Insert your ignition key and turn the switch to the “ON” position. 3. Within 10 seconds, press and hold the valet/program switch to its momentary position until you hear 1 chirp, then release the switch. The LED will light in red and stay lit, confirming that the system is now in program mode. 4.
How to Program Your AvantGuard II NOTE: A Quick Programming Guide is on pages 17-19. However, if you are programming the system for the first time, we strongly recommend that you follow the detailed instructions in the specific sections that follow before attempting to use the guide. F or your convenience, everything was preprogrammed for you at the Clifford Electronics factory.
How to Set Your Own Personalized Siren Sound You can program a unique code of siren chirps to recognize your system at a distance.. Your Personalized Siren Sound will consist of any combination of eight or less dot (short) and/or dash (long) siren pulsating sounds. A dot is a 1/4-second siren chirp. A dash is a 3/4-second chirp. A short pause of a 1/4-second is automatically inserted between each dot or dash, or you can enter one or more 3/4-second pauses for a more distinctive sound.
How to Adjust Sensitivity of the Optional OmniSensor You can easily increase or decrease the sensitivity of the optional OmniSensor any time, any place, without tools and without even knowing where to sensor is mounted. To change sensitivity of the optional OmniSensor, use the following procedure: 1. Turn ignition to the ON position. 2. Within 10 seconds, press and hold the valet/program switch to its momentary (spring-loaded) position until you hear 1 chirp, then release the switch.
How to Enable/Disable AutoLock and AutoUnLock The system automatically locks your car doors 5 seconds after you shift the transmission into Drive. Conversely, the doors automatically unlock after you turn the ignition off. To disable or re-enable this feature, use the following procedure: 1. Turn ignition to the ON position. 2. Within 10 seconds, press and hold the valet/program switch to its momentary (spring-loaded) position until you hear 1 chirp, then release the switch.
How to Set the Smart AutoArming Entry Delay Entry delay is programmable from 1 to 59 seconds (factory preset to 15 seconds). For security reasons, the entry delay should be just enough time for you to open the door and turn on the ignition. To set a new entry delay, use the following procedure: 1. Turn ignition to the ON position. 2. Within 10 seconds, press and hold the valet/program switch to its momentary (spring-loaded) position until you hear 1 chirp, then release the switch.
b. Flip the switch to its latched position, then back to center. You will hear 3 chirps. c. Tap the switch to its momentary position 1 time. d. Flip the switch to its latched position, then back to center. You will hear 1 chirp. e. Flip the switch to its latched position, then press button II on your remote. You will hear 3 chirps to confirm that the new button II code has been added. f. To program button III/channel 3, go to step 5.
Quick Programming Guide Once you are familiar with the AvantGuard II programming procedures, you may use this quick guide to make programming changes. IMPORTANT: DO NOT use this guide unless you have programmed the AvantGuard II before. If you have never programmed the system before, you should refer first to the detailed programming instructions in the appropriate section of How To Program Your AvantGuard II. 1.
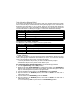
Programmable Parameter Feature Step Number Action 1 2 3 4 5 6 7 8 9 10 11 12 13 14 Flick switch to M M L C M M M L C Personalized Siren Sound Any pattern of up to 8 dots Number of chirps and/or dashes Special instructions Siren duration From 1 second Flick switch to M M L C M M L C L4 C to 5 minutes Number of chirps 2 2 1 3 Optional OmniSensor Sensor Sensitivity Flick switch to Number of chirps 2 2 M L C M L C 1 L 1 C 35 3 6 Special instructions Flick switch to Channel 1 (arm/disarm) M
Programmable Parameter Feature Action Flick switch to Enable AutoLock and AutoUnLock Enable Number of chirps M M L C 1 M L C Number of chirps Flick switch to AutoStart 1 2 3 4 5 6 7 8 9 10 11 12 13 14 M L C Number of chirps Flick switch to Disable Step Number L 2 M M L C 1 M L C M L C 1 Special instructions 1 C 3 M 2 3 M C 3 3 12 13 12 Turn the ignition off to exit program mode.