CLIMATISEUR MOBILE CLIMA18 / CLIMA19 Manuel d’utilisation Dans un souci d’amélioration constante de nos produits, nous nous réservons la possibilité de modifier les caractéristiques techniques sans préavis. CLIMADIFF SA 143 Boulevard Pierre Lefaucheux 72230 Arnage – FRANCE http://www.climadiff.com/ Dans ce manuel, vous trouverez de nombreux conseils utiles sur la façon d'utiliser et d'entretenir votre climatiseur correctement.
SOMMAIRE Lisez attentivement ce manuel Dans ce manuel, vous trouverez de nombreux conseils utiles sur la façon d'utiliser et d'entretenir votre climatiseur correctement. Un peu de soin préventif de votre part peut vous faire économiser beaucoup de temps et d'argent au cours de la vie de votre climatiseur. Vous trouverez de nombreuses réponses aux problèmes communs PROTECTION DE L’ENVIRONNEMENT Protection de l’environnement.....................................................................................
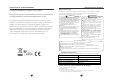
PROTECTION DE L’ENVIRONNEMENT Les matériaux d’emballage de cet appareil sont recyclables. Participez à leur recyclage et contribuez ainsi à la protection de l’environnement PRECAUTIONS DE SECURITE Règles de sécurité Afin d'éviter toute blessure pour l'utilisateur ou d'autres personnes, et des dommages sur l'appareil, merci de suivre les instructions suivantes. Toute opération incorrecte due à l'ignorance de ces instructions peut causer des blessures ou dommages.
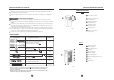
IDENTIFICATION DES PARTIES IDENTIFICATION DES PARTIES Pour votre sécurité NOMS DES PARTIES Ne pas entreposer ou utiliser d'essence ou d'autres vapeurs et liquides inflammables à proximité de cet appareil ou de tout autre appareil. Avant Évitez tout risque d'incendie ou de choc électrique. Ne pas utiliser une rallonge ou un adaptateur. 1 1 Panneau de contrôle 2 ATTENTION Information électrique Assurez-vous que le service électrique est adéquat pour le modèle que vous avez choisi.
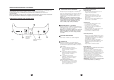
INSTRUCTIONS D’UTILISATION CARACTERISTIQUES DE L’APPAREIL MODE D’EMPLOI DU CONTROLE ELECTRONIQUE Avant de commencer, veillez à bien vous familiariser avec le panneau de commande et la télécommande, puis suivez le symbole pour les fonctions que vous désirez. L'appareil peut être commandé par le panneau de commande seul ou avec la télécommande. NOTE: ce manuel n'inclut pas les opérations télécommande, voir le livret "Instruction de la télécommande" emballé avec l'appareil pour plus de détails.
INSTRUCTIONS D’INSTALLATION (optionnel) INSTRUCTIONS D’UTILISATION INSTRUCTIONS D’INSTALLATION Autres caractéristiques Localisation Redémarrage automatique Si l'appareil s'éteint de façon inattendue en raison d'une coupure de courant, il redémarrera avec la précédente mise en fonction automatiquement lorsque le courant revient. L'appareil doit être placé sur un sol ferme pour limiter le bruit et les vibrations.
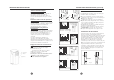
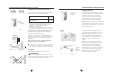
INSTRUCTIONS D’ INSTALLATION (optionnel) Joint en mousse A (type adhésif) INSTRUCTIONS D’ INSTALLATION (optionnel) Installation dans une fenêtre à guillotine Installation dans une fenêtre coulissante Joint en mousse A (type adhésif) 1. Couper le joint en mousse (type adhésif) à la bonne longueur et le joindre au rebord de la fenêtre. Fig.8 1. Couper le joint en mousse (type adhésif) à la bonne longueur et le joindre au rebord de la fenêtre. Fig.12 Fig 8 Kit fenêtre 2.
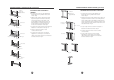
INSTRUCTIONS D’INSTALLATION (optionnel) INSTRUCTIONS D’ INSTALLATION Installation du tuyau d’évacuation : Fig.16 Drainage de l’eau : Le tuyau d'évacuation et l'adaptateur doivent être installés ou enlevés en conformité avec le mode d'utilisation. Fig.17 - Pendant le mode de déshumidification, retirez le Retirez le bouchon de vidange bouchon de vidange à l'arrière de l'unité, installez le raccord d'évacuation.
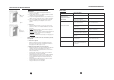
GUIDE DE DEPANNAGE NETTOYAGE ET MAINTENANCE NETTOYAGE ET MAINTENANCE PROBLEMES Filtre à air (retrait) Fig.24 Filtre à air (installation) Fig. 25 IMPORTANT : 1) Assurez-vous de débrancher l'appareil avant de le nettoyer ou le réparer. 2) Ne pas utiliser d'essence, de diluant ou d'autres produits chimiques pour nettoyer l'appareil. 3) Ne pas laver l'appareil directement sous un robinet ou en utilisant un tuyau. Cela peut causer un danger électrique.
MOBILE TYPE AIR CONDITION ERS CLIMA18 / CLIMA19 The design and specifications are subject to change without prior notice for product improvement. Consult with the sales agency or manufacturer for details. CLIMADIFF SA 143 Boulevard Pierre Lefaucheux 72230 Arnage – FRANCE http://www.climadiff.com/ Inside you will find many helpful hints on how to use and maintain your air conditioner properly.
CONTENTS Read This Manual Inside you will find many helpful hints on how to use and maintain your air conditioner properly. Just a little preventive care on your part can save you a great deal of time and money over the life of your air conditioner. You'll find many answers to common problems in the chart of troubleshooting tips. If you review our chart of Troubleshooting Tips first, you may not need to call for service at all. SOCIABLE REMARK Sociable remark................................................
SOCIABLE REMARK SAFETY PRECAUTIONS When using this air conditioner in the European countries, the following information must be followed: Safety r ules To prevent injury to the user or other people and property damage, the following instructions must be followed. Incorrect operation due to ignoring of instructions may cause harm or damage. ! DISPOSAL: Do not dispose this product as unsorted municipal waste. Collection of such waste separately for special treatment is necessary.
IDENTIFICATION OF PARTS IDENTIFICATION OF PARTS For your safety NAMES OF PARTS Do not store or use gasoline or other flammable vapors and liquids in the vicinity of this or any other appliance. Avoid fire hazard or electric shock. Do not use an extension cord or an adaptor plug. Do not remove any prong from the power cord. 2 3 4 6 Electrical Information WARNING Front 1 5 Be sure the electrical service is adequate for the model you have chosen.
OPERATING INSTRUCTIONS AIR CONDITIONER FEATURES E LE CT RONI C CONT ROL OP E RATI NG INS T RUCT I ONS Before you begin, thoroughly familiarize yourself with the control panel and remote controller and all its functions, then follow the symbol for the functions you desire. The unit can be controlled by the unit control panel alone or with the remote controller . NOTE: This manual does not include Remote Controller Operations, see the <> packed with the unit for details.
INSTALLATION INSTRUCTIONS (optional) OPERATING INSTRUCTIONS INSTALLATION INSTRUCTIONS Other features Location Auto-Restart If the unit breaks off unexpectedly due to the power cut,it will restart with the previous function setting automatically when the powe resumes.. Wait 3 minutes before resuming operation After the unit has stopped, it cannot be restarted operation in the first 3 minutes. This is to protect the unit. Operation will automatically start after 3 minutes.
INSTALLATION INSTRUCTIONS (optional) Foam seal A (adhesive type) Fig.8 Window kit 26.5 ~ 48.0 or INSTALLATION INSTRUCTIONS (optional) Installation in a double-hung sash window Installation in a sliding sash Foam seal A (adhesive type) 1. Cut the foam seal(adhesive type) to the proper length and attach it to the window stool. Fig.8 1. Cut the foam seal(adhesive type) to the proper length and attach it to the window frame,Fig.12. Fig.12 2. Attach the window slider kit to the window stool.
INSTALLATION INSTRUCTIONS (optional) INSTALLATION INSTRUCTIONS Exhaust hose installation: Fig.16 Water drainage: The exhaust hose and adaptor must be installed or removed in accordance with the usage mode. Fig.17 COOL, AUTO mode Remove the drain plug - During dehumidifying modes, remove the drain plug from the back of the unit, install the drain Install connector(5/8 universal female mender) with FAN,DEHUMIDIIFY mode 3 4 hose(locally purchased).
CARE AND MAINTENANCE TROUBLESHOOTING TIPS CARE AND MAINTENANCE Air filter (take out) Fig.24 Air filter (install) IMPORTANT: 1) Be sure to unplug the unit before cleaning or servicing. 2) Do not use gasoline, thinner or other chemicals to clean the unit. 3) Do not wash the unit directly under a tap or using a hose. It may cause electrical danger. 4) If the damaged power supply cord must be replaced with a new power supply cord obtained from the product manufacturer and not repaired.