
System information


C0240111-06-07-GB
99
10.3.2 Configuring the plan network (global)
It is easy to install a PLAN network (global). Just a few but essential operations are required. If just one
of these is not performed correctly, the entire system will not work.
The remote keyboard will work problem-free if the following operations are performed one after the
other.
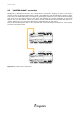
1 Set the on-board machine board and keyboard
addresses (see configuring the local plan
network)
Configure the addresses of each board and keypad
(with a univocal address in the network), leaving
the network cable disconnected (connector J11)
2 Check the chillers work correctly without being
connected to the network.
3 Disconnect the power supply from the chillers
4 Connect all the chillers to the network except
for the remote keyboard.
Connect connectors J11 together. Do not connect
the remote keyboard. This creates a plan network
comprising more than one chiller.
5 Power the chillers.
6 Check that all the networked devices (boards
and keypads) work correctly
If any faults occur, check the configuration of the
terminals to make sure that no two devices have
the same address.
7 Connect the remote keypad to one of the units Disconnect the machine keyboard and connect the
remote keypad to the J10 connector.
8 Make sure the remote keyboard address is set
to 32.
Follow the procedure for addressing the keyboard.
9 Make sure that the devices outside the chillers
are correctly configured.
If the power unit for the remote keypad is fitted
(see below: remote keypad from 200 up to 500
metres), make sure the remote keypad is powered.
11 Connect the remote keyboard. Disconnect connector J10 from the last board and
connect it to connector “A” of the “T” shunt.
Connect connector J10 on the last board to
connector “B” of the “T” shunt.
10 Wait a few seconds until network
communication has stabilised.
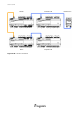
• In a global network comprising just W3000 chillers, the W3000-compact can be used as a remote
keyboard. After configuring the various units (each with a different address in order not to
generate conflicts in the global network), connect the remote keyboard and repeat the procedure.
In this network type, the various machines of the network are switched by pressing [ESC] and
[UP] together.
• If the plan network does not comprise just W3000 chillers, a 16-key keyboard must be used.
Press [UNIT] to switch between one board and another. The terminals, however, must be given a
special configuration as the 16-key keyboard is only recognised on “terminal 3”.
Then configure the local plan network. Follow the same procedure up to point 6 and then modify
the subsequent points as follows:
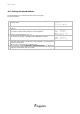
7 The remote keyboard can be configured even if the plan network doe
not comprise just W3000 chillers. Simply define the keyboard
addressed with 32 (N.B.: on terminal 3) as Sh, i.e.: shared.
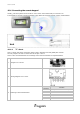
P:01 Adr Priv/Shared
Trm1 21 Pr
Trm2 None --
Trm3 32 Sh Ok?No
8 To save the settings and exit the configuration procedure, move the
cursor to “No”, change it to “Yes” and press [ENTER]. To exit without
saving the settings, wait 30 seconds without touching the keyboard.
P:01 Adr Priv/Shared
Trm1 21 Pr
Trm2 None --
Trm3 32 Sh Ok?Yes