
User's Manual


3
Installation
Installation Guideline
The PIR Camera is designed to be mounted on either a flat surface or in
a corner situation with fixing screws and plugs provided.
The base has knockouts, where the plastic is thinner, for mounting
purpose. Two knockouts are for surface fixing and a triangular mounting
bracket is used for corner fixing.
It is recommended to install the PIR Camera in the following
locations
Mount where the animals cannot come to the detection area by
climbing on furniture or other objects.
Don’t aim the detector at stairways the animals can climb on.
In a position such that an intruder would normally move across the PIR’s field of view.
Between 1.9 and 2m above ground for best performance. When mounted at 1.9 meters above ground, it
gives a typical PET IMMUNE range of 7 meters. As the PIR Pet-Immune Camera is higher from above
ground, it gives a farther PET IMMUNE range.
In a corner to give the widest view.
Where its field of view will not be obstructed e.g. by curtains, ornaments etc.
For a small 3 to 5m room, install between 1.9 to 2m above ground.
Limitations
Do not install the PIR Camera completely exposed to direct sunlight.
Avoid installing the PIR Camera in areas where devices may cause rapid change of temperature in the
detection area, i.e. air conditioner, heaters, etc.
Avoid large obstacles in the detection area.
Not pointing directly at sources of heat e.g. Fires or boilers, and not above radiators.
Avoid moving objects in the detection area i.e. curtain, wall hanging etc.
Be sure to always remain the RSSI signal strength steady at “4”.
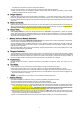
Mounting the PIR Camera
Surface mounting:
1. Open the cover by loosening the Cover Screw using a Philips screwdriver.
2. Break through the 2 Surface knockouts at the center of base.
3. Use the holes as template to drill holes on the surface.
4. Insert the wall plugs if fixing it into plaster or brick.
5. Screw the base into the wall plugs.
6. Fit the cover onto the base and tighten.
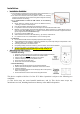
Corner mounting:
1. Break through the two knockouts on the triangular bracket.
2. Use the two holes as template to drill holes on the corner surface.
3. Insert the wall plugs.
4. Screw the triangular bracket into the wall plugs with the two pointing
sticks on top facing you.
5. Fit the PIR Camera onto the hooks of the triangular bracket.
This device complies with Part 15 of the FCC Rules. Operation is subject to the following two
conditions:
(1) This device may not cause harmful interference, and (2) This device must accept any
interference received, including interference that may cause undesired operation.