
Installation Instructions

1
Hardwire to Wireless Converter (HWC-1B)
HWC-1B is a wired to wireless converter that converts existing wired sensors of security alarm systems to wireless technology.
HWC-1B can be installed at a preferable location where it can send reports to the Control Panel easily without any more
concern about traditional wired scenarios. To achieve this, the existing wired sensors are connected to the input zones of the
HWC-1B, so there is no need to replace wired devices with individual transmitters.
The easy-to-use Converter consists of 9 input zones which can be connected to existing PIR sensors, door contacts etc. by
wiring.
This saves on installation cost, and provides homes and businesses with increased convenience and efficient
functionality for users.
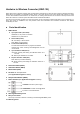
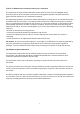
Parts Identification
1. LED Indicator
Input power LED1 (Green/Red):
LED Green on: AC power is connected.
LED Red on: AC power failure.
Status LED2 (Yellow):
ON: Low battery or disconnection.
Flash: Battery charging failure.
Transmission LED3 (Green):
The LED Green flashes when any signal is transmitted.
Flashes twice: When receiving acknowledgement from the
Control Panel.
Input calibration LED4 (Green):
ON: When pressing and holding the calibration button for 2
seconds.
ON: When Input calibration is successful.
Require calibration LED5 (Red):
Flash: When Input needs calibrating.
ON: When pressing and holding the calibration button for 2
seconds.
2. Test/Learn Button (SW11)
.
3. Calibration Button (SW12)
4. Reset Button (SW1)
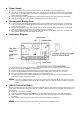
5. Terminal: Z1~Z9 Input Zones.
(See Application Diagram for detail.)
6. Tamper Switch Button (SW20)
.
7. Power Terminal (See Application Diagram for detail.)
+12V/GND: Connect to power supply.
12VAUX/GND: Provides 12V DC@100mA
to power on connected devices.
8. Rechargeable Battery Pack
9. Two-pin Connector
The two-pin connector is used for connecting to the Rechargeable Battery Pack.
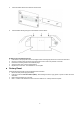
10. Mounting Holes