
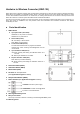
Installation Instructions

3
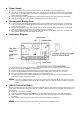
(SW11) Learning / Walk Test
Make sure the devices are connected and properly calibrated before proceeding to learning.
Refer to your Control Panel Manual to put panel into learning mode.
Press the Test/Learn button SW11 to send learning code to the Control Panel.
<
<
N
N
O
O
T
T
E
E
>
>
Each learned input zones will send an individual RF code to the Control Panel. The zone number is indicated
by the the last digit of the device ID.
HWC-1B’s own status (Low Battery, Tamper..etc) is transmitted via Zone 1.
Test/Learn button is also used for Walk Test function. Put the panel into Walk Test mode and press the button to
check signal range and strength.
Supervision
The Converter will automatically transmit Supervisory signals periodically to the Control Panel at random intervals
of 15 to 18 minutes in Normal Operation Mode.
If the Control Panel has not received the signal from the Converter for a preset period time, the Control Panel will
indicate that particular Converter is experiencing an out-of-signal problem.
(SW20) Tamper Switch
It is designed to protect against unauthorized cover opening. When the tamper switch is triggered, HWC-1B will
emit a tamper open signal to the Control Panel for reporting.
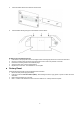
Installation Procedures
The HWC-1B can be wall mounted with the mounting bracket provided, or with the pre-punched mounting holes. Please
follow steps below to proceed.
A. With Mounting Bracket:
1. Take out the mounting bracket provided.
2. Use the 2 central mounting holes on the mounting bracket to mark positions on the wall.
3. Drill holes at mounting location and install wall plugs if required.
4. Install mounting screws at marked location as shown below.
Zone number