
Installation Instructions

4
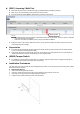
5. Attach the HWC-1B onto the bracket as shown below.
6. Hold the HWC-1B and gently push it downwards as shown below.
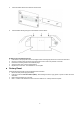
B: With Pre-punched Mounting Holes:
1. Press down on the pre-punch holes on the edges of HWC-1B and gently lift the front cover at the same time.
2. Use the 4 mounting holes around the edge of the back cover to mark hole positions on the wall.
3. Drill holes at mounting location and install wall plugs.
4. Screw the back cover onto the marked location.
5. Replace front cover back. The installation is now complete.
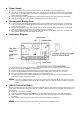
Factory Reset
Factory Reset will clear HWC-1B of all calibrated zone information.
1. Disconnect both power supply and battery.
2. Press and hold the Test/Learn Button (SW11), while holding the button, apply power to power on HWC-1B at the
same time.
3. Keep holding the button for 3 seconds.
4. LED 1~3 will turn ON. Release the button when the LEDs turn on. Factory Reset is complete.