
Installation Instructions

1
LMHT-3 Ambient Light, Humidity and Temperature Sensor
Introduction
LMHT-3 is an Ambient Light, Humidity and Temperature Sensor. It monitors your home environment and transmits
measured Illuminance (lux), humidity and temperature to the Control Panel.
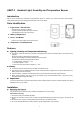
Parts Identification
1. Light Sensor / LED Indicator
- Flashes every 4 seconds: low battery
- The LED indicator will flash twice when receivng
acknowledgement from the Control Panel.
2. Battery Compartment
3. Learn / Test Button
- Press once to send a signal to the Control Panel.
4. Temperature / Humidity Sensor
Features
L
L
i
i
g
g
h
h
t
t
i
i
n
n
g
g
,
,
H
H
u
u
m
m
i
i
d
d
i
i
t
t
y
y
a
a
n
n
d
d
T
T
e
e
m
m
p
p
e
e
r
r
a
a
t
t
u
u
r
r
e
e
M
M
o
o
n
n
i
i
t
t
o
o
r
r
i
i
n
n
g
g
The sensor measures illuminance, humidity and temperature to transmit measured data to the Control Panel
regularly.
Illuminance reading is detected every 60 seconds.
Humidity and temperature reading is detected every 20 seconds.
The sensor will transmit signal automatically when:
The temperature changes by +/- 2˚C.
Humidity changes +/- 10%.
When the current illuminance changes by +/- 10%.
B
B
a
a
t
t
t
t
e
e
r
r
y
y
The sensor uses one CR123 3V Lithium battery as its power source.
The sensor features Low Battery Detection function. When the battery voltage is low, the sensor will transmit Low
Battery signal to the Control Panel.
When the battery is depleted, the LED flashes every 4 seconds and the sensor will stop all functions.
When changing battery, after removing the old batteries, press the Learn/Status Button a few times to fully
discharge before inserting new battery.
S
S
u
u
p
p
e
e
r
r
v
v
i
i
s
s
i
i
o
o
n
n
The sensor will transmit a supervision signal along with the reading signal to report its condition regularly. The factory
default interval is 15-18 minutes.
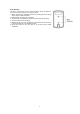
Installation
M
M
o
o
u
u
n
n
t
t
i
i
n
n
g
g
t
t
h
h
e
e
S
S
e
e
n
n
s
s
o
o
r
r
The sensor can be mounted using two methods: Self-adhesive or Screw mounting.
Self-adhesive mounting
1. Clean the surface with a suitable degreaser.
2. Remove the protective covering from one side of double-sided adhesive pad and firmly apply to the back of the
device.
3. Remove the other covering and firmly place/press the device in the desired location.
4. Do not use the Self-adhesive mounting method on poorly painted and/or rough surfaces.