IR Turret Camera CE-T909
The lightning flash with an arrowhead symbol, within an equilateral triangle is intended to alert the user to the presence of uninsulated dangerous voltage within the product’s enclosure that may be of sufficient magnitude to constitute a risk of electric shock to persons. The exclamation point within an equilateral triangle is intended to alert the user to the presence of important operating and maintenance (servicing) instructions in the literature accompanying the appliance.
Table of Contents Warning Precautions Components Installation On Screen Display (OSD) Menu Accessing the OSD Menu Settings • LENS • EXPOSURE • WHITE BALANCE • BLC (Back Light Compensation) • DNR (Digital Noise Reduction) • DAY / NIGHT • IMAGE ADJ Special • Cam Title • Sync • Motion Detection • Privacy • DIS (Digital Image Stabilizer) • Comm Adj (Communication Adjustment) • Language • Reset • Return Exit Troubleshooting Specifications Dimension (inches) Sales: 1-800-447-3306 Support: 1-800-549-6393 1 2 4
Warning The camera requires periodic inspection. Contact an authorised technician to carry out the inspection. Stop using your camera when you find it malfunctioning. If the camera emits smoke or is unusually hot for a long period, a fire may be caused. Do not install the camera on a surface that can not support it. If the camera is installed on an inappropriate surface, it may fall and cause injury. Do not hold plug with wet hands. It could cause an electric shock. Do not dis-assemble the camera.
Precautions Do not install the camera in extreme temperature conditions. Only use the camera under conditions where temperatures are between -20°F ~ 122°F. Be especially careful to provide ventilation when operating under high temperatures. Do not install the camera under unstable lighting conditions. Severe lighting change or flicker can cause the camera to work improperly. Do not touch the front lens of the camera. This is one of the most important parts of the camera.
Do not drop the camera or subject it to physical shocks. It can cause malfunctions to occur. Never keep the camera pointed directly at strong light. It can damage the CCD. Do not expose the camera to radioactivity. If exposed to radioactivity the CCD will fail. Notes • If the camera is exposed to spotlight or object reflecting strong light, smear or blooming may occur. • Check that the power satisfies the normal specification before connecting the camera.
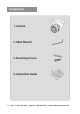
Components 4 Sales: 1-800-447-3306 Support: 1-800-549-6393 www.clintonelectronics.
Installation Mounting Plate Side Screw Outer Plate Side Screw 1. Place the mounting plate on a flat installation surface and mount with the provided screws. 2. Feed the cable through the center of the mounting plate. 3. Place the camera body in the mounting plate socket and hold. 4. Then place the outer plate over the camera body & mounting plate and tighten side screws to lock the camera into place. 5. Loosen side screws to adjust camera angle as needed, then tighten the side screws to lock into place.
On Screen Display (OSD) Menu • On Screen Display (OSD) Menu Camera functions and settings can be adjusted or changed by activating the OSD menu. When the OSD menu is activated text will display on the monitor. The user can then move the cursor to the desired function to change the setting.
Accessing the OSD Menu Settings Connecting the CE-REMOTE to the camera. Unscrew cap and locate port as shown. 1. Press the SET button. • The Setup menu is displayed on the monitor screen. 2. Select a menu item using the UP and DOWN buttons. • Place the cursor over a desired item. Sales: 1-800-447-3306 Support: 1-800-549-6393 www.clintonelectronics.
Accessing the OSD Menu Settings continued Select the desired menu item by using the UP and DOWN buttons. Modes can be changed using the LEFT and RIGHT buttons. 3. Set up a selected item by using the LEFT and RIGHT buttons. 4. To finish and save the settings, select ‘EXIT’ and press the SET button. Notes • An item with the icon also has sub-menus. To select a sub-menu, press the SET button. • An item with the - - - icon has no sub-menus available for selection.
LENS continued l MANUAL : Manual Lens selection l DC : Auto Iris Lens selection Notes • The brightness of the screen can be adjusted in DC mode. The brightness can be adjusted within the range of 1 ~ 70. The optimum level of brightness can be achieved using this adjustment. • If you select the MANUAL mode, it can be adjusted in ESC mode. 3. Press the SET button if you wish to return to the previous menu. Sales: 1-800-447-3306 Support: 1-800-549-6393 www.clintonelectronics.
EXPOSURE 1. When the SETUP menu is displayed on the screen, select EXPOSURE using the UP and DOWN buttons. 2. Select the desired mode using LEFT and RIGHT buttons. l SHUTTER : Select either auto or manual shutter. - A.FLK: Select this when picture flicker is experienced, which can happen when there is a clash with the frequency of the installed lighting. - ESC: Select this to control the shutter speed automatically.
EXPOSURE continued Notes • To produce better results with A.FLK, do not use it in conjunction with the WDR mode on the BACKLIGHT menu. • When the SHUTTER is set to ESC, and the camera is set to Internal Synchronization, the picture may become unstable if the camera faces a bright florescent light. Therefore, take care when choosing the installation position. • ESC and MANUAL modes are only available together when the lens is set to MANUAL. • When the SHUTTER is set to MANUAL or A.
WHITE BALANCE control Use the WHITE BALANCE function to adjust the screen colors. 1. Position the cursor to point to ‘WHITE BAL’ on the SETUP menu screen using the UP and DOWN buttons. 2. Select the desired mode using the LEFT and RIGHT buttons. * Select one of the 5 modes, as appropriate. l ATW (Auto Tracking White Balance): Select when the color temperature is between 1,800°K ~ 10,500°K. l INDOOR : Select when the color temperature is between 4,500°K ~ 8,500°K.
Notes Under the following conditions WHITE BALANCE may not work properly. In such cases, select the AWC mode. 1. When the color temperature of the subject environment has a very high temperature range (e.g. clear sky, or sunset). 2. When the ambient illumination of the subject is low. 3. If the camera is directed toward a florescent light, or is installed in a place where illumination changes dramatically, the WHITE BALANCE operation may become unstable.
BLC (Back Light Compensation) continued l BLC : Enables a user to directly select a desired area from a picture, and to view the area more clearly. BLC ON BLC OFF l HLC (High Light Compensation) : If there is a high light installed in a limited environment such as an apartment parking garage or gas station entrance, removing the high light makes it possible to view car license plates efficiently. - DAY: In normal daylight conditions, the HLC is not activated.
Notes • Because there can be a difference in the effectiveness of HLC according to the amount of light area in the screen, optimize the installation angle for the best HLC performance. • In a dark environment, the HLC is only activated when a high light that is larger than a certain area is present. • The HLC is not activated in light or overly dark conditions. DNR (Digital Noise Reduction) This function reduces the background noise in a low luminance environment. 1.
DNR (Digital Noise Reduction) continued 3. Set the DNR mode to ‘ON’ and press the SET button. The noise reduction level can now be adjusted. Notes • You cannot set the DNR to ‘ON’ or ‘OFF’ when the AGC mode in the EXPOSURE menu is ‘OFF’. • When adjusting the noise reduction level in DNR mode, remember that the higher the level is set, the greater the reduction in noise level, but it also increases the possibility of ghosting. DAY / NIGHT Pictures can be displayed in either color or black and white. 1.
DAY / NIGHT continued 2. Select the desired mode using the LEFT and RIGHT buttons. l COLOR : The picture is displayed in color. l B/W : The picture is always displayed in black and white. l AUTO : This camera has an IR Cut-Filter and automatically changes to the appropriate mode according to lighting levels. To set up the switching time and switching speed for the AUTO mode press the SET button. l EXTERN : This mode allows the application of a filter to external signals.
IMAGE ADJ. 1. When the SETUP menu screen is displayed, select ‘IMAGE ADJ.’ using the UP and DOWN buttons. 2. Select the desired mode using the LEFT and RIGHT buttons. l FREEZE : View still pictures. l V-REV : Flips the picture vertically on the screen. l H-REV : Flips the picture horizontally on the screen. 18 Sales: 1-800-447-3306 Support: 1-800-549-6393 www.clintonelectronics.
IMAGE ADJ. continued l D-ZOOM : Digitally zooms, the range is x1 ~ x10. l SHARPNESS : As this value is increased the picture outline becomes stronger and clearer. l RETURN : Select this to save the settings for the IMAGE ADJ. menu and to return to the SETUP menu. Notes • When H-REV or V-REV is selected, any text in the picture also will be flipped horizontally or vertically. • If the SHARPNESS level is increased too high the picture may become distorted, or noise may be generated.
SPECIAL 1. When the SETUP menu screen is displayed, select ‘SPECIAL’ using the UP and DOWN buttons. 2. Select the desired mode using the LEFT and RIGHT buttons. l CAM TITLE : If a title is entered, the title appears on the monitor. 1. When the SPECIAL menu screen is displayed, use the UP and DOWN buttons to point the cursor to ‘CAM TITLE’. 20 Sales: 1-800-447-3306 Support: 1-800-549-6393 www.clintonelectronics.
l CAM TITLE continued 2. Set to ‘ON’ using the LEFT and RIGHT buttons. Notes • When the CAM TITLE menu is ‘OFF’, no title will be displayed on the monitor screen even if one has been entered. 3. Press the SET button. 4. Use the 4 directional buttons to move to a character and select it by pressing the SET button. Repeat this action to enter multiple characters. Up to 15 alphanumeric characters can be used.
l CAM TITLE continued 5. Enter a title, move the cursor to ‘POS’ and press the SET button. The entered title appears on the screen. Select the position to display the title on the screen using the 4 directional buttons and press the SET button. When the position is determined, select ‘END’ and press the SET button to return to the SPECIAL menu.
l MOTION DET continued 1. When the SPECIAL menu screen is displayed, press the UP and DOWN buttons so that the cursor points to MOTION DET. 2. Set up the function using the 4 directional buttons. - SENSITIVITY: Select up to eight MD areas. When the SENSITIVITY value is high, motion detection sensitivity is increased to recognize small movements. - AREA MODE: Determines whether to use the MD area selected in SENSITIVITY.
l PRIVACY continued - MASK COLOR: Determine area color. Select grey, green, red, blue, black or white. - TRANSP: Determine the transparency of the selected area, the range is number from 0 to 3. - RETURN: Select this to save the PRIVACY menu settings and return to the SPECIAL menu. l DIS (Digital Image Stabilizer) : This function mitigates picture movement caused by external factors, such as wind.
Troubleshooting If you have trouble operating your camera, refer to the following table. If the guidelines do not enable you to solve the problem, contact Clinton Electronics Technical Support at 1-800-549-6393 or 815-633-1444. Problem Solution Nothing appears on the screen. • Check the power connection. • Check the video signal line connection. • Check the Brightness of Auto Iris lens. The video image is not clear. • Check if the lens is clean. Clean the lens with a clean cloth or brush.
Troubleshooting Problem Solution The MOTION DETECTION function is not working. • Check if ‘MOTION DETECTION’ mode is turned on. • Check if the MD LEVEL is too low. • Check the setting of the MD AREA. Colors are not quite right. • Check the ‘WHITE BAL’ setting. The screen is flickering. • Check if the camera is facing directly into sunlight or fluorescent light. L/L mode isn’t able to be selected. • Have you connected your camera to DC power source? Connect it to AC power source.
Specifications Camera CE-T909 Image Sensor 1/3 Inch SONY Super HAD CCD Resolution 580 TV Lines IR LEDs 42 pcs Effective Pixels 768 (H) x 494 (V) Scanning System 2:1 Interlace S/N Ratio 52dB (AGC Off, Weight ON) Sync System Internal / Line Lock Scanning Frequency 15.734 KHz (H), 59.94 Hz (V) Minimum Illumination 0.15 Lux / F1.2 (Color), 0.001 Lux w/Sense-Up at 256x Shutter Speed 1/60 ~ 1/100,000 sec. Dynamic Range 62dB (Max.) Lens 3.5 ~ 16mm F1.
Dimensions 5.51” 4.37” SIDE 4.37” 5.51” W FRONT 28 Sales: 1-800-447-3306 Support: 1-800-549-6393 www.clintonelectronics.
MEMO
MEMO
v.03.23.