0
Table of Contents 1. CWP-100 OVERVIEW ................................................................................................................................................ 4 2. PRODUCT DESCRIPTION........................................................................................................................................ 5 3. HARDWARE OVERVIEW.......................................................................................................................................... 6 4.
7.3.3. Call hold........................................................................................................................................................ 19 7.3.4. Call mute ...................................................................................................................................................... 19 7.3.5. Call Transfer.................................................................................................................................................
10.1. FIRMWARE UPGRADE VIA DISPLAY MENU .......................................................................................................... 36 10.2. FIRMWARE UPGRADE VIA FTP ........................................................................................................................... 37 10.3. SYSTEM RESET BY FACTORY VALUE .................................................................................................................. 38 11. CHARACTER INPUT USING KEYPAD .................
1. CWP-100 Overview 1. CWP-100 Overview Conform to Wireless LAN standard 802.11b. Operate on wireless LAN AP (Access Point) with static IP, ADSL and dynamic IP(DHCP). Provide VoIP calls. Provide CID service. Provide NAT traversal function that enables external calls with private IP address behind NAT network environment. Provide various ring melody. Provide phonebook and speed dial function. Support user-friendly menu system with ICON and LCD.
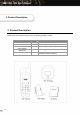
2. Product Description 2. Product Description Please check and make sure that you have the following package contents.
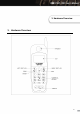
3. Hardware Overview 3.
Controls Handset Send and receive the sound during a call. LCD Display system status and user information. LEFT SOFT KEY RIGHT SOFT KEY ENTER SEND Function Button Description Select the menu option at the down-left side of the LCD. Select the menu option at the down-right side of the LCD. Activate the menu that the cursor point. Confirm input of character string or numeric constants. Activate the call with the dialed number. Return to the main menu. END Deactivate the call.
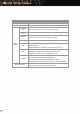
4. LCD Icon Overview 4. LCD Icon Overview The descriptions of the icons displayed on CWP-100 LCD are as below. • CLIPCOMM CWP-100 12:00:49 AM MENU Please refer to the table below for the descriptions of each icon. Icons Category AP connection status Icon Proxy server register status Icon Meaning The signal strength received from the AP. Success in registration. Failure in registration None : No registration Vibration mode Icon Vibration mode is on. Alarm Icon Alarm clock setup is on.
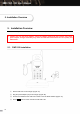
5. Installation Overview 5. Installation Overview Please check the parts of the CWP-100 and then follow the steps bellow to instal CWP-100 properly. Caution: Use only the power adaptor, charger and battery supplied by the provider. Using other power adaptor, charger and battery may cause the CWP-100 to deteriorate the voice quality and malfunction. 5.1. CWP-100 Installation 9 ① Set the CWP-100 on the charger. (Figure “A”) ② Plug the power adaptor (5V) to the charger.
6. Basic Configuration 6. Basic Configuration You can set the CWP-100 system with the keypad or the embedded web interface. The descriptions of setting the system with LCD and keypad are explained below. Please refer to Chapter9. “Configuration with Internal Web Interface” to set the system with the web interface. CLIPCOMM CWP-100 12:00:49 AM MENU To set the system with LCD and keypad, press ”LEFT SOFT KEY”. Then you will enter the main menu and see the displays as below.
1: AP Scan 2: Device Addr 3: WLAN Mode 4: ESSID 5: Channel 6: WEP Setting ② Select “1: AP Scan” to search the wireless LAN access point around the CWP-100. If the CWP-100 succeeds in searching the AP, the CWP-100 LCD display “AP Scan Success” and restart automatically. If there is no AP around or if the CWP-100 fails in searching the AP, the CWP-100 LCD display “AP Not Found” and return to the previous menu. ③ Select “2: Device Addr” to check the CWP-100 MAC address.
Follow the steps as MENU “3: System Setting” ”1: Network Setting” to check the current setting. 1: Current Setting 2: Static IP 3: DHCP 4: ADSL 5: Restart 6.2.1. Current Setting ① Follow the steps as MENU “3: System Setting” ”1: Network Setting” “1: Current Setting” to view the current settings. You can check current network mode and network parameters. 1: Current Mode DHCP 2: IP address 192.168.0.223 3: G/W Address 192.168.0.1 4: DNS Address 168.126.63.1 5: Netmask 255.255.255.
④ The changed parameter will apply only after the system restarts. Select “5:Restart” from the menu and press ENTER button. Then the system will automatically restart with the new network parameters. 6.2.3. Dynamic IP (DHCP) Setting ① Follow the steps as MENU “3: System Setting” ”1: Network Setting” “3: DHCP”. Use DHCP? Yes No ② Select “Yes” and press ENTER button. Then the system will automatically restart with the DHCP mode. 6.2.4.
6.3. VoIP Setting You need to register with the Internet Telephony Service Provider (ITSP) to utilize various VoIP services. You may set the CWP-100 as your ITSP requests. To set the system with the LCD and the keypad, follow the steps as MENU “3: System Setting” “2: VoIP Setting”. Then you will enter the submenu and see the display as below. 1: Server Setting 2: Name Setting 3: Codec Setting 4: NAT Traversal 6.3.1.
6.3.2. Name Setting ① Follow the steps as MENU “3: System Setting” “2: VoIP Setting” “2: Name Setting”. 1: User ID 2: Display Name 3: AUTH ID 4: Password ② Select “1: User ID” and input the phone number you wish to make a call. Press ENTER button to confirm or CANCEL button to erase the number. User ID 7711 MODE: 1 ③ In the same way, set Display name, Authentication ID, Password parameters. Display name is the user name set as user information.
Follow the steps as MENU “4: NAT Traversal”. 1: NAT Function 2: STUN Address 3: NAT Router IP 4: NAT Timer 6.3.4.1. NAT Traversal using STUN server ① To use NAT traversal function with the STUN server, follow the steps as MENU “1: NAT Function” “2: Use STUN”. “4: NAT Traversal” 1: NOT USE 2: Use STUN 3: Use Manually ② Follow the steps as MENU “4: NAT Traversal” “2: STUN Address” and then input the STUN server address. This parameter may appear as FQDN. STUN Addr. clipcomm.co.kr:5088 MODE: A 6.3.4.2.
external IP address. NAT Router IP 211.211.211.211 MODE: A 6.3.4.3. NAT Session Timer When using the NAT traversal function, you need to set the session time for transmitting the packet periodically so that the CWP-100 maintains the NAT router and the NAT session. Follow the steps as MENU “4: NAT Traversal” “4: NAT Timer” and then input appropriate time. NAT Timer[sec] 30 MODE: A You may use the embedded web page and configure more parameters for VoIP settings.
7. Basic Services 7. Basic Services 7.1. Making a Phone Call ① Dial the phone number that you wish to make a call. In case making a direct call to the devices’ IP address, press “LEFT SOFT KEY” to select A and then press 1 to express “.” between the numbers. Press CANCEL button to edit the numbers. ② Press SEND button to make call. You need to register with the Internet Telephony Service Provider (ITSP) to use PSTN calls in the VoIP service mode. Please contact your service provider for details.
7.3. Extra functions on Call You can use various functions with SEND button or menu button during call. 7.3.1. Phonebook Follow the steps as Menu “1: Phone book” during the call to check the phone number list that is saved on the Phonebook. Press END to return to the main menu. 7.3.2. Call history Follow the steps as Menu “2: Call History” during the call to check the sent/received/missed call list. Press END to return to the main menu. 7.3.3.
B will be able to talk to each other. 7.3.6. Call Waiting When there is an incoming call while you are on the phone, the CWP-100 can put the incoming call in the waiting mode and do not reject the call. To enable call waiting, you need to use the embedded web interface. Please refer to Chapter9. “Configuration with Internal Web Interface” to set the system with the web interface. ① The CWP-100 LCD display as below when there is an incoming call while you are on the phone.
8. Supplementary Services 8. Supplementary Services The CWP-100 provides various supplementary services addition to basic services. 8.1. Phonebook You can save and delete the phone number on the phonebook. Follow the steps as MENU ”1: Phonebook”. 8.1.1. Register ① Follow the steps as MENU ”1: Phonebook” “1: Register”. No. MODE: A ② Input the entry on the first row, the name on the second row and the phone number on the third row. The last row indicates the mode of the text.
8.1.2. Search You can search the phone number with the registered name and the entry number. ① Follow the steps as MENU ”1: Phonebook” “2: Search”. ② Select the menu among All Entries, By Names, By Phone No. and By Entry No. All Entries : Display all the registered phone numbers. By Name : Search the phone number with the name. By Phone No.: Search the phone number with the partial phone number. By Entry No.: Search the phone number with the previously assigned entry number.
8.2. Call History You can save and delete the call history on the phonebook by following the steps as MENU ”2: Call History”. Choose the menu from below. 1: Placed Call 2: Received Call 3: Missed Call 4: Delete Call 8.2.1. Check Recent Dialed/Received/Missed Calls ① “1: Placed Call” is the list of recent dialed calls. Maximum of 10 entries will be saved. ② “2: Received Call” is the list of recent received calls. Maximum of 10 entries will be saved. ③ “3: Missed Call” is the list of recent missed calls.
3: Time Server 4: Time Zone 5: Alarm Setting 6: Phone Lock 7: Firmware 8: Call Forwarding 8.3.1 Melody Setting ① Select “1. Melody Setting”. 1: Melody Selection 2: Melody Volume ② Use ▲,▼ to choose the ring melody that you wish to use and then press ENTER button. ③ Select “2. Melody Volume” and use ▲,▼ to set the melody volume and then press ENTER button. 8.3.2 Screen Message Setting ① Select “2. Screen Message”.
MENU: A ② Input the time server and press ENTER button to confirm or END button to cancel. 8.3.4. Time Zone Setting You can set the time zone according to your region. Select “4: Time Zone”, then CWP-100 will display the current wall-clock time according to the time information from the time server interpreted by this time zone. 8.3.5. Alarm Setting ① Select “5: Alarm Setting”.
8.3.7. Firmware Management You can return to the factory reset or update the firmware. ① Select “7: Firmware” to check the current firmware version. 1: Load Default 2: Firmware Ver. 3: Firmware Update 4: Update Server ② Select “1: Load Default” to return to the factory reset. ③ Select “2: Firmware Ver.” to check the current version. ④ Select “3: Firmware Update” to update the firmware from the assigned server. ⑤ Select “4: Update Server” to set the server for updating the firmware. 8.3.8.
9. Configuration with Internal Web 9. Configuration with Internal Web Interface The CWP-100 provides the internal web interface for convenient configuration and monitoring. Once the CWP-100 is available for networking after the configuration with the keypad, you can use the web interface by inputting the CWP-100 IP address on the web browser. With the web interface, you can check the current settings and set the parameters that are hard to configure with the phone buttons.
9.1. Network Configuration 9.1.1. Network Mode Configuration 9.1.1.1. Network Mode Configuration with Internal Web Interface ① Select “System Configuration” “Network” from the CWP-100 embedded web page. ② Select the appropriate IP configuration parameters that match your network environment from below. (a) Static IP A. Select “Static IP”. B. Input IP, gateway, subnet mask and DNS address. (b) DHCP(Dynamic IP) or Cable modem A. Select “DHCP”. (c) ADSL A. Select “ADSL”. B. Input ADSL ID and the password.
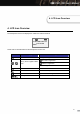
9.2. VoIP Configuration VoIP configuration is required to enable VoIP calls. Please contact your service provider or the network administrator for more information on VoIP configuration. ① Select “System Configuration” “VoIP” on the left side of the web page. ② Set each configuration parameters with appropriate value. Parameter Description Default SIP Server Standard SIP server name for service area, which is also called SIP Domain.
Parameter Expiry SIP Local Port Voice Codec Description Set the time for transmitting the REGISTER periodically so that the CG keeps registering. Default message Set the CG port that send and receive SIP packet. Please notice that this is not the port that proxy server receives. Set the VoIP call voice codec among G.7231.A, G.711 µ -law, G.711 A-law and G.729AB. 3600 5060 G.723.1A Set the DTMF transmission method when the user press digits during VoIP call.
Waiting Indication) and enables the user to use external voice mail server. Parameter Description Use External Voice Mail System The user can use external voice mail server when the service provider supports Voice Mail server. The user can simultaneously use auto answering function that the CWP-100 supports itself. In case there is a new message from the external voice mail server, the CWP-100 will display a message icon.
Condition Unconditional : The CWP-100 immediately forwards all the incoming calls to the previously assigned phone number. Busy : The CWP-100 forwards the incoming call when the channel is in use. No Answer: The CWP-100 forwards the incoming calls to the previously assigned phone number when the CWP-100 user does not answer the phone for 30 seconds. Call Forwarding Number Set the phone number to forward the incoming call. N/A 9.3.4.
Usually, users use this function when he wants to call a remote VoIP device directly with IP address without server registration. Examples for Dial Plan ① Input the values as below and click the [Insert] button and then the [save] button.
When the user picks up the handset and dial the phone number, the CWP-100 starts searching the pattern that coincide with the recent dial plan entries (from the bottom to the top). In case the user dial “00123” and press “#” to make an outgoing call; The CWP-100 will edit the final dialing number as “5551231004” and attempt the outgoing VoIP call.
STUN Server (FQDN) for STUN NAT Router IP for Manual Use NAT Keep Alive Interval 35 Assign STUN server address and server port when using NAT traversal through “STUN.” N/A Ex) stun.Clipcomm.co.kr:3478 Assign the NAT router’s external IP address of the network that CWP100 is connected while using NAT Traversal manually when there is no appropriate STUN server. The user should assign the SIP local port, RTP port, CWP-100 IP address etc that the CWP-100 uses behind NAT router.
10. Firmware Upgrade and Factory Reset 10. Firmware Upgrade and Factory Reset You easily upgrade the new firmware with a simple process. 10.1. Firmware Upgrade via Display Menu You can upgrade the firmware with the CWP-100 LCD display menu. This process is available only when the network is in normal state and connected properly. ① Select MENU and follow the steps as “4: Extra Setting” ”7: Firmware”. 1: Load Default. 2: Firmware Ver. 3: Firmware Update 4: Update Server ② Select “2. Firmware Ver.
10.2. Firmware Upgrade via FTP Upgrading the firmware via FTP is the fastest way. But this process is available only when the network is in normal state and connected properly. The following example shows how a command line FTP client is used to upload new firmware (“CWP100.fls”) to the CWP-100 when its IP address is 192.168.0.36. Enter “admin” as the user name and type in the password that is set on the VoIP configuration web page. The default password is “0000.” C:\> ftp 192.168.0.36 Connected to 192.168.
10.3. System Reset by Factory Value The CWP-100 can reset system by factory value with its LCD [MENU]. After booting the CWP-100 successfully, follow the steps as [MENU] ”4: Extra Setting” ”7: Firmware” “1: Load Default”. Then the CWP-100 will ask to input the password for resetting the system. Input the correct password and then press ENTER. Then the CWP-100 will automatically reboot with the factory value.
11. Character Input Using Keypad 11. Character Input Using Keypad In character input mode during menu manipulation, you can change current character set by pressing SOFT Key 1 repetitively. The character set circulates as upper case letter, lower case letter, numeric character and symbolic character. Icons Category Character Input Mode Meaning Upper case letter, lower case letter, numeric character and symbolic character 11.1.
40