
Installation Instructions

How to determine the amount of ColumnWrap pieces you will need:
Multiply the number of posts by the height you want each column to determine the total number
of ColumnWrap kits needed. 3 posts at 3ft high each means you will need 9 column kits.
Each ColumnWrap kit has four individual pieces that combine to create a one-foot high, 14"x14"
column section to install around a 4x4 or 6x6 post.
Finish each Column with an 18"x18" two-piece cap with the 4x4 or 6x6 opening to fit your post.
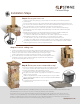
Tools you will need to install
your ColumnWrap:
Levels.
Measuring tape.
A chisel/file.
1-2" exterior grade pan head screws. You want at
least 8 screws per row.
Impact driver/screw gun with a drill bit extender.
Plastic shims.
Concrete masonry adhesive to add between column
sections and the capstone.
Caulking gun.
Rubber mallet.
Exterior grade caulk, to match the color of your
cap and prevent water intrusion.
Backer rod or furring strips.
Before you begin…
1. Check your ground surface. Install your ColumnWraps
on a level, flat and solid service. Examples of
acceptable surfaces include concrete, concrete pavers,
or crushed stone.
2. Remove all four pieces from your ColumnWrap box
and inspect for any over-poured concrete or rough
edges that may impair a tight fit. Remove these uneven
edges carefully with a chisel. You will want to check
each piece inside each box as you work.
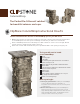
ClipStone ColumnWrap Instructional How-To
ColumnWrap
The Perfect Do-It-Yourself solution
for beautiful columns and caps.