
Installation Guide

INSTALLATION INSTRUCTIONS
Rear Track Hanger Kit
Assembly And Mounting
"'If
the
distance
between
the
top
of
your
door and
the
roof
rafters
is
greater
than
24",
longer
upright
braces
will
be needed
(not
provided
-1
W x 1W
punched
angle at least
13
go. or
%,"
thick).
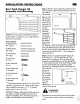
IMPORTANT:
Please
carefully
read
the
following
instruc-
tions
before
you
begin
installation
of
the
rear
track
hanger
kit.
Installation
of
this
kit
should
be done
by
a
person
with
reasonable
mechanical
aptitude.
LEVEL
~.
Fig.
1
\
~
-
~
,-
f"
/1'
Side
View
1~
1L
Fig.
2
lL
_____
,
--
L
_________
~
Dr
b
ll
I
!::Jl
CJ~
~
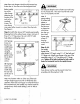
Step
2:
Fasten
one upright brace
(20"
long)
to
the
track
using
a
%"
x 1
W'
hex
head
bolt
and
%"
hex
flange
nut.
Do
not
tighten
at
this
time.
Insert
the
bolt
through
the
punched
angle
iron
and
then
through
the
%"
hole
located
at
the
rear
of
the
track.
Bolt
the
upright
brace
to
the
horizontal
track
so
that
the
top
of
the
upright
brace
is
touching
the
bottom
of
the
ceiling
truss.
Be
sure
the
bolt
.-
-======,.-_--,
~hx~et~~~~~:
__
m
~
--~~~~::
~;~eiling
Fig.
3
h
II
Truss
t
at
it
wi
stop
0,
the
top
roller
~
'll'
Track
from
exiting
0
the
horizontal
0
~
Roller
track.
See 0
~%"
x
l~"
bolt
Figure
3. used to stop roller
Repeat
proce-
dure
for
the
other
side.
Bolts
placed
in
the
end
of
each
track
must
be
at least
1"
long
to
prevent
the
top
of
door
from
exiting
the
track.
AIWARNING I
Step
1:
The
Rear
Track
Hanger
Kit
provides
the
hard-
ware required
to
attach
the
horizontal
track
to
the
ceil-
ing
trusses
of
your garage.
Begin
by
mak-
ing
sure
that
the
horizontal
tracks
are
(a)
both
level,
(b)
and square
to
the
door.
Squareness
should
be
measured
by
comparing
two
diagonal
distances:
1)
the
distance
from
the
top
left
hand
cor-
ner
of
the
door
to
the
rear
of
the
right
horizontal
track
and
2)
the
distance
from
the
top
right
hand corner
of
the
door to
the
rear
of
the
left
horizontal
track.
These
measurements
should
be
within
1"
of one another
to
ensure squareness.
~ll1IlIm
lTh
(6)
Lag
Screws
0/,,"
x 1
%"
(6)
Hex
Head
Bolts
71'6
11
x
%11
(6)
Hex
Flange
Nuts
0/,,"
diameter
(2)
Hex
Head
Bolts
%"
x
1W
'
(2)
Hex
Flange
Nuts
%"
diameter
ATTENTION:
If
your
ceiling
is
finished
with
plaster or
plaster board
it
is
necessary
to
use
3"
long
lag
screws
(minimum),
not
provided.
Ports Contained:
(2)
Upright
Braces
10
0 0 0 0 0 0 0 0 I
{20"
long)***
10
0 a 0 0 0 0 0 0 !
(2)
Rafter
Braces
10
0 0 0 a 0 0 () 0 0 0 0 I
(26"
Long)
10
0 0 0 0 0 0 0 0 0 0 0 I
(2)
Sway
Braces
10
0 0 0 0 0
01
(14"
Long)
100000001
7@
,(:j
~
0
'\\
00000
00000
DC
JDCD
IDDDCJD
-
DDDCJD