
Instructions / Assembly

14
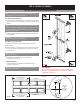
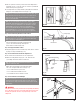
Fig. 9-C
33
Center Stile
#1 Hinge
#2 Hinge
Bottom
Edge
End
Stile
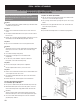
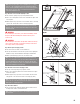
Step 9A-3: Prepare Second (Lock) Section
NOTE: If door is predrilled for a lock, this section will be the one with
holes in the center of panel face.
■
Place Second Section face down on covered sawhorses.
■
Attach a #2 hinge to each end at top edge using (2) #14 × 5/8" sheet
metal screws. Attach a #1 hinge to all other pre-punched holes using
(2) #14 × 5/8" sheet metal screws (Fig. 9A-C).
Step 9A-4: Keyed Lock/Lift Handle Installation
■
If you wish to install a keyed lock, begin lock installation now according
to supplemental instructions included with lock hardware.
■
If door did not come with a keyed lock, install lift handle (Fig. 8A-B).
! CAUTION
Take care not to bend or twist sections with glass as this may cause
glass to break, which may result in personal injury.
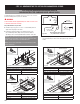
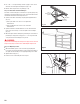
Step 9A-5: Place and Secure Second (Lock) Section
■
Place Second Section in opening on top of First Section.
■
Drive a 10d 3" nail in jambs at each section end. Bend over edge to hold
section in place.
■
Attach hinges from top of First Section to bottom of Second Section using
(2) #14 × 5/8" sheet metal screws for each hinge (Fig. 9A-D).
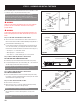
Step 9A-6: Prepare Next (Third) Section
Third Section has the general safety label applied (Fig. 9A-D).
■
Place section face down on covered sawhorses.
■
Attach a #3 hinge to each end at top edge using (2) #14 × 5/8" sheet
metal screws for each hinge. Attach a #1 hinge to all other prepunched
holes using (2) #14 × 5/8" sheet metal screws (Fig. 9A-E).
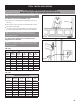
Safety
Label
Fig. 9-D
Fig. 9A-D
Fig. 9A-C
INSIDE OF SECTIONS
Door ID
Label
DOOR ID #: SECTION #:
9723-01
E X A M P L E
Alignment Label
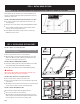
Fig. 9B-A
STEP 9 - INSTALL DOOR SECTIONS
STEP 9 - INSTALL DOOR SECTIONS CON'T.
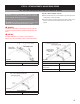
STEP 9B: STACKING ORDER FOR NON-INSULATED COMPOSITE OVERLAY SECTIONS
Non-Insulated Composite Overlay Doors are custom assembled one door
at a time. It is important matching sections stay together and sections are
stacked in the correct order.
Step 9B-1: Stack Non-Insulated Composite Overlay Door Sections
■
Door sections are labeled on the inside upper left hand corner of the
section (Fig. 9B-A).
■
All sections for each door have the same four digit identification number.
■
Sections should be stacked in sequence, with #01 being the bottom
section, the next section being #02 and so on.
■
Use the Alignment Label between joining sections to ensure proper
alignment of the door sections.