
Instructions / Assembly

21
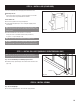
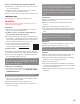
Pull Rope
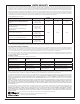
Fig. 13-A
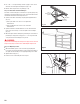
Fig. 12-A
#14 x 5/8" Sheet Metal Screw or 1/4" x 1" Lag Screw
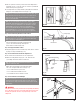
If a lock is included with door, follow appropriate instructions below.
Exterior Keyed Lock:
■
If door has an exterior keyed lock, complete installation of lock at this
time. Follow instructions provided with lock hardware.
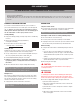
Interior Slide Lock:
■
Use track as a guide to achieve proper alignment.
■
Position slide bolt against top of one of rectangular engaging slots in
vertical track.
NOTE: It may be necessary to knock out slug in vertical track to open
slot for lock engagement. Remove slug by striking with a hammer from
outside of track.
■
Install inside slide bolt on the end stile of second section.
Use (4) #14 × 5/8" hex head sheet metal screws (steel doors)
or (4) 1/4" × 1" lag screws (Fig. 12-A).
NOTE: 3/16" holes may need predrilled before installing screws.
IMPORTANT: If door is going to be equipped with an automatic garage
door opener, disable or remove this lock. This will avoid damage to door.
Fig. 13-A
Fig. 12-A
STEP 12 - INSTALL LOCK (IF INCLUDED)
STEP 13 - INSTALL PULL ROPE (MANUALLY OPERATED DOORS ONLY)
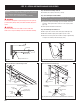
STEP 14 - INSTALL SPRINGS
NOTE: Rope is only intended for use on manually operated doors.
DO NOT install pull rope if using an automatic garage door opener.
Step 13-1: Install Pull Rope for Manually Operated Doors
■
Install the pull rope by attaching to roller shaft in bottom bracket of door
(Fig. 13-A).
Step 14-1: Install Springs
■
Proceed to springing instructions that came with spring hardware.