
Instructions / Assembly


15
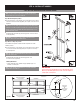
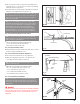
Fig. 9-E
1/4" x 3/4"
Self-Tapping Screws
Strut
(if necessary)
#3 Hinge
#1 Hinge
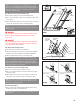
3
Fig. 9A-E
NOTE: If door has more than 1 strut, consult Table 7-A or 7-C. Attach
using 1/4" × 3/4" self-tapping screws (Fig. 9A-E). When predrilled
holes do not line up with hinge, drill (2) 3/16" pilot holes through strut,
hinge and door at each location or use impact wrench with 7/16"
socket and self-tapping screws.
Step 9A-7: Place and Secure Next (Third) Section
■
Place section in opening on top of previously installed section.
■
Drive a 10d 3" nail in jambs at each section end. Bend over edge to hold
section in place.
■
Attach hinges from top of previous section to bottom of this section using
(2) #14 × 5/8" sheet metal screws for each hinge (Fig. 9A-E).
NOTE: If you have two sections left, repeat STEP 9A-6 to 9A-7 using
#4 hinges on the end of the top edge and #1 hinges to all other stiles
along the top edge.
! WARNING
DO NOT install top section unless you are able to immediately continue
through to STEP 9A-10 installing vertical track as this may cause
sections to fall.
! WARNING
DO NOT install top section if there are high wind conditions as this may
cause sections to fall. Failure to follow these warnings could result in
serious injury, death or property damage.
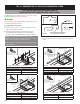
Step 9A-8: Prepare Last (Top) Section
■
Place Last Section face down on covered sawhorses.
■
Place top roller brackets 3-1/4" from the top of the section, aligning the
middle hole in top of bracket with the bottom hinge hole/indentation.
■
Attach top bracket using (3) #14 × 5/8" sheet metal screws.
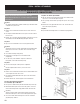
NOTE: If door was supplied with any struts (Table 7-A) attach using
1/4" × 3/4" self-tapping screws (Fig. 9A-F). When predrilled holes do
not line up with hinge holes, drill (2) 3/16" pilot holes through strut
and door at each hinge hole location (or use impact wrench with 7/16"
socket and self-tapping screws (Fig. 9A-F).
Step 9A-9: Place and Secure Last (Top) Section
■
Place top section in opening on top of previous section.
■
Drive a 10d 3" nail in the jambs at each section end. Bend over edge to
hold section in place.
■
Attach hinges from top of previous section to bottom of the this section
using (2) #14 × 5/8" sheet metal screws for each hinge (Fig. 9A-E).
NOTE: If your door is to be used with an electric operator, you must
reinforce the top section before placing it in the opening. Proceed to
STEP 10 prior to completing this step.
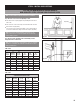
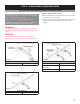
Step 9A-10: Place Rollers
■
Place a roller in the top and bottom bracket and in the tubes in each of
the hinges at the ends of each installed section.
NOTE: In hinges with two tubes, place roller in tube furthest from door
face (Fig. 9A-G).
Fig. 9-F
End Stile
Top Bracket
Strut
(if necessary)
1/4" x 3/4"
Self-Tapping
Screws
#14 x 5/8"
Sheet Metal
Screws
Fig. 9A-F
Top Bracket
#1 HingeBottom Bracket
#2, 3 or 4 Hinge
Fig. 9-G
Fig. 9A-G