
Installation Guide


P01-R01-0704
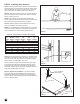
STEP 9 - Installing Door Sections
Step 9-1: Place the section in the opening so that it is against
the stop molding and centered from side to side. Place a level
on the section and use a piece of wood under one end or the
other (if necessary) to make the section level. (FIG. 9-A)
Step 9-2: Remove the level and drive a 3” nail in the jambs at
each end and bend it over the edge of the section to hold the
section in place. (FIG. 9-B)
NOTE: These nails are all that will hold the stacked door
section in place until the tracks are secured to the back jambs.
Be sure the nails hold the sections rmly in position.
Step 9-3: With the Table 9-A below, determine the order in
which you will attach the remaining sections.
NOTE: If a lock assembly was ordered with the door, the holes
for the lock may be predrilled. (Lock templates are included in
the lock instructions for doors without predrilled holes.)
* Section with general safety label.
Step 9-4: Place the next section face down on the saw horses.
If your door is predrilled for a lock, this section will be the one
with holes in the center of the panel face. Identify the bottom
edge as shown in the illustration. (FIG. 9-C)
Attach a number 2 hinge to each end at the top edge using
#14 x 5/8" sheet metal screws. Remember that the number
is stamped on the side of the hinge that is to be attached to
the section. Attach a number 1 hinge to all other pre-punched
holes along the top edge of the section.
Step 9-5: Keyed Lock Installation. If you wish to install a
keyed lock, begin the lock installation now according to the
supplemental instructions included with the lock hardware. If
your door did not come with a keyed lock, install lift handle as
shown on previous page.
1st 2nd
Door (Bottom) (Lock) 3rd 4th 5th
Height Section Section Section* Section Section
6'0" 18" 18" 18" 18" -
6'3" 18" 18" 18" 21" -
6'6" 21" 18" 18" 21" -
6'9" 21" 21" 18" 21" -
7'0" 21" 21" 21" 21" -
7'6" 18" 18" 18" 18" 18"
7'9" 18" 18" 18" 18" 21"
8'0" 21" 18" 18" 18" 21"
FIG. 9-A
#2 Hinge
#1 Hinge
Bottom Edge
End Stile
#14 x 5/8" Sheet
Metal Screws
12
Table 9-A - Section Order for Various Door Heights
FIG. 9-B
FIG. 9-C
Stop Molding