
Installation Guide


1
EZ-SET
®
Torsion Spring System
Assembly and Installation Instructions
EZ-SET
®
Torsion Spring
System Assembly and
Installation Instructions
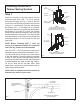
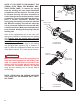
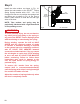
These instructions are to be used in conjunction
with your standard installation manual. Follow the
manual up through “Assembling & Installing the
Track” – except leave a minimum of 1/2" per
side between track and door, and just loosely
(temporarily) attach 3/8" - 16 x 3/4" carriage bolt
in ag bracket.
Please read and understand these instructions
completely before proceeding with the installation
of the EZ-SET Torsion Spring System. Carefully
follow these instructions to avoid personal injury
or property damage.
Use these instructions for the EZ-SET Torsion
Spring System only. (If you have regular torsion
springs, extension springs or the EZ-SET
Extension Spring System see the standard
Installation Manual.)
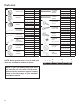
Tools Needed
• 3/8" Medium duty reversible power drill
• 3/8" Open end wrench
• 3/16" Hex wrench
• 1/8" Drill bit
• 1/4" Insert bit (included)
• Locking pliers (2sets)
WARNING
In the interest of safety this symbol means
WARNING or CAUTION. Personal injury
and/or property damage may occur unless
instructions are followed carefully.
ALL REFERENCES TO LEFT-HAND AND RIGHT-HAND ARE MADE ASSUMING
THAT YOU ARE INSIDE THE GARAGE LOOKING OUT.
FR
La version française de ce supplément peut être accédée en ligne à l'adresse suivante :
http://www.clopaydoor.com/installation-manuals.aspx
Français
ES
Se puede acceder a la versión en español del presente suplemento en la siguiente
dirección: http://www.clopaydoor.com/installation-manuals.aspx
Español