240063 customers@thestowcompany.com 1-800-218-2494 If you have any questions, or you’re missing parts, call our customer care department. MONDAY – FRIDAY 8AM TO 5PM EST Si tiene alguna pregunta o falta alguna pieza, comuníquese con nuestro Departamento de Servicio al Cliente.
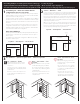
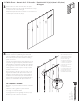
Gather the tools you’ll need. Reúne las herramientas que necesitarás. Rassemblez les outils dont vous avez besoin. Get the big picture. Analiza el proyecto a grandes rasgos. Ayez une vue d’ensemble. TAPE MEASURE CINTA PARA MEDIR RUBAN À MESURER Read these installation instructions. Check to see you have all the parts on the hardware list. If you’re adding optional components, such as drawers, you’ll find instructions for installing them in their cartons. Lea estas instrucciones para la instalación.
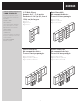
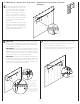
If installing multiple closet kits, please reference this page. If not, skip to page 5. Si planea instalar varios kits de armario, consulte esta página. De lo contrario, vaya a la página 5. Si vous devez installer plusieurs trousses de penderie, veuillez vous reporter à cette page. Sinon, passez à la page 5. 1 2 Closet Kit Layout • Diseño de los Kits de Armario Configuration de la trousse de penderie Closet kits can be installed in several layouts. Plan your layout before starting installation.
If installing multiple closet kits, please reference this page. If not, skip to page 5. (Continued) Si planea instalar varios kits de armario, consulte esta página. De lo contrario, vaya a la página 5. (Continuación) Si vous devez installer plusieurs trousses de penderie, veuillez vous reporter à cette page. Sinon, passez à la page 5.
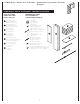
3'-5' Wide Closet • Armario de 3' - 5' de ancho • Penderie de 3 à 5 pi (91,4 cm à 152,4 cm) de largeur LOOK INSIDE • REVISE EL INTERIOR • CONTENU DE LA BOÎTE PARTS INCLUDED PIEZAS INCLUIDAS PIÈCES INCLUSES HARDWARE INCLUDED INCLUYE HERRAJES QUINCAILLERIE COMPRISE 1 48" vertical panels (1) 48" paneles verticales (1) 48" panneaux verticaux (1) rod holders (8) porta varillas (8) supports de tige (8) 2 72" vertical panels (2) 72" paneles verticales (2) 72" panneaux verticaux (2) shel
3'-5' Wide Closet • Armario de 3' - 5' de ancho • Penderie de 3 à 5 pi (91,4 cm à 152,4 cm) de largeur 1 Mark locations of vertical panels with masking tape. Marque las ubicaciones de los paneles verticales con la cinta adhesiva protectora. Marquez l’emplacement des panneaux verticaux avec du ruban-cache. TIP • CONSEJO • CONSEIL Panel locations can be changed for other configurations. Las ubicaciones de los paneles se pueden cambiar para otras configuraciones.
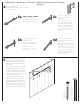
3'-5' Wide Closet • Armario de 3' - 5' de ancho • Penderie de 3 à 5 pi (91,4 cm à 152,4 cm) de largeur 3 Mark locations of studs. Studs are often 16" apart. Marque las ubicaciones de las vigas. Normalmente se deja un espacio de 16" entre cada viga. Marquez l’emplacement des montants. Les montants sont souvent espacés de 40 cm (16 po). Position rail slightly past outside panels. Make sure bottom of rail lines up with hang line and screw into the stud that's nearest to the center of the rail.
3'-5' Wide Closet • Armario de 3' - 5' de ancho • Penderie de 3 à 5 pi (91,4 cm à 152,4 cm) de largeur 5 Level the rail and mark a line along its bottom edge. Drill 1/8" pilot holes into each stud location and in the last hole of the rail on both ends of the wall. Nivele el riel y marque una línea a lo largo de su borde inferior. Taladre orificios guías de 1/8" en cada lugar donde colocará las vigas y en el último orificio del riel sobre los dos extremos de la pared.
3'-5' Wide Closet • Armario de 3' - 5' de ancho • Penderie de 3 à 5 pi (91,4 cm à 152,4 cm) de largeur 8 Install toggle channels. Instale los canales para los pernos acodados. Installez les chevilles. 8a 8c STEPS • PASOS • ÉTAPES Insert toggle into wall. Inserte el perno acodado en la pared. Slide plastic ring along straps until flange of ring is flush against wall. Deslice el aro plástico por las abrazaderas hasta que la brida del aro quede al ras de la pared. Enfoncez la cheville dans le mur.
3'-5' Wide Closet • Armario de 3' - 5' de ancho • Penderie de 3 à 5 pi (91,4 cm à 152,4 cm) de largeur 10 To create the tower unit on the floor, attach two shelves to longer vertical panels using #8 x 50mm screws. If desired, attach screw covers onto screw heads. Para crear la unidad de la torre en el piso, acople dos estantes a los paneles verticales más largos usando tornillos Nº 8 x 50 mm. Si lo desea, coloque cubiertas para tornillos sobre las cabezas de los tornillos.
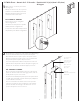
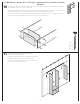
3'-5' Wide Closet • Armario de 3' - 5' de ancho • Penderie de 3 à 5 pi (91,4 cm à 152,4 cm) de largeur ATTACHING THE RODS • FIJACIÓN DE LAS VARILLAS • FIXATION DES TRINGLES • Attach the rod ends to the rod (12a). • While setting on a flat surface, use an 1⁄8” drill bit to drill a pilot hole through the backside of the rod and rod end (12b). Note: Do not drill through both sides of the rod end. • Install the rod ends (with the hole towards the back of the closet) into the verticals (12c).
3'-5' Wide Closet • Armario de 3' - 5' de ancho • Penderie de 3 à 5 pi (91,4 cm à 152,4 cm) de largeur 13 Install adjustable shelf with shelf pins. Instale el estante ajustable con clavijas para estantes. Shelf Pin Clavijas para estantes Supports de tablette Installer une tablette ajustable avec des supports de tablette. 15 IMPORTANT. Attach support cleat to the back wall of the closet into at least one stud using #8 x 50mm screws. Congratulations! Your installation is complete.
Basic Shared Kit • Kit compartido básico • Trousse de base partagée LOOK INSIDE • REVISE EL INTERIOR • CONTENU DE LA BOÎTE PARTS INCLUDED PIEZAS INCLUIDAS PIÈCES INCLUSES HARDWARE INCLUDED INCLUYE HERRAJES QUINCAILLERIE COMPRISE 1 48" vertical panels (2) 48" paneles verticales (2) 48" panneaux verticaux (2) rod holders (10) porta varillas (10) supports de tige (10) 2 72" vertical panels (4) 72" paneles verticales (4) 72" panneaux verticaux (43) shelf pins (40) clavijas para estan
Classic Shared Kit • Kit compartido clásico • Trousse classique partagée LOOK INSIDE • REVISE EL INTERIOR • CONTENU DE LA BOÎTE PARTS INCLUDED PIEZAS INCLUIDAS PIÈCES INCLUSES HARDWARE INCLUDED INCLUYE HERRAJES QUINCAILLERIE COMPRISE 1 48" vertical panels (2) 48" paneles verticales (2) 48" panneaux verticaux (2) rod holders (10) porta varillas (10) supports de tige (10) 2 72" vertical panels (4) 72" paneles verticales (4) 72" panneaux verticaux (4) shelf pins (46) clavijas para e
Deluxe Shared Kit • Kit compartido de lujo • Trousse de luxe partagée LOOK INSIDE • REVISE EL INTERIOR • CONTENU DE LA BOÎTE PARTS INCLUDED PIEZAS INCLUIDAS PIÈCES INCLUSES HARDWARE INCLUDED INCLUYE HERRAJES QUINCAILLERIE COMPRISE 1 48" vertical panels (2) 48" paneles verticales (2) 48" panneaux verticaux (2) rod holders (8) porta varillas (8) supports de tige (8) 2 72" vertical panels (4) 72" paneles verticales (4) 72" panneaux verticaux (4) shelf pins (24) clavijas para estante
All Kits • Todos los kits • Toutes les trousses 1 Mark locations of vertical panels with masking tape. Marque las ubicaciones de los paneles verticales con la cinta adhesiva protectora. Marquez l’emplacement des panneaux verticaux avec du ruban-cache. NOTE • NOTA • REMARQUE Use shelves to help determine widths between verticals. Utilice los estantes para ayudar a determinar el ancho entre los verticales. Utilisez les tablettes pour vous aider à déterminer les largeurs entre les panneaux verticaux.
All Kits • Todos los kits • Toutes les trousses 3 Mark locations of studs. Studs are often 16" apart. Marque las ubicaciones de las vigas. Normalmente se deja un espacio de 16" entre cada viga. Marquez l’emplacement des montants. Les montants sont souvent espacés de 40 cm (16 po).
All Kits • Todos los kits • Toutes les trousses 4a Hang a 72" rail on either side of the installation. If the vertical panels are not installed against a wall, the rail should extend 2 inches past the vertical edge. Make sure bottom of rail lines up with hang line and screw into the stud that's nearest to the center of each rail. Cuelga un riel de 72" a cada lado de la instalación. Si los paneles verticales no se instalan contra una pared, el riel debe extenderse 2 pulgadas más allá del borde vertical.
All Kits • Todos los kits • Toutes les trousses 5 Drill 1⁄8" pilot holes into each stud location and in the last hole of the rail on both ends of the wall. Measure remaining rail and cut if necessary. Cut rail to correct length with a hacksaw, if necessary. Taladre orificios guías de 1⁄8" en cada lugar donde ubicarás las vigas y en el último orificio del riel sobre los dos extremos. Mida el riel restante y córtelo si es necesario.
All Kits • Todos los kits • Toutes les trousses 7 Rotate rail out of position, then drill toggle holes. Use 1⁄2" drill bit. Repeat for remaining rails. Gire el riel hacia afuera, luego perfore los orificios para los pernos acodados. Use una broca de 1/2". Repita la operación para los paneles restantes. Faites pivoter la traverse hors de sa position, puis percez des trous à chevilles. Utilisez une mèche de 13 mm (1⁄2 po). Répétez pour les autres rails.
All Kits • Todos los kits • Toutes les trousses 9 Rotate rails back into position. Bolt and screw each rail to wall using #8 x 50mm screw and toggle bolts if needed. Ensure each rail is level when attaching it to the wall. 10 #8 x 50mm screws Nº 8x 50mm tornillos Nº 8x 50 mm vis Faites pivoter las traverses pour la remettre en position normale. Vissez chaque traverse au mur jusqu’à ce qu’elle y soit parfaitement fixée, à l’aide de vis nº 8 x 50 mm et de boulons à ailettes, le cas échéant.
All Kits • Todos los kits • Toutes les trousses 11 Place each fixed shelf into position (see below for screw hole locations for each shelf ). Each fixed shelf will be secured to side of each vertical panel using four (4) #8 x 50mm screws. Coloque cada estante fijo en su posición (consulte a continuación las ubicaciones de los orificios de los tornillos para cada estante). Cada estante fijo se asegurará al lado de cada panel vertical con cuatro (4) tornillos Nº 8 x 50 mm.
Basic Shared Kit • Kit compartido básico • Trousse de base partagée ATTACHING THE RODS • FIJACIÓN DE LAS VARILLAS • FIXATION DES TRINGLES • Attach the rod ends to the rod (12a). • While setting on a flat surface, use an 1⁄8” drill bit to drill a pilot hole through the backside of the rod and rod end (12b). Note: Do not drill through both sides of the rod end. • Install the rod ends (with the hole towards the back of the closet) into the verticals (12c).
Basic Shared Kit • Kit compartido básico • Trousse de base partagée Install four (4) shelf pins into verticals for each shelf. Lower adjustable shelves onto shelf pins. Instale cuatro (4) clavijas para estantes en los verticales para cada estante. Desciende los estantes ajustables hasta las clavijas para estantes. Installez quatre (4) supports à tablette dans les panneaux verticaux pour chaque tablette. Abaissez les tablettes réglables sur les supports de tablette.
Basic Shared Kit • Kit compartido básico • Trousse de base partagée IMPORTANT • IMPORTANTE • IMPORTANT Place 23 7⁄8" support cleats against the back wall of the closet and under a fixed shelf below. Secure by installing #8 x 50mm screws through a pre-drilled hole into a wall stud location. Coloque los tacos de soporte de 23 7⁄8" contra la pared posterior del armario y por debajo del estante fijo abajo de la gaveta central.
Classic Shared Kit • Kit compartido clásico • Trousse classique partagée 16 Place each fixed shelf into position (see below for screw hole locations for each shelf ). Each fixed shelf will be secured to side of each vertical panel using four (4) #8 x 50mm screws. Coloque cada estante fijo en su posición (consulte a continuación las ubicaciones de los orificios de los tornillos para cada estante). Cada estante fijo se asegurará al lado de cada panel vertical con cuatro (4) tornillos Nº 8 x 50 mm.
Classic Shared Kit • Kit compartido clásico • Trousse classique partagée ATTACHING THE RODS • FIJACIÓN DE LAS VARILLAS • FIXATION DES TRINGLES • Attach the rod ends to the rod (17a). • While setting on a flat surface, use an 1⁄8” drill bit to drill a pilot hole through the backside of the rod and rod end (17b). Note: Do not drill through both sides of the rod end. • Install the rod ends (with the hole towards the back of the closet) into the verticals (17c).
Classic Shared Kit • Kit compartido clásico • Trousse classique partagée 18a Install three (3) shoe shelves. Carefully insert shoe fences into holes. If needed, use a rubber mallet or hammer. Instale tres (3) estantes para zapatos. Inserte con cuidado las barras para sujetar zapatos dentro de los orificios. Si es necesario, use un mazo de caucho o un martillo. Installez trois (3) tablettes pour chaussures. Insérez soigneusement les barres de retenue dans les trous.
Classic Shared Kit • Kit compartido clásico • Trousse classique partagée 19 Please proceed to the drawer assembly instructions which are located in each of the drawer boxes. The diagram to the right shows where to install the drawer glides on each vertical panel. Siga las instrucciones de montaje que se encuentran en cada una de las cajas de la gaveta. El diagrama a la derecha muestra dónde instalar los deslizadores de la gaveta en cada panel vertical.
Classic Shared Kit • Kit compartido clásico • Trousse classique partagée Install four (4) shelf pins into verticals for each shelf. Lower adjustable shelves onto shelf pins. Instale cuatro (4) clavijas para estantes en los verticales para cada estante. Baje los estantes ajustables hasta que lleguen a las clavijas para estantes Installez quatre (4) supports à tablette dans les panneaux verticaux pour chaque tablette. Abaissez les tablettes réglables sur les supports de tablette.
Classic Shared Kit • Kit compartido clásico • Trousse classique partagée IMPORTANT • IMPORTANTE • IMPORTANT Place 23 7⁄8" support cleats against the back wall of the closet and under the fixed shelf below the center drawer. Secure by installing #8 x 50mm screws through a pre-drilled hole into a wall stud location. Coloque los tacos de soporte de 23 7⁄8" contra la pared posterior del armario por debajo del estante fijo abajo de la gaveta central.
Deluxe Shared Kit • Kit compartido de lujo • Trousse de luxe partagée 22 Place each fixed shelf into position (see below for screw hole locations for each shelf ). Each fixed shelf will be secured to side of each vertical panel using four (4) #8 x 50mm screws. Coloque cada estante fijo en posición (consulta a continuación las ubicaciones de los orificios de los tornillos para cada estante). Cada estante fijo se asegurará a un lado de cada panel vertical con cuatro (4) tornillos Repita Nº 8 x 50 mm.
Deluxe Shared Kit • Kit compartido de lujo • Trousse de luxe partagée ATTACHING THE RODS • FIJACIÓN DE LAS VARILLAS • FIXATION DES TRINGLES • Attach the rod ends to the rod (24a). • While setting on a flat surface, use an 1⁄8” drill bit to drill a pilot hole through the backside of the rod and rod end (24b). Note: Do not drill through both sides of the rod end. • Install the rod ends (with the hole towards the back of the closet) into the verticals (24c).
Deluxe Shared Kit • Kit compartido de lujo • Trousse de luxe partagée 25 To install drawer slides, follow instructions included with each drawer box. See diagram indicating drawer slide location. Install drawers. Para instalar los deslizadores de las gavetas, siga las instrucciones incluidas con cada gaveta. Consulte el diagrama que indica las ubicaciones de los deslizadores para las gavetas. Instale las gavetas.
Deluxe Shared Kit • Kit compartido de lujo • Trousse de luxe partagée Install four (4) shelf pins into verticals for each shelf. Lower adjustable shelves onto shelf pins. Instale cuatro (4) clavijas para estantes en las verticales para cada estante. Baje los estantes ajustables hasta que lleguen a las clavijas para estantes. Installez quatre (4) supports à tablette dans les panneaux verticaux pour chaque tablette. Abaissez les tablettes réglables sur les supports de tablette.
Deluxe Shared Kit • Kit compartido de lujo • Trousse de luxe partagée 28 IMPORTANT • IMPORTANTE • IMPORTANT Place 23 7⁄8" support cleats against the back wall of the closet and under the fixed shelf below the drawers. Secure by installing #8 x 50mm screws through a pre-drilled hole into a wall stud location. Coloque los tacos de soporte de 23 7⁄8" contra la pared trasera del armario y debajo del estante fijo abajo de las gavetas.