
User guide

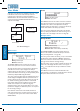


DCM-1 User Manual v1.0
Conguration
30
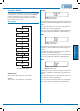
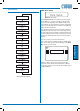
User Mode
Only three menu functions are available to the User – two
in the Music menu and one in the Groups menu. The
required menu is selected by pressing the MUSIC or
GROUPS button. The two functions in the Music menu are
accessed by pressing the NEXT FUNCTION button
adjacent to the display.
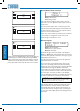
Select Input
Source Name
Level
|||||||||
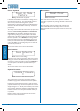
Group 1
Enable X
MUSIC MENU
GROUPS MENU
User Menu Flow Diagram
Music menu
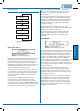
Select Input
Rotary:
Buttons:
selects Input
select zone
The SELECT INPUT function is where the user selects
which music input source is to be routed to each Zone.
The eight numeric buttons correspond to the eight Zones;
select the one to have an input assigned. If a Group is
enabled, selecting any Zone that is a member of that Group
selects all the Zones in the Group (see Group Enable); this is
indicated by multiple LEDs being illuminated.
The rotary control scrolls through the available inputs; these
will be displayed as Input n unless the inputs have been re-
named, in which case the names will be shown (see page 36
for details of renaming inputs). Selection is restricted to
those inputs which have been enabled for the zone (the
default is for all inputs to be enabled. See page 33).
Assignment of the music source takes effect as soon as the
input name is displayed; no additional “presses” are required
for the routing to change.
Note that this menu function is the default, and that all
other menu functions time out after approx. 45 seconds of
no activity. The menu system then reverts to Music Menu,
SELECT INPUT.
Level
Rotary:
Buttons:
sets Zone Level
select Zone
The LEVEL function sets the volume of music in each Zone.
The eight numeric buttons correspond to the eight Zones;
select the one to have its level adjusted. If a Group is
enabled, selecting any Zone that is a member of that Group
selects all the Zones in the Group (see below).
The rotary control adjusts the audio level in the selected
Zone (or Group). An indication of relative level is given on
the lower row of the display in the form of a bargraph.
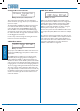
Groups menu
Group Enable
Rotary:
Press:
Buttons:
selects Group
enable/disable Group
LEDs confirm Group membership
The GROUP ENABLE menu function allows Groups of
Zones to be enabled or disabled. The Groups must have
been previously dened – see page 43).
The rotary control selects the Group (1 to 4) to be enabled/
disabled. These will be displayed as Group n unless they
have been renamed, in which case the names will be shown
(see page 37 for details of renaming Groups).
Press the rotary control to enable or disable the Group. The
lower row of the display will show either a cross (X) or a
tick (
ü
) to conrm that the Group is disabled or enabled
respectively.
The LEDs above the numeric buttons illuminate in this
menu function to conrm Zone membership of the selected
Group. The buttons themselves are not used.