
Instruction manual

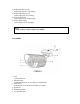


1. This light is lit in blue when the AC power supply is properly plugged to DC jack
(refer to #9).
2 -Select the CH1 camera by pressing this button in the manual mode or automatic
sequential mode.
-Press Down (▼) button to navigate the submenu.
3. -Select the CH2 camera by pressing this button in the manual mode or automatic
sequential mode.
-Press Up (▲) button to navigate the submenu.
4. -Decrease audio level by pressing this button.
-Press Left (◄) button to select values.
5. -Increase audio level by pressing this button.
-Press Left (►) button to select values.
6. -Press this button to setup the menus.
-Press and hold this button for 3 seconds to set the unit into playback (VCR) mode.
7. Press this button to place the system into the automatic sequential mode (See section
6.4).
8. -Press this button to turn the power off.
-Press and hold this button for 3seconds to turn the power on.
9. DC power jack
Plug the provided AC power supply only.
Do not use the unproven AC power supply as this can result in fatal damage to the
system. In case of this, the warranty term should be voided.
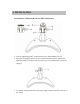
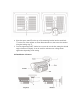
10. 11. Video inputs (6pin Din jack)
-Connect a provided camera to the 6pin Din jack.
-Make sure that the two arrows on the monitor and on the top of the cable should be
aimed at each other.