
Instruction manual

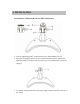
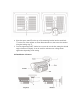


1. Attach the mounting bracket base ① to the wall or ceiling, wherever you want to
install the camera. Locate a wall stud or ceiling joist and secure the bracket base
using the supplied screws.
2. Lock the mounting bracket with the locking ring②.
3. Turn the pivot locking screw③ with the provided hex-head wrench counter-
clockwise to set the desired angle of camera toward objects and turn it clockwise
to secure. It can be used for wall-mount or ceiling-mount application depending
on setting this pivot locking screw.
4. Loosen the locking screw④ with the provided hex-head wrench and turn the
camera clockwise or counter-clockwise to upright images on the screen and turn it
clockwise to secure.
5. Connect the one end of 60’ cable to CH1 or CH2. Make sure that the two arrows
on the top of 60’ cable and on the monitor should be aimed at each other.
5.1 Automatic Sequential Mode
- Press AUTO button on the front panel, then the monitor will be displayed one
camera after another.
- The dwell time can be adjusted from 1 to 60 seconds in the SETUP menu (See
section 6.4).
5.2 Manual Mode
- Press the desired camera button on the front panel of the monitor to display a full
screen when the system is in the automatic sequential mode or manual mode.
5.3 DVR / VCR Operation
- Normally this system is in Record mode. To record, connect cables (not included)
to the AUDIO IN/OUT and VIDEO IN/OUT ports on the monitor and vice versa
on the DVR/VCR. Then press the “REC” button on the DVR/VCR.
- Press the “PLAY” button on the DVR/VCR.
- To play back, press the “MENU/VCR” button on the front panel for 3seconds or
select the VCR in the SYSTEM menu (refer to system menu).
It is impossible to setup the menus if images are not being displayed on the screen.
- Press the MENU button on the front panel to setup the menus.
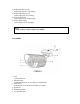
5. OPERATION
6. SETUP THE MENUS