
Instruction manual


▪
Connect the one end of 60’ 6pin Din cable to the Din jack on the rear of the zoom
camera and the other end of cable to the DIN jack that the settings for PAN/TILT menu
on the DVR system has been completed.
-Be sure that the two arrows on the camera and the cable should be aimed at each
other.
-Do not apply DC 12V to the DC Jack and connect the BNC video out on the zoom
camera when the 6 pin Din Cable is connected.
▪ Make sure that the video quality is normal and the power LED on the rear of the zoom
camera is lit in green when the DVR system is turned ON for the next step.
▪ Attach the mounting bracket to the desired location on the wall or ceiling, wherever you
want to install the zoom camera. Locate a wall stud or ceiling joist and secure the
mounting bracket using the supplied screws.
▪ Attach the zoom camera to the mounting bracket and firmly tighten the swivel.
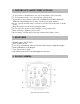
▪ Click the PAN/TILT button on the Menu bar in the Live mode to access the zoom
camera as shown in Fig. 6-1 and then the PAN/TILT Controller will be displayed as
shown in Fig. 6-2.
6. OPERATION
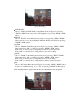
[Fig.5-2Connecting bared copper wire]