Owner’s Manual Keep with machine for reference MODELS AH/B/C/S INSTALLATION & OPERATION Rev 1.
TABLE OF CONTENTS MODEL AH/B/C/S. 1. 2. 3. SPECIFICATIONS ........................................................................................ 3 1.1 MODEL AH/C......................................................................................................................................3 1.2 MODEL B.............................................................................................................................................4 1.3 AH, B AND C OPERATIONAL CYCLE .................
1. Specifications Electrical and plumbing connections must be made by a qualified service person who will comply with all available Federal, State, and Local Health, Electrical, Plumbing and Safety codes 1.1 Model AH/C USA METRIC PER RACK 1.7 GAL. (6.45 L) PER HOUR 74 GPH (280.1 LPH) WASH TIME-SEC. 45 45 RINSE TIME-SEC. 30 30 DWELL TIME-SEC. 15 15 90 SEC.* 90 SEC.
Electrical and plumbing connections must be made by a qualified service person who will comply with all available Federal, State, and Local Health, Electrical, Plumbing and Safety codes 1.2 Model B USA METRIC PER CYCLE 3.0 GAL. (11.4 L) PER HOUR 118.4 GPH (448.2 LPH) 45 45 WATER CONSUMPTION OPERATING CYCLE WASH TIME-SEC. RINSE TIME-SEC. 30 30 DWELL TIME-SEC. 15 15 90 SEC.* 90 SEC.* 80 80 WASH TANK CAPACITY 3.0 GAL. (11.4 L) PUMP CAPACITY (two pumps) 104 GPM (393.
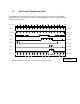
AH, B and C Operational Cycle * 1.3 The AH, B and C Operational Cycle have a total cycle time of 90 seconds. The Timing Diagram and the steps listed below detail the individual functions that are executed during each Operational Cycle. Seconds: 0 10 20 30 40 50 60 70 80 90 Cam 1 Start/Stop Cam 2 Cycle Reset Cam 3 WASH DRAIN RINSE Drain/Rack Counter Cam 4 Flush/Fill Cam 5 Detergent Cam 6 Sanitizer Cam 7 Rinse Aid Cam 8 Pump Motor 1.
The pump motor runs the pump for the 45-second wash cycle, then pumps the water out through the drain, turns off for about 8 seconds (allowing the machine to refill with clean rinse water) and then runs the pump for the 30-second rinse cycle. 3. Cam switch 3 controls the drain function. At the end of the 45-second wash cycle, cam switch 3 energizes the drain solenoid allowing the wash water out of the machine. Cam switch 3 also increments the rack counter by one each cycle. 4.
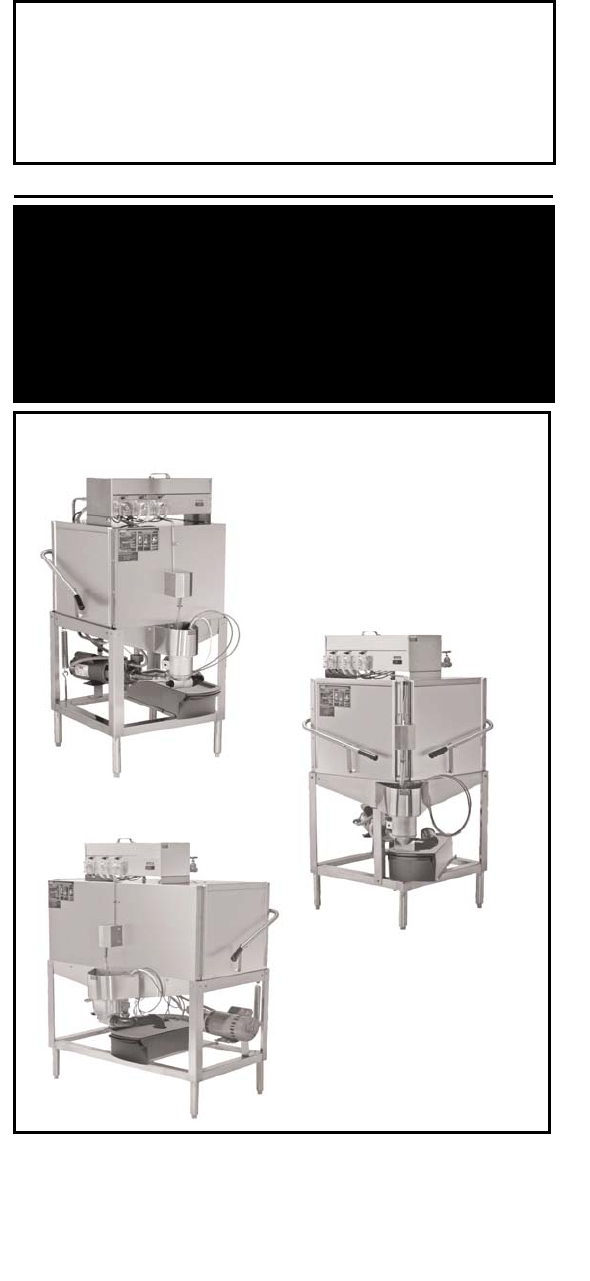
2. Getting Started All sections of the manual address dishmachine models AH, B ,C & “S”series. Separate information on each machine is only provided where differences exist between the models. 2.1. Introduction to Models AH, B ,C&” S” series. The CMA AH, B ,C &”S”series.Dishmachines are safe and easy to operate with their “Auto Start/Stop” function. The Dishmachines’ top mounted controls include built-in chemical pumps controlled by adjustable cams to insure proper chemical usage.
Getting Started 2.2. Receiving and Installation The dishwasher is shipped from the factory in a corrugated box on a wooden pallet. The installation guidelines give a systematic procedure for setting up the machine. Start by removing the dishmachine from the box. Remove the packaging, unwrap the machine and check for the following components: Scrap Accumulator complete with lid and scrap tray.
Getting Started 2.2.3. Connecting the Scrap Accumulator and Drain The scrap accumulator is designed to perform two basic functions: 1. It allows all the heavy solids to discharge out of the machine with each wash cycle and collect in a clean out tray. 2. It provides accumulation capacity to allow draining the contents of one cycle regardless of the discharge rate of the existing drain. The drain pipe is connected to the scrap accumulator drain using a 2” no-hub connector (not supplied) as shown in Figure 2.
3. Operation 3.1. Initial Setup All machines are equipped with switches to prime the peristaltic pumps at anytime the master switch is "ON". Following completion of the installation, always fill the machine with water before starting it. Caution: Do not operate the dishmachine without the drain screen in place. Debris getting into the pump impeller can damage the pump. 3.1.1. Check… Drain screen is in place Spray arms and end plugs are secure 3.1.2.
Operation 3.2. General Please follow the instructions given here before each shift to assure trouble free operation. Caution: Do not operate the dishmachine without the drain screen in place. Debris getting into the pump impeller can damage the pump. 1. Drain the water if it is cold by lifting the drain ball until all the water is out of the machine. 2. Check the drain screen and, if needed, remove it from the machine and clean it out. After cleaning, replace it properly into the sump housing. 3.
3.3. Addendum for Machines Installed in the City ofChicago "All food dispensing establishments using chlorine or other approved chemical sanitizers shall, at all times, maintain an adequate testing device." "Dishes and other eating and drinking utensils to be washed in a dishwashing machine shall be properly scraped and pre-rinsed and shall be stacked in racks or trays so as to avoid overcrowding, and so as to permit the wash and rinse waters to reach all surfaces of each utensil.
3.4. Electrical Diagrams 3.4.1. Models AH/ C & B MODEL AH, B & C INSTALLATION & OPERATION MANUAL Rev. 1.
3.4.2. Solid Bowl MODEL AH, B & C INSTALLATION & OPERATION MANUAL Rev. 1.