MODEL EVA INSTALLATION & OPERATION Rev 1.03 CMA DISHMACHINES 12700 KNOTT AVENUE GARDEN GROVE, CALIFORNIA 92841 800-854-6417 FAX 714-895-2141 www.cmadishmachines.
TABLE OF CONTENTS Model EVA 1. SPECIFICATIONS .........................................................................................2 1.1 2. 3. EVA................................................................................................................................................ 2 GETTING STARTED .....................................................................................3 2.1. INTRODUCTION TO THE EVA.............................................................................
1. Specifications 1.1 EVA USA METRIC WATER CONSUMPTION PER RACK 1.25 GAL. (4.73 L) PER HOUR 46.2 GPH. (174.9 LPH) WASH TIME-SEC. 53 53 RINSE TIME-SEC. 30 30 DWELL TIME-SEC. 7 7 90 SEC. 90 SEC. 37 37 1.25 GAL. (4.73 L) 52 GPM (196.8 LPM) REQUIRED MINIMUM TEMP. 120°F (49°C) RECOMMENDED TEMP. 140°F (60°C) WATER INLET ½” — DRAIN CONNECTION 2” — DEPTH 25 ¾” (65.405 cm) WIDTH 25 ¾” (65.405 cm) HEIGHT 55-56” (140-142 cm) 17” (43.
Getting Started 2. Getting Started 2.1. Introduction to the EVA The EVA Dishmachine is safe and easy to operate with its “Auto Start/Stop” and it’s economical to operate—using only 1.25 gallons of water per cycle and less than 1900 watts of power when running. The EVA Dishmachine’s top mounted controls include built-in chemical pumps and a de-liming system that assures proper chemical usage. Its integrated scrap tray prevents food soil from entering the drain system.
Getting Started 2.2. Receiving and Installation The dishwasher is shipped from the factory in a corrugated box on a wooden pallet. The installation guidelines give a systematic procedure for setting up the machine. Start by removing the dishmachine from the box. Remove the packaging, unwrap the machine and check for the following components: Inside the wash tank is a plastic bag with one control box key and a cam timer wrench.
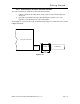
Getting Started 2.2.3. Connecting the Scrap Accumulator and Drain The scrap accumulator is designed to perform two basic functions: 1. It allows a method to discharge all the heavy solids out of the machine with each wash cycle. 2. It provides accumulation capacity to allow draining the contents of one cycle regardless of the discharge rate of the existing drain. The drainpipe is connected to the scrap accumulator drain using a 2” no-hub connector as shown in Figure 2.2.3 below.
Operation 3. Operation 3.1. Initial Setup All machines are equipped with switches to prime the peristaltic pumps at anytime the master switch is "ON". Following completion of the installation, always fill the machine with water before starting the machine. 1. With the power “ON” hold the fill button until the water level overflows into the scrap accumulator. 2. Check the chemical lines to the chemical containers. a. Red: detergent line. b. Blue: rinse agent line. c.
Operation 3.2. Startup Procedures Please follow the instructions given here before each shift to assure trouble free operation. 2. Drain the water if it is cold by activating the drain switch until all the water is out of the machine. 3. Check the drain screen and, if needed, remove it from the machine and clean it out. After cleaning, replace it properly into the sump housing. 4. Check the wash arm spray tips. If they are clogged, clean them with a toothpick and rinse them at the sink.
Operation 3.3. Quick service guide MODELS: CMA 44/66 CONVEYOR (S) TECHNICAL ISSUE CAUSE SOLUTION Manual/auto switch in MANUAL mode or faulty Turn switch to AUTO position or replace Continuously cycles Final rinse does not come on Does not run Losing water Oil coming out of conveyor motor Conveyor cam bearing destroyed Conveyer timer faulty Replace timer, P/N 13418.85 Faulty tilt micro switch Replace micro switch, P/N 00411.
4. Addendum for Machines Installed in the City of Chicago "All food dispensing establishments using chlorine or other approved chemical sanitizers shall, at all times, maintain an adequate testing device." "Dishes and other eating and drinking utensils to be washed in a dishwashing machine shall be properly scraped and pre-rinsed and shall be stacked in racks or trays so as to avoid overcrowding, and so as to permit the wash and rinse waters to reach all surfaces of each utensil.
Electrical Diagram 5. Electrical Diagram MODEL EVA INSTALLATION & OPERATION MANUAL Rev. 1.