M-Key Ultra-thin MIDI Keyboard User’s manual ————————————————— Model: M-Key Read “Precautions” on page 5 before use (Ver 04) Please read this manual carefully before use. Please keep this manual for reference.
Thank you for choosing CME M-Key — Ultra-thin MIDI Keyborad Please keep all the important information here Attach your invoice or receipt here ~~~~~~~~~~~~~~~~~~~~~~~ for reference Purchase Dealer’s Dealer’s tel. Warning: date Serial(on name the back of the and keyboard) addr. z Improper connection may cause damage to the device. Copyright z Copyright of the manual belongs to Central Music Co. Anyone must get a written permission from Central Music Co.
Special Message Section This product utilizes batteries or an external power supply (adapter). Do NOT connect this product to any power supply or adapter other than one described in the manual, on the product, or specifically recommended by CME. NOTICE: Service charges incurred due to a lack of knowledge relating to how a function or effect works (when the unit is operating as designed) are not covered by the manufacturer’s warranty, and are therefore the owners responsibility.
FCC INFORMATION (U.S.A) 1. IMPORTANT NOTICE: DO NOT MODIFY THIS UNIT! This product, when installed as indicated in the instructions contained in this manual, meets FCC requirements. Modifications not expressly approved by CME may void your authority, granted by the FCC, to use the product. 2. IMPORTANT: When connecting this product to accessories and/or another product use only high quality shielded cables. Cable(s) supplied with this product MUST be used. Follow all installation instructions.
PRECAUTIONS IMPORTANT Always follow the basic precautions listed below to avoid the possibility of serious injury or even death from electrical shock, damages, fire or other hazards. These precautions include, but are not limited to, the follows: 1. Read and understand all the instructions. 2. Always follow the instructions on the instrument. 3. Before cleaning the instrument, always remove the electric plug from the outlet as well as the USB cable. When cleaning, use a soft and dry cloth.
CAUTION: Setting up Do not connect the instrument when thundering. Do not set up the cord or outlet to a moist place, except for that the outlet is specially designed for moist places. When the power cord is connected to the AC outlet, do not touch the naked part of the cord or the connector. Always follow the instructions carefully when setting up the product. Avoid using any extending USB cable with poor quality or too long extending USB cable. Do not use USB HUB to connect the product.
Content 1 General view ...........................................................................................................................9 1.1 Front panel ................................................................................................................9 1.2 Rear panel ...............................................................................................................10 2 Installation guide....................................................................................
This page was intentionally left blank.
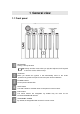
1 General view 1.1 Front panel KEYBOARD 49 keys, velocity sensitive. Velocity sensitive means when you play the keyboard, it will respond to the force used to strike the keys. JOYSTICK When you release the joystick, it will automatically return to the center position.The joystick is the part to control the pitch and/or modulation. POWER indicator It is the power indicator LED. SHIFT button The SHIFT button is used with other control parts for more functions. DATA button The DATA buttons are assignable.
1.2 Rear panel z USB port: to make computer connection for MIDI data transfer and get the USB bus power z MIDI OUT:Standard 5-din MIDI OUT port. z PEDAL A jack:1/8" TRS x1, can be used for volume or sustain pedal. z PEDAL B jack:1/8" TRS x1, can be used for volume or sustain pedal. z DC IN(AC adapter power in port):Connect the AC adapter here. z POWER ON-OFF switch: Use it to turn the instrument on/off.
2 Installation guide 2.1 Power supply A、 Use USB Power: 1. Make sure the power switch is set to OFF. 2. Connect the product to the computer via USB cable. B、 Use AC adapter Power: 1. Make sure the power switch is set to OFF. 2. Connect the AC adapter (optional) to the POWER IN port in the rear panel. 3. Make sure the AC requirement of the AC adapter is compliant with the local AC supply, then connect the AC adapter to the power supply outlet.
3 Connections Before you make these connections, please turn off all devices to avoid possible damage. Please refer to the fig.
4 Turning on 4.1 Normally turning on Set the power switch on the rear panel to ON to turn on this product. By default, this product is set to work with WINDOWS XP / Mac OSX. To make it work with WINDOWS VISTA, please press down and hold the joystick and turn iton, and you will see the DATA button flashes for 5 times. To make it work with WINDOWS XP / Mac OSX again, please do the above operation again, and you will see the SHIFT button flashes for 5 times. 4.
5 Basic functions 5.1 Adjusting volume z You can use the slider to send the volume control message CC#7 to adjust volume. You can change the function of the slider by assigning it to another kind of MIDI message. (6.2) 5.2 Transpose and octave z Octave By default, you can use the【- DATA +】button for octave shift. When the octave is shifted, the related button indicator will be on. The octave shift range is -03~00~03.
5.3 Working with the joystick z z z Move the joystick to the left/right to send the PITCHBEND message. Move the joystick upward to send CC#1 (MODULATION) message. Move the joystick downward to send the AFTER TOUCH message. You can use the【ASSIGN JOYSTICK】command to define the downward joystick message. (6.1) . 5.4 Pedal z z z For the two pedal jacks, each one can be used for continuouls pedal (e.g volume pedal) or switch pedal (e.g sustain pedal).
z z z MIDI message sent:CC#0 + CC#32 + Program Default value:0 Value range:0-127 5.5.3 Program Change z z z z Operation:【SHIFT】ÖB1【Program Change】Ö【Set value】Ö【ENTER】 MIDI message sent:CC#0 + CC#32 + Program Default value:1 Value range:1-128 You can finish setting all the three values then press【ENTER】to send the data. 5.
6 ASSIGNING 6.1 Assigning Joystick z z z z Operation:【SHIFT】ÖC#4【Assign Joystick】Ö【Set value】Ö【ENTER】 Value (controller#) range:0-145 The center position of the joystick will send data 0, and the lowerst position will send data 127. Please refer to the appendix 8.1 for more detail. 6.
7 SYSTEM settings 7.1 Velocity Curve z z z z z You can try different velocity curves to find your favorite one and get the best touch response for the voice being played. Velocity Curve 1:【SHIFT】ÖC1【Velocity Curve1】 (Normal) Velocity Curve 2:【SHIFT】ÖD1【Velocity Curve2】 (Soft) Velocity Curve 3:【SHIFT】ÖE1【Velocity Curve3】 (Hard) Velocity Curve 4:【SHIFT】ÖF1【Velocity Curve4】 (Expand) 7.2 Pedal Polarity z z z You can set the pedal A polarity to make it work properly.
8 Appendix 8.1 Assignable controller list Cont# Name Cont# Name 000 Bank Select 067 Soft pedal on/off 001 Modulation wheel 068 Legato Footswitch 002 Breath control 069 Hold 2 003 Undefined 070 Sound Variation 004 Foot controller 071 Timbre/Harmonic Intens.
128 Pitch Bend 146 * ProgramChange 129 Pitch Bend Sensitivity 147 ** Start(MTC) 130 Fine Tuning 148 ** Continue(MTC) 131 Coarse Tuning 149 ** Stop(MTC) 132 Vibrato Rate 150 ** System Reset(MTC) 133 Vibrato Depth 151 ** Stop(MMC) 134 Vibrato Delay 152 ** PLAY(MMC) 135 Low Pass Filter Cutoff Frequency 153 ** DEFERRED PLAY 136 Low Pass Filter Resonance 154 ** FORWARD(MMC) 137 High Pass Filter Cutoff Frequency 155 ** REWIND(MMC) 138 EQ Low Gain 156 ** RECORD STROBE(MMC
8.2 GM voice list Voice# Name Voice# Name Voice# Name Voice# Name 001 GrandPno 033 Aco.Bass 065 SprnoSax 097 Rain 002 BritePno 034 FngrBass 066 Alto Sax 098 SoundTrk 003 El.Grand 035 PickBass 067 TenorSax 099 Crystal 004 HnkyTonk 036 Fretless 068 Bari.Sax 100 Atmosphr 005 E.Piano1 037 SlapBas1 069 Oboe 101 Bright 006 E.Piano2 038 SlapBas2 070 Eng.Horn 102 Goblins 007 Harpsi.
8.3 Velocity curve list Velocity Curve 1 (Normal) Velocity Curve (Soft) Velocity Curve 3 (Hard) Velocity Curve 4 (Expand) 8.
9 Troubleshooting Trouble with possible reasons and solution z z z z After turning on the power switch, the instrument is not powered on: 1. Make sure the USB connection is made the the computer is on. 2. Make sure the power connector is firmly connected to the power outlet. 3. Check the power connectors. No sound when playing the instrument 1. Check the volume settings of the tone generator and speaker system 2. Check the MIDI connection and the audio cable 3.
10 Specifications z Keyboard M-Key:49 keys(C1 - C5), (velocity sensitive) z Functions Basic functions: USB MIDI, Octave shift, Transpose, Joystick, Pedals, Breath control, MIDI OUT, Slider, Function buttons MIDI Data: Bank select, Program change, GM System On, GS System on, XG System On, Control change, All Notes Off, etc. Parameters: Transose, Octave, MIDI out channels, Velocity curve, Pitch bend, Moulation, Brightness, etc.
11 MIDI Implementation Chart CME M-Key (MIDI KEYBOARD) Model: M-Key MIDI Implementation chart Function Transmitted Basic Default 1 Channel Changed 1~16 Default Mode Messages X Altered *********** Note 0~127 Number: True voice *********** Velocity Note ON ○ v=0~127 Note OFF ○ v=0~127 Aftertouch Key’s X Ch’s ○ Pitch Bend ○ Control Change 0~127 Prog ○ Change: True # *********** System Exclusive ○ System Clock X Real Time Commands ○ System Song position X command Aux Active Sense X Messages ○: Yes X: No z Ver
2007-06 Central Music Co. Tel: +86-10-8580 1115 Fax: +86-10-8580 1114 Web: www.cme-pro.com E-mail for support: support@cme-pro.