Digital Music/Video MP3 808 BENUTZERHANDBUCH (Deutsch)
INHALTSVERZEICHNIS Vorwort…………………………………………………………………………………….. Seite 2 1. 2. 3. 4. 5. 6. 7. 3 Funktionen.................................................................................................. Seite Warnhinweise…………………………………………………………………. Seite Lieferumfang…………………………………………………………………... Seite Minimale Systemanforderungen……………………………….. Seite Die Tasten/Anschlüsse…………………………………………………Seite Funktion der Tasten (Kurzübersicht)……………………….. Seite Bedienung....................................................
Sehr geehrter Kunde! Vielen Dank dafür, dass Sie unserer Marke cmx® und einem unserer Produkte das Vertrauen geschenkt haben. Der cmx®MP3 808 besticht durch seine elegante Form und durch die vollständige Ausstattung. Dieser MP3-Player gehört zu der neuesten Generation tragbarer digitaler Geräte. Er unterstützt digitale Musik-Formate, kann für digitale Aufnahme (optional)n genutzt werden und Sie können Ihren cmx® MP3 808 als USB-Stick verwenden.
1. Funktionen Hochwertige Verarbeitung Einzigartige Form und komfortable Handhabung Multi-Codec-Player z.B. MP3, WMA, WMA-DRM(optional), ACT und WAV Firmware Upgrade Sie erhalten das neueste Firmware-Upgrade unter: www.cmx-electronics.com Laufwerkmodus Der Interne Speicher kann als USB Stick verwendet werden, auf welchem Sie beliebige Dateien abspeichern können. Aufnahme (optional) /Wiedergabe Der Player nimmt über ein eingebautes Mikrophon auf und speichert die Dateien im WAVoder ACT-Format.
2. Warnhinweise Dieses Handbuch enthält wichtige Sicherheitsmaßnahmen und korrekte Betriebsinformationen. Bitte lesen Sie alle Informationen aufmerksam durch, bevor Sie den MP3 808 in Betrieb nehmen. Setzen Sie den Player nicht hohen Temperaturen, Luftfeuchtigkeit oder Staub aus. Schlagen Sie nicht auf den Player, insbesondere sollten Sie den LC-Bildschirm nicht berühren. Damit vermeiden Sie, dass dieser beschädigt wird.
3. Lieferumfang Bitte überprüfen Sie Ihre MP3-Player Verpackung auf folgendem Inhalt. (1) (2) (3) (4) (5) (6) cmx®MP3 808 Stereo Ohrhörer MiniCD (Treiber u. Programme) Bedienungsanleitung USB Kabel AAA-Batterie 1,5V 1Stück 1Stück 1Stück 1Stück 1Stück 1Stück 4.
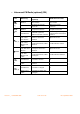
5.
6.
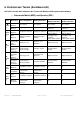
• Untermenü Aufnahme (REC) (optional) Taste Taste (1) MenüTaste (2) Taste (3) Taste (4) Bedienung Pause/Stop Modus Lange Drücken Ausschalten Kurz Drücken Lange Drücken Aufnahme (optional) starten Hauptmenü aufrufen Kurz Drücken Aufnahme (optional) Ordnerverzeichnis aufrufen X X X Option wechseln X X Kontinuierlicher Vorlauf X X Option wechseln X X Kontinuierlicher Rücklauf Menü Taste nach rechts kurz drücken MenüTaste nach rechts drücken und halten Menü Taste nach links kurz drü
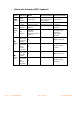
• Untermenü FM Radio (optional) (FM) Taste Taste (1) MenüTaste (2) Taste (3) -Taste (4) Vol+Taste (5) Vol— Taste (6) Bedienung Untermenü FM Radio (optional) FM Ordnerverzeichnis Lange Drücken Ausschalten Ausschalten Kurz Drücken Gespeicherte Sender wechseln Ordnerverzeichnis verlassen Lange Drücken Hauptmenü aufrufen Hauptmenü aufrufen Kurz Drücken FM Radio (optional) Ordnerverzeichnis aufrufen Aktuelle Option bestätigen oder nächsten Unterordner aufrufen 0,1 MHz schrittweise erhöhen
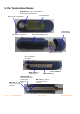
7. Bedienung 7.1. Allgemeiner Hinweis Die in der Verpackung enthaltenen Ohrhörer mit dem 3,5mm Klinke-Stecker voraus in die am Player vorgesehene Kopfhörerbuchse (6) bis zum Anschlag stecken. Bitte legen Sie die mitgelieferte AAA-Batterie in das Batteriefach ein. Je nach Betriebsbedingungen des cmx®MP3 808 kann die Batterielaufzeit von ca. 12h variieren. Sie können aufladbare AAA-Akkus oder Alkaline-Batterien verwenden. 7.2.
aktivieren. Sobald Sie eine Taste drücken wird ein Symbol (siehe Bild nebenan) angezeigt. Schieben Sie die Hold-Taste (7) von links nach rechts um die Tastensperre aufzuheben 7.3.
Menüstruktur Untermenü Musik Play Modus (MSC) Musik Pause/Stop Modus (MSC) Aufnahme (REC) (optional) Sprache Play Modus (RPL) Sprache Pause/Stop Modus (RPL) FM-Radio (optional) (FM) System (SYS) Telefonbuch (TEL) E-Book (TXT) Ordnerverzeichnis Wiederholen Unterordner Normal | Wiederholen einm | Heft | Wiederhol sheft | Wiederholen Alle | Gelegentlich | Intro Natural | Felsen | Pop | klassisch | Weich | Jazz | DBB Entzerrer (=Equalizer) Tempo Anzeigen (=A-B Wiederholung) Anzeigenzeit (= Anzahl der
File Select Text Read 7.3.1. Untermenü Musik Wählen Sie im Hauptmenü durch Drücken der Menü-Taste (2) nach Links oder Rechts (4 oder 3) das Untermenü Musik aus. Durch einen kurzen Druck auf die Menü-Taste (2) wird das gewählte Menü geöffnet und Sie befinden sich im Untermenü Musik. Drücken Sie länger die Menü-Taste (2), so gelangen Sie wieder ins Hauptmenü zurück.
Drücken Sie die Vol- Taste (6) um die Lautstärke zu verringern. • Liedtext Anzeige im Play Modus Dieser Player unterstützt *.LRC Liedtextdateien. Hiermit können Liedtexte synchron zur Wiedergabe angezeigt werden. a.) Benutzung von Liedtext-Dateien Speichern Sie die Liedtext-Datei im gleichen Ordner und unter demselben Namen wie die entsprechende Musikdatei. Zum Beispiel: Name der Musikdatei: GiGi-Sky.mp3 Name der Liedtext-Datei: GiGi-Sky.lrc b.
• Einstellungsoptionen bei Musikwiedergabe für das Untermenü Musik Während der Musikwiedergabe drücken Sie kurz auf die Menü-Taste (2) und Sie gelangen in das Ordnerverzeichnis von Untermenü Musik (siehe unterhalb abgebildetes Bild). Drücken Sie kurz die Menü-Taste (2) nach Links oder Rechts (4 oder 3) und Sie können zwischen den 7 Auswahloptionen Wiederholung, Entzerrer (=Equalizer), Tempo, Anzeigen (=A-B Wiederholung), Anzeigen Zeit, Anzeigen Abstand oder Ausgang wählen.
beendet dann die Wiedergabe Ordner wiederhole Spielt alle Lieder im aktuellen Ordner immer wieder ab, ohne die Wiedergabe zu beenden. Alles Wiederholen Spielt alle Lieder die am Player gespeichert sind immer wieder ab. Zufällig Spielt alle Lieder im aktuellen Ordner per Zufallsauswahl ab. Vorschau Spielt die ersten 10 Sekunden eines jeden Liedes im aktuellen Ordner nach der Reihe ab.
Die Equalizereinstellungen finden Sie an der fünften Stelle am Bildschirm von links nach rechts gesehen im Untermenü Musik angezeigt (siehe Bild auf Seite 13). 3. Tempo Befinden Sie sich im Tempo Ordner so können Sie Durch Drücken der Menü-Taste (2) nach Links oder Rechts (4 oder 3) das Abspieltempo des Liedes verlangsamen oder erhöhen. Durch kurzes Drücken der Menü-Taste (2), -Taste (1) oder durch längeres Warten bestätigen Sie und haben das gewünschte Tempo eingestellt. 4.
Im Wiederholungsmodus können Sie durch Drücken der Menü-Taste (2) nach Links (4) „A“ (den Startpunkt der Wiederholung) und danach „B“ (Endpunkt der Wiederholung) verändern. • Karaoke-Modus (nur während des A-B Wiederholungsmodus aufrufbar) a) Drücken Sie während der Wiedergabe des Teilstücks A-B auf die Menü-Taste (2) nach Rechts (3). Sie gelangen automatisch in den Karaoke-Modus. b) Aus dem Wiederholungs-Icon wird das Karaoke-Modus-Icon und die Sie können Ihr Talent beweisen und singen.
5. Anzeigenzeit Die Anzeigenzeit legt fest, dass nach der Wiedergabe der Titel A-B der Wiederholungsmodus nach der festgelegten Anzahl von Wiederholungen verlassen wird. Durch Drücken der Menü-Taste (2) nach Links oder Rechts (4 oder 3) können Sie die Anzahl der Wiederholungen von 1 bis 10 auswählen. Durch kurzes Drücken der Menü-Taste (2), -Taste (1) oder durch längeres Warten bestätigen Sie und haben das gewünschte Tempo eingestellt. 6.
7.3.2. Untermenü Aufnahme (optional) Sie können Ihren MP3 Player als Diktiergerät verwenden. Stellen Sie sicher, dass die Batterie nicht zu schwach ist. Der Player kann 99 Aufnahmedateien in jedem Ordner und Unterordner speichern. Die Aufnahmedateien werden unter dem Dateinamen RECxxx.wav oder RECxxx.act in den Ordner, der im Aufnahme (optional) Ordnerverzeichnis Lokale Heft eingestellt wurde (Siehe Kapitel 7.3.8 auf Seite 38, 39 und 40).
Halten Sie die -Taste (1) für längere Zeit gedrückt um die Aufnahme zu beenden. Diese wird automatisch gespeichert, und Sie können eine neue Aufnahme starten. Halten Sie die Menü-Taste (2) für längere Zeit gedrückt um die Aufnahme zu beenden. Diese wird automatisch gespeichert und Sie gelangen danach ins Hauptmenü.
Fein VOR (32K VOR): Lang VOR (8K VOR): Sprachgesteuerte Aufnahme mit guter Qualität, d.h. es wird nur aufgenommen wenn Geräusche/Sprache hörbar ist. Sprachgesteuerte Aufnahme mit normaler Qualität, d.h. es wird nur aufgenommen wenn Geräusche/Sprache hörbar ist. Einstellungsoptionen im Pause/Stop Modus (siehe Kapitel 7.3.8 auf Seite 38, 39 u. 40) • 7.3.3. Untermenü Sprache Wählen Sie im Hauptmenü durch Drücken der Menü-Taste (2) nach Links oder Rechts (4 oder 3) das Untermenü Sprache aus.
Drücken Sie kurz die Taste Menü-Taste (2) nach Rechts (3) um die nächste Aufnahme (optional) auszuwählen. Drücken Sie kurz die Taste Menü-Taste (2) nach Links (4) um die vorherige Aufnahme (optional) auszuwählen. • Lautstärke einstellen Drücken Sie die Vol+ Taste (5) um die Lautstärke zu erhöhen. Drücken Sie die Vol- Taste (6) um die Lautstärke zu verringern. • Einstellungsoptionen im Pause/Stop Modus (siehe Kapitel 7.3.8 auf Seite 38, 39 u.
Durch einen kurzen Druck auf die Menü-Taste (2) wird das gewählte Menü geöffnet und Sie befinden sich im Untermenü FM-Radio. Drücken Sie länger die Menü-Taste (2), so gelangen Sie wieder ins Hauptmenü zurück. Symbol für Untermenü FM-Radio (optional) Aktueller gespeicherter Sender MHz Anzeige Batterieanzeige Oberer MHz Bereich Unterer MHz-Bereich • Sender suchen Drücken Sie kurz die Taste Menü-Taste (2) nach Links oder Rechts (4 oder 3) um 0,1 MHz vor oder zurück zu springen.
• Gespeicherte Sender wechseln Durch Drücken der -Taste (1) können Sie die gespeicherten Sender wechseln. • Lautstärke einstellen´ Drücken Sie die Vol+ Taste (5) um die Lautstärke zu erhöhen. Drücken Sie die Vol- Taste (6) um die Lautstärke zu verringern. • Einstellungsoptionen im Untermenü FM-Radio (optional) Drücken Sie kurz die Menü-Taste (2) und Sie gelangen in das Ordnerverzeichnis von Untermenü Radio (siehe folgendes Bild).
Menü-Taste (2) nach Links oder Rechts (4 oder 3) ausgewählt und dann mit der Menü-Taste (2) bestätigt, so startet automatisch das Untermenü Aufnahme (optional). Durch kurzes Drücken der -Taste (1) wird die Aufnahme (optional) gestartet. Drücken Sie erneut kurz auf die -Taste (1) um die Aufnahme (optional) anzuhalten. Drücken Sie auf die -Taste (1) um mit der Aufnahme (optional) fortzufahren. Halten Sie die -Taste (1) für längere Zeit gedrückt um die Aufnahme (optional) zu beenden.
Wird diese Funktion ausgewählt, so kann im FM Bereich zwischen 87 und 108 MHz nach verfügbaren Sendern gesucht werden. 6. Japan Band Wird diese Funktion ausgewählt, so kann im Bereich zwischen 76 und 90 MHz nach verfügbaren Sendern gesucht werden. 8. Ausgang Wenn sie diese Option durch kurzes Drücken der Menü-Taste (2) auswählen, so gelangen Sie wieder ins Untermenü FM-Radio. 7.3.5. Untermenü System Hier können die Systemparameter eingestellt werden. Sämtliche Optionen hängen vom Firmware-Upgrade ab.
2. Durch Drücken der VOL+ Taste (5) können Sie zwischen den einzelnen Datums- und Uhrzeitfenstern wählen, die Anzeige blinkt dann. Durch kurzes Drücken der Menü-Taste (2) nach Links oder Rechts (4 oder 3) stellen Sie die Ziffern um. Durch kurzes Drücken der Menü-Taste (2) bestätigen Sie und gelangen wieder in das Ordnerverzeichnis vom Untermenü System. Rückseitige Lich Mit dieser Option können Sie einstellen wie lange die Hintergrundbeleuchtung nach dem letzten Tastendruck eingeschaltet bleiben soll.
4. Sprache Wählen Sie den Ordner Sprache durch Drücken der Menü-Taste (2) nach Links oder Rechts (4 oder 3) und bestätigen durch kurzes Drücken der Menü-Taste (2). Nun können Sie zwischen 18 verschiedenen Sprachen für die Menüsteuerung wählen. Durch kurzes Drücken der Menü-Taste (2) nach Links oder Rechts (4 oder 3) können Sie die gewünschte Sprache auswählen und durch kurzes Drücken der Menü-Taste (2) bestätigen. Danach gelangen Sie automatisch ins Ordnerverzeichnis vom Untermenü System. 5.
wird nach dem Einschalten deaktiviert. Die Zeit muss beim nächsten Mal erneut eingestellt werden. Wählen Sie Ausschalten durch Drücken der Menü-Taste (2) nach Links oder Rechts (4 oder 3) und bestätigen durch kurzes Drücken der Menü-Taste (2). Wählen Sie Energie Einspare durch Drücken der Menü-Taste (2) nach Links oder Rechts (4 oder 3) und bestätigen durch kurzes Drücken der Menü-Taste (2).
Durch langes Drücken der -Taste (1) können Sie den MP3 Player wieder aktivieren. 6. Anzeigen Modus Bei der manuellen Wiederholung im A-B-Wiederholungsmodus kann der Endpunkt B nur manuell eingestellt werden. Bei der automatischen Wiederholung im A-B-Wiederholungsmodus kann der Endpunkt B nur automatisch eingestellt werden. Wählen Sie Anzeigen Modus durch Drücken der Menü-Taste (2) nach Links oder Rechts (4 oder 3) und bestätigen durch kurzes Drücken der Menü-Taste (2).
Bei der Media Device Funktion können Sie den Player als MTP Laufwerk nutzen und DRM geschützte Musikdateien über den Windows Media Player auf den Player kopieren. Die Vorgehensweise wird unter Punkt 7.5 Nutzung von WMA-DRM Dateien auf Seite 44 näher beschrieben. Bei der USB Disk Funktion wird der MP3 Player als Wechseldatenträger am PC erkannt und es können Dateien über den Arbeitsplatz oder Explorer auf den Player kopiert werden. Kopieren von Daten auf den MP3 Player wird unter Punkt 7.4.
Wählen Sie Online Modus durch Drücken der Menü-Taste (2) nach Links oder Rechts (4 oder 3) und bestätigen durch kurzes Drücken der Menü-Taste (2). Wählen Sie Multi-Antrieb, Normal Nur oder Verschlüsselte durch Drücken der Menü-Taste (2) nach Links oder Rechts (4 oder 3) und bestätigen Sie Ihre Auswahl durch kurzes Drücken der Menü-Taste (2). Danach gelangen Sie automatisch ins Ordnerverzeichnis vom Untermenü System. 10.
Wählen Sie Mikroprogramm durch Drücken der Menü-Taste (2) nach Links oder Rechts (4 oder 3) und bestätigen durch kurzes Drücken der Menü-Taste (2). Durch kurzes Drücken der Menü-Taste (2) oder der -Taste (1) gelangen Sie wieder in das Ordnerverzeichnis vom Untermenü System. 12. Mikroprogramm 2 (=Firmware Upgrade) Bevor Sie ein neues Update auf den Player spielen, müssen Sie diese Option aktivieren.
Links oder Rechts (4 oder 3) und bestätigen durch kurzes Drücken der Menü-Taste (2). Durch Drücken der VOL+ Taste (5) können Sie zwischen den einzelnen Datums- und Uhrzeitfenstern wählen, die Anzeige blinkt dann. Durch kurzes Drücken der Menü-Taste (2) nach Links oder Rechts (4 oder 3) stellen Sie die Ziffern um. Drücken Sie kurz die Menü-Taste (2), es wird kurz am Bildschirm „DRM affect Play Rigths“ angezeigt, danach werden Sie gefragt ob Sie die Zeit wirklich umstellen wollen.
Drücken Sie länger die Menü-Taste (2), oder kurz die -Taste (1), so gelangen Sie wieder ins Hauptmenü zurück. Drücken Sie kurz die Menü-Taste (2) nach Links oder Rechts (4 oder 3) und Sie können zwischen den 4 Auswahlmöglichkeiten Browse Tel, Import Tel, Export Tel, oder Ausgang wählen. Bestätigen Sie mit einem kurzen Druck auf die Menü-Taste (2) und Sie gelangen in den ausgewählten Ordner. 1.
Links oder Rechts (4 oder 3) und bestätigen durch kurzes Drücken der Menü-Taste (2), so gelangen Sie wieder ins Hauptmenü. 7.3.7. Untermenü E-Book Wählen Sie im Hauptmenü mit den Tasten Menü-Taste (2) nach Links oder Rechts (4 oder 3) das Untermenü E-Book aus. Durch einen kurzen Druck auf die Menü-Taste (2) wird das gewählte Menü geöffnet und Sie befinden sich im Ordnerverzeichnis von Untermenü E-Book (siehe folgendes Bild).
Befinden sich Text-Dateien im zuvor ausgewählten Ordner, so können Sie diese durch Drücken der Menü-Taste (2) nach Links oder Rechts (4 oder 3) eine dieser Dateien auswählen und durch kurzes Drücken der Menü-Taste (2) bestätigen. Danach gelangen Sie wieder ins Untermenü E-Book. Sollte keine Text-Datei in diesem Ordner vorhanden sein, so wird „Long Put Mode keine Akten“ am Bildschirm angezeigt. Drücken Sie in diesem Fall länger die Menü-Taste (2) oder die -Taste (1) und Sie gelangen ins Hauptmenü zurück.
Drücken Sie kurz die Menü-Taste (2) nach Links oder Rechts (4 oder 3) und Sie können zwischen den 4 Auswahlmöglichkeiten Lokale Heft, Löschen, Löschen Alle oder Ausgang wählen. Bestätigen Sie mit einem kurzen Druck auf die Menü-Taste (2) und Sie gelangen in den ausgewählten Ordner. Durch langes Drücken der Menü-Taste (2) gelangen Sie wieder ins Hauptmenü zurück.
6. • Befindet sich eine Datei in einem Ordner, so wird diese angezeigt, Sie können die Datei durch Drücken der Menü-Taste (2) nach Links oder Rechts (4 oder 3) auswählen und durch kurzes Drücken der Menü-Taste (2) bestätigen. Somit gelangen Sie automatisch wieder ins Untermenü, es wird die Datei angezeigt und durch Drücken der -Taste (1) wird die Datei abgespielt. Löschen Dateien können in den entsprechenden Menüs, z.B. Untermenü Musik und Untermenü Sprache gelöscht werden.
• 3. Durch Drücken der Menü-Taste (2) nach Links oder Rechts (4 oder 3) können Sei zwischen „JA“ und „NEIN“ umschalten. 4. Haben Sie „JA“ ausgewählt, dann werden durch kurzes Drücken der Menü-Taste (2) alle Dateien im aktuellen Untermenü und aktuellen Ordner (z.B. im Untermenü Musik löscht Löschen Alle alle Musikdateien im aktuellen Ordner, während Aufnahme (optional)dateien unverändert bleiben) gelöscht.
Wechseldatenträger erkannt (siehe Bild nebenan). Sie haben nun die Möglichkeit sofort Videos und Bilder anzusehen, oder die Ordner auf dem internen Speicher anzeigen zu lassen. Über diese Funktion stehen Ihnen alle Möglichkeiten offen um Daten, wie im Betriebsystem gewohnt, zu transferieren oder Ordner zu erstellen.
7.4.1 Kopieren von Dateien und Erstellen von Ordnern in Windows XP 1. Schließen Sie das Gerät zunächst mit dem USB-Kabel an den Computer an. Auf dem Display wird die Verbindung zum PC angezeigt. Verwenden Sie den Windows Explorer oder doppelklicken Sie auf den Arbeitsplatz, danach bitte wie folgt vorgehen: 2. Öffnen Sie den Ordner indem sich die zu kopierenden Dateien /Ordner befinden aus. 3. Wählen Sie eine oder mehrere Musik-Dateien/-Ordner, die Sie auf den Player aufspielen wollen, mit der Maus aus. 4.
Es werden die Suchergebnisse angezeigt und wählen Sie das passende Ergebnis durch einen Klick mit der linken Maustaste aus. Es werden auf der rechten Seite die Arbeitsschritte um Dateien zu kopieren und Ordner zu erstellen beschrieben. Der Player spielt die Dateien in alphabetischer Reihenfolge ab. Um eine gewünschte Reihenfolge zu erreichen, können Sie vor dem Dateinamen eine Nummer eintragen z.B. „01“-„99“. Die Dateien werden dann nach der Ziffernreihenfolge abgespielt. 7.5.
Bild 1 Nachdem der cmx® MP3 808 korrekt installiert wurde (kann man im Arbeitsplatz erkennen, Bild 2) erscheint eine Hinweisbox im Windows (Bild 3). Anmerkung: Das Bild (Icon) des MTP Player kann sich in der Darstellung je nach Windows Version ändern.
Bild 3 In der Hinweisbox (Bild 3) klicken Sie auf “Abbrechen“ oder „Keine Aktion durchführen“. Öffnen Sie danach den Windows Media Player Version 10 oder höher (Bild 4, WMP Version 11). Anmerkung: Die Darstellung kann je nach Version anders aussehen. Bild 4 Rechts oben (Bild 4) wird der cmx® MP3 808 automatisch als MTP Player erkannt. Die verbleibende Speicherkapazität in Megabyte (MB) wird ebenfalls angegeben.
Klicken Sie rechts oben mit der linken Maustaste auf das Register „Synchronisieren“ (Bild 4). Hiermit erhalten Sie nun im Hauptteil des WMP eine Liste mit allen Ihren verfügbaren Multimedia-Dateien.
Bild 6 Jetzt sind Dateien zum Synchronisieren bereit gestellt und können mit Klick auf „Synchronisierung starten‘‘ (Bild 6) auf den cmx® MP3 808 kopiert werden. Der Fortschritt des Kopiervorganges wird in einer Prozentanzeige dargestellt (Bild 7). Bild 7 Wenn der Kopiervorgang beendet ist (Bild 8), können Sie den cmx® MP3 808 vom PC Musikstücke mit dem cmx® MP3 808 abspielen.
Bild 8 Beim ersten Einschalten vom cmx® MP3 808 nach dem Kopiervorgang, kann es ca. 10 Sekunden dauern bis Sie das Hauptmenü steuern und Musikstücke abspielen können. Anmerkung: Der oben beschriebene Vorgang kann auch für ‘‘normale, ungeschützte’’ Dateien verwendet werden. Weitere Informationen finden Sie über die Hilfefunktion vom Windows Media Player. 8. Installation der Programme von der Mini CD Auf der MiniCD befindet sich die notwendige Software um 1.) 2.) 3.) 4.) 5.
Es besteht natürlich auch die Möglichkeit die Software auf der CD über den Arbeitsplatz oder den Explorer zu installieren. In den folgenden Punkten werden die Installation und Funktion der wichtigsten Programme näher beschrieben. Klicken Sie mit der Linken Maustaste auf die Schaltfläche „Actions“, dann klicken Sie mit der linken Maustaste auf die Schaltfläche „AMV Convert 4.13“. Das Setup wird gestartet.
Ein Fenster wird geöffnet und Sie können auf „weiter“ klicken. Bitte geben Sie den Pfad ein in welchen Ordner das Programm installiert werden soll. Klicken Sie auf solange auf die Schaltfläche „Weiter“ bis die Installation der Software durchgeführt wird. Nach diesem Vorgang stehen Ihnen auf der Festplatte Ihres PCs unter dem von Ihnen angegebenen Pfad folgende Programme zur Verfügung: 8.1.
MP3 Player Utilities 4.13\ RDiskUtility auf Ihrem PC. 3. Unter dem Register Format besteht die Möglichkeit die Laufwerke des internen Speicher des Players zu formatieren. Klicken Sie auf „Partition and encrypt" und geben Sie die gewünschte Größe der verschlüsselten Partition ein (setting encrypted disk capacity). Klicken Sie auf das leere Feld neben „Set username and passwort“. Die darunter stehenden Felder werden aktiviert und es ist ein Häkchen zu sehen.
6. Nachdem Sie auf „JA“ geklickt haben, beginnt die Partitionierung. 7. Die Partitionierung endet mit dem Hinweis: 8. 9. Klicken Sie auf „OK“. Ist der Player per USB am PC angeschlossen, so erscheint am PC das Laufwerk (Normal nur, Verschlüsselte) b.z.w. die Laufwerke (Multi Antrieb) je nach Einstellung am Player.
10. Bei der Einstellung „Multi Antrieb“ und „Verschlüsselte“ müssen Sie, bevor Daten sichtbar werden auf die Datei RdiskDecrypt klicken. Im Dialogfeld tragen Sie den richtigen Benutzernamen und das Passwort ein. Danach stehen Ihnen wieder alle Möglichkeiten offen Daten zu kopieren und zu löschen. Am Player selbst ist das verschlüsselte Laufwerk und die darin enthaltenen Daten nicht mehr zu sehen. 8.2.
3. Wählen Sie die neue Firmware Datei (wenn es eine neue gibt, sie können diese auf unserer Webseite herunterladen) unter „Select new firmware file“ aus. 4.
5. Nach erfolgreichem Upgrade führt das Gerät ein Reset durch. 6. Klicken Sie auf die Schaltfläche „Close“ um das Programm zu beenden. Warnung: Mit dem Firmware-Upgrade verbessern Sie die Leistung Ihres Players. Auch wenn Ihr Gerät ohne Upgrade funktioniert, hat dies keinen Einfluss auf den normalen Betrieb. • Ein fehlerhaftes Firmware-Upgrade kann zu Störungen am Gerät führen. Bitte lesen Sie das Handbuch vor Gebrauch sorgfältig durch.
… mi=Minuten, se=Sekunden wann der Text am Bildschirm erscheint Damit ist die Datei fertig erstellt ... Aussehen würde das z.B. so: [ar:Dido] [ti:White Flag] [la:uk] [by:xxxx] [0:00] [0:34.20] I know you think that I shouldn't still love you [0:39.73] I'll tell you that [0:44.75] But if I didn't say it [0:48.12] Well, I'd still have felt it [0:51.32] Where's the sense in that? [0:54.33] [0:55.72] I promise I'm not trying to make your life harder [1:02.06] Or return to where we were [1:04.88] [1:08.
[2:49.82] Well I will go down with this ship [2:54.18] And I won't put my hands up and surrender [2:59.79] There will be no white flag above my door [3:05.42] I'm in love and always will be [3:11.10] [3:12.13] Well I will go down with this ship [3:16.74] And I won't put my hands up and surrender [3:22.08] There will be no white flag above my door [3:27.95] I'm in love and always will be [3:33.96] [3:34.68] I will go down with this ship [3:39.07] And I won't put my hands up and surrender [3:44.
möglicherweise beschädigt sind. Schlechter Radioempfang Verändern Sie die Lage von Kopf-/Ohrhörer da dieser als Antenne dient. Schalten Sie andere Elektrogeräte in der Nähe des Players ab. Wie spiele ich Musik auf den MP3-Player? 8. Schließen Sie das Gerät zunächst mit dem USB-Kabel an den Computer. Auf dem Display wird die Verbindung zum PC angezeigt. Verwenden Sie den Windows Explorer, danach bitte wie folgt vorgehen: 9.
Es kommt sehr stark auf die Qualität der Musikstücke an. Wenn die Musikstücke in sehr hoher Qualität aufgenommen sind, muss der Prozessor mehr Rechenarbeit leisten. Das bedeutet, dass er mehr Strom benötigt. Ein weiterer Punkt ist das Format der Musikstücke. MP3-Lieder benötigen fast doppelt soviel Leistung (Strom) wie WMA-Musikstücke. Tipp: Wenn möglich, spielt man nur WMA-Musikstücke (max. 192KBps) ab.