
User's Manual
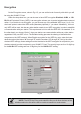

4.Set the startup type to “Boot” and click “OK”.
5. Click “Close” on the “Device” window.
In order to let the operating system know about your new card, you must enable the Network
support by following the next steps:
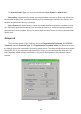
1. Click Start XSettingsXControl Panel.
2. Double click the “Network” icon.
3. In the “Network Settings” window you will be prompted to install Windows NT Networking in
case no network has been installed yet. Click “Yes” and follow the instruction on the screen. If
networking had been already installed, you will see a dialog with several tabs. In the “Adapters” tab
click the “Add” button. Windows NT Networking Setup will determine the type of network adapter
card that you are going to use.
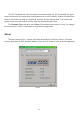
4. When prompted to select a driver, locate the driver provided with your Firmware, Driver, and
Software Tools CD.
5. During the installation, a dialog box appears asking for the I/O base and IRQ resource
information. In order to find out which values to use, go to Start XProgramsXAdministrative Tools
XWindows NT DiagnosticsXselect the “Resources” tab Xpress the “IRQ” button. Select one free
IRQ from the list. Next, press the button “I/O Port” and choose an 0x20 free I/O space. Add these
values into the dialog box. If at any point after the installation you want to change these values, go to
the Control PanelXNetwork, select the Adapters tab, press the Properties button, and fill in the new
values.
6. Next Windows will start copying the files. In case there is a version conflict between one or
more of the files being copied and files in your system, you should normally keep the latest version.
7. Finally, when the installation has been completed, you will need to restart your computer.
NOTE: If the card is not working properly, after a restart procedure, you
should make sure that your system has free resources ever it may shows them
as being available.
33
33
3
Configuration / Uninstall
In order to configure the card, please use the Configuration and Monitor Utility described in a
different section of this document. This application lies on the system tray of your machine, as long
as the card is inserted into your system, and permits you to change the parameters of the card “on
the fly”.
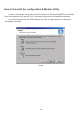
To uninstall the WLAN adapter from Windows NT 4.0. you must double click on the “Network”
option in the “Control Panel” (Start XSettingsXControl Panel). Select the “OEM 11 Mbps WLAN PC-
Card (3.3V)” card from the list and press the “Remove” button.
20