
User's Manual

21
Chapter 6: Installation Procedure Under
Windows XP
About Windows XP
Use the procedures described in this section to install and configure the WLAN adapter under
MS Windows XP
Throughout this section it is assumed that you have a basic working knowledge of WinXP.
However, in this paragraph, some specific feature of WinXP are briefly explained.
WinXP operating system supports the “Plug & Play” feature. That means that once you insert
the WLAN adapter into your PC for the very first time, the operating system will detect the card and
automatically install the driver.
Furthermore WinXP supports “Hot Swapping”. with this feature, you can remove and reinsert
the card whenever you want.
Installing the Driver
1. Insert the Software Tools CD into your CD-ROM driver.
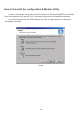
2. When the “New Hardware Wizard” is opened, select the “install from a list or specific
location (Advanced)” option and press “Next”
3. As soon as the “Include this location in the search” option appears you provide the
appropriate path for the WinXP Driver folder in the CD-ROM (Driver XOEM_PCMCIA
XWinXP).
4. Upon completion of the Hardware Installation, you can safely press the “Continue Anyway”
button and then “Finish”.
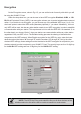
Configuration Under WinXP
In order to configure the card, please use the WinXP build-in Application.
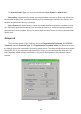
Uninstall Procedure Under WinXP
In order to uninstall the WLAN adapter from WinXP, you must right click on the “Properties”
option under “My computer” icon. Then, under the “Hardware” tab, select the “Device Manager” and
expand the “Network Adapters”. After you right click on the “OEM 11 Mbps WLAN PC-Card” option,
press “Uninstall”. Finally, on the “Confirm Device Removal” window, select “OK”.