CUA-854/854L Wireless-G Long Range USB Adapter with Antenna User’s Guide
Table of Contents Chapter 1. Introduction....................................................................................5 1.1. 1.2. 1.3. About CUA-854 ..................................................................................................5 Key Features......................................................................................................5 Package Included...............................................................................................5 Chapter 2. Chapter 3.
List of Figures Figure 2-1 connect antenna with SMA connector ....................................................................6 Figure 3-1 AutoPlay Menu.........................................................................................................7 Figure 3-2 Setup: License Agreement ......................................................................................7 Figure 3-3 Setup: Choose Configuration ...................... 錯誤! 錯誤 尚未定義書籤。 尚未定義書籤。 Figure 3-4 Setup: Setup Status .........
List of Figures Table 4-1 Profile....................................................................................................................... 17 Table 4-2 Configuration........................................................................................................... 19 Table 4-3 Authentication: Open or Shared ............................................................................. 21 Table 4-4 Authentication: LEAP .....................................................................
Chapter 1. Introduction 1.1. About CUA-854 Once installed and connected, you can keep in touch with friends and work through e-mail, instant messaging and chat rooms as well as sharing files and other network resources such as printers and network storage with other computers. The CUA-854 follows IEEE 802.11g wireless standard works at the speed of 54Mbps and for added versatility; it also interoperates with all Wireless-B (IEEE 802.
Chapter 2.
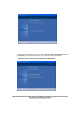
Chapter 3. Installing Driver, Configuration Utility and Hardware 3.1. Driver Installation for Windows 98SE/ME/2000/2003/XP Before installing your long range Wireless-G USB Adapter, insert the Auto-Install CD into your CD-ROM drive. Unless you have disabled the auto-run feature of Windows, the AutoPlay Menu should appear automatically. If not, you can manually access the installation by clicking the Start button and choosing Run. In the drop-down box type D:\ AUTORUN.
- The driver will be installed to your computer. The Setup Status screen will be displayed. Figure 3-3 Setup: Setup Status - - During the installation, there will pops up a plug-in message screen. Please insert the Wireless-G USB Adapter into the USB port at this moment. Figure 3-4 Setup: plug-in message In Windows XP and 2000, click Finish to complete the installation.
- In Windows 98SE and ME, please select Yes, I want to restart my computer now and click Finish to complete the installation. The system will restart automatically. Figure 3-6 Setup: Click Finish to Complete (for WIN98 / ME) Note: In Windows ME and 98SE, after the installation is completed, Windows will ask to restart the computer, just click Yes to restart.
3.2. Driver Installation for Windows Vista Before installing your Long Range Wireless-G USB Adapter, insert the Auto-Install CD into your CD-ROM drive. - There will be a Vista AutoPlay Confirm Window. Click Run AUTORUN.EXE icon. Figure 3-7 AutoPlay Confirm Window (Vista) - Click on CUA-854 to install driver/utility for your Wireless-G USB Adapter. Figure 3-8 AutoPlay Menu (Vista) - After reading through the License Agreement, please click Yes to continue.
- The driver will be installed to your computer. The Setup Status screen will be displayed. Figure 3-10 Setup: Setup Status (Vista) - There will be a plug-in message screen. Please insert the Wireless-G USB Adapter into the USB port now.
- Click Ask me again later when the Found New Hardware window appears. Figure 3-12 Setup: Found New Hardware (Vista) - Click Finish to complete the installation.
Chapter 4. Using the Configuration Utility for 98SE/ME/2000/2003/XP 4.1. Overview The wireless Configuration Utility can be used to check link information, search for available wireless networks, or to create profiles that hold different configuration settings. 4.2. Access the Configuration Utility The Configuration Utility icon will appear in your system tray. Double-click the icon.
B. The Computer Management window comes up. Select Services from the Services and Applications menu. Scroll down to locate Wireless Zero Configuration service. Figure 4-3 Wireless Zero Configuration: Select Wireless Zero Configuration C. Double Click on Wireless Zero Configuration to go into its properties. For Startup type, choose Disable to disable the Wireless Zero Configuration then click Apply and OK to make the changes effective.
4.3. Getting to Know the Utility 4.3.1. Profile The Profile can keep your favorite wireless settings among your home, office and other public hotspots. You may save multiple profiles and activate the correct one at your preference.
Table 4-1 Profile LABEL DESCRIPTION Profile Name Connection profile name. There is a connection icon standing for the connection status, : Indicate connection is successful on currently activated profile. : Indicate connection fails on currently activated profile. SSID Wireless station or ad-hoc name. Channel Channel in use for this wireless connection. Authentication The Authentication method used for this profile. Encryption The Encryption type used for this profile.
4.3.1.1. Create a New Profile Click the Add button on the Profile screen to create a new profile. (A) Add Profile: Configuration Fill the Profile Name and SSID for this new profile.
Table 4-2 Configuration LABEL DESCRIPTION Profile Name Enter the profile name that you want. SSID User can key in the intended SSID name or use pull down menu to select from available wireless network. PSM CAM (Constantly Awake Mode) – the wireless Adapter will stay full power when AC power cord is plugged into power outlet. PSM (Power Saving Mode) – the wireless Adapter will enter the power saving mode. Network Type There are two wireless modes.
(B) Add Profile: Authentication and Security Enter the authentication and security information here.
Table 4-3 Authentication: Open or Shared LABEL DESCRIPTION Authentication Type Under Open System authentication, any wireless station can request authentication. Under Shared Key authentication, each wireless station is assumed to have received a secret shared key over a secure channel that is independent from the 802.11 wireless network communications channel. To use Shared Key authentication, you must have a network key. Encryption Select None or WEP WEP Key#1 ..
Figure 4-8 Add Profile: Authentication and Security: LEAP Table 4-4 Authentication: LEAP LABEL DESCRIPTION Authentication Type Light Extensible Authentication Protocol. It is an EAP authentication type used primarily in Cisco Aironet WLANs. It encrypts data transmissions using dynamically generated WEP keys, and supports mutual authentication. Identity Enter identity for the LEAP authentication service Password Enter password for the LEAP authentication service.
Figure 4-9 Add Profile: Authentication and Security: WPA/ WPA-PSK/ WPA2/ WPA-PSK Table 4-5 Authentication: WPA/ WPA-PSK/ WPA2/ WPA-PSK LABEL DESCRIPTION Authentication Type Select WPA, WPA-PSK, WPA2 or WPA-PSK Encryption Specify an encryption method to use. Select TKIP (Temporal Key Integrity Protocol) that uses a stronger encryption algorithm and protects against hackers with MIC (Message Integrity Check). Select AES (Advanced Encryption System) that uses symmetric 128-bit block data encryption.
(C) Add Profile: 802.1x IEEE 802.1x supports true authentication and user control. Figure 4-10 Add Profile: Authentication and Security: 802.
Table 4-6 Authentication: 802.1x Setting: Ceritication LABEL DESCRIPTION Authentication Type PEAP: Protected Extensible Authentication Protocol. PEAP transports authentication data by using tunneling between PEAP clients and an authentication server. PEAP can authenticate wireless LAN clients using only server-side certificates, thus simplifying the implementation and administration of a secure wireless LAN.
Figure 4-11 Add Profile: Authentication and Security: 802.1x Setting: CA Server Table 4-7 Authentication: 802.1x Setting: CA Server LABEL DESCRIPTION Use certificate chain Enable the certificate feature Certificate issuer Choose to use server that is the issuer of certificates. Allow intermidiate certificates It must be in the server certificate chain between the server certificate and the server specified in the certificate issuer field. Server name Enter the authentication server’s name.
4.3.2. Link Status The Link Status provides the link information of the Wireless-G USB Adapter with Atenna. Figure 4-12 Utility - Link Status Table 4-8 Link Status LABEL DESCRIPTION Status Displays current connection status. If no connection, it will show Disconnected. Otherwise, the SSID and BSSID will show here. Displays link status and current channel in use.
4.3.3. Site Survey The site survey page displays a list of all Infrastructure and Ad-hoc wireless networks available for connection.
Table 4-9 Site Survey LABEL DESCRIPTION SSID Service Set ID of the Wireless Network. BSSID Basic Service Set ID of the Wireless Network. Signal Signal Strength status. Channel The channel used by Wireless Network. Encryption Encryption type. Authentication Authentication type used. Network Type Wireless Network mode. (Infrastructure mode or Ad-hoc mode) Rescan Click Rescan to re-search for wireless networks. Connect Select one of the networks on the list, and click the Connect button.
4.3.4. Statistics The Statistics screen provides information about the Transmit and Receive Statistics. You can reset counters if you need, otherwise click OK. Figure 4-14 Utility – Statistics Table 4-10 Statistics LABEL DESCRIPTION Transmit Statistics Displays current transmit frame information Receive Statistics Displays current receive frame information. Reset Counter Resets all counter to zero.
4.3.5. Advanced The Advanced screen shows settings for Wireless Mode, Ad-hoc wireless mode,……… Table 4-11 Advanced LABEL DESCRIPTION Wireless mode 802.11 B only: allows to connect to the 802.11b wireless stations only. 802.11 B/G mix: allows to connect to the 802.11b or 802.11g wireless stations. When the network type is in Ad Hoc mode that the wireless adapter can only work in 802.11b data rate. It is defined by Wi-Fi organization.
4.3.6. About The About screen shows release dates as well as driver/utility versions and the MAC/IP address of the wireless adapter.
Chapter 5. Troubleshooting 1. I cannot connect to the configuration utility. • Make sure the wireless adapter is inserted properly. • Make sure you have installed the correct driver and utility version for your wireless adapter. 2. I cannot connect to a wireless network. • Make sure the wireless router or AP is within range. Move your computer closer to the wireless router. • Make sure that you have set the wireless network settings correctly. For example, the SSID and security settings.
5.1. Europe – EU Declaration of Conformity This device complies with the essential requirements of the R&TTE Directive 1999/5/EC.
Federal Communication Commission Interference Statement This equipment has been tested and found to comply with the limits for a Class B digital device, pursuant to Part 15 of the FCC Rules. These limits are designed to provide reasonable protection against harmful interference in a residential installation. This equipment generates, uses and can radiate radio frequency energy and, if not installed and used in accordance with the instructions, may cause harmful interference to radio communications.