Coastal Industries Inc. FAX NO. (904) 641-1697 P.O BOX 16091 JACKSONVILLE FLORIDA 32246 TELEPHONE NO.
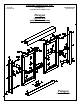
PARTS LIST K EY PART LE TTE R NUMBER A 620 HEADER DESCRIPTION QUANTITY 1 B 651 SILL 1 C 643 WALL JAMB 2 D ---- DOOR PANEL ASSEMBLY 2 FINGER PULL, TOWEL BAR 2 TOWEL BAR W/ NO FINGER PULL SCREW 2 E 8156 F 832MSPHP G C P 22 H 21 I PN193 J 832HEX K 832114 TOWEL BAR BRACKETS 4 TOWEL BAR 2 ROLLER (attached) 4 ROLLER SCREWS (attached) 4 TOWEL BAR W/ FINGER PULL SCREW 2 L 8112 INSTALLATION SCREWS 5 M 1329 PLASTIC SCREW ANCHOR 6 N 5169 BUMPER 2 P CP1111
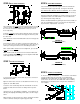
BEFORE STARTING STEP 4 Secure Wall Jambs Please check the box contents against the parts list. Make sure that all material is accounted for before starting unit installation. STEP 1 Measure base opening & cut Sill Reposition Wall Jambs as before and secure to shower walls using five (5) #8 x 1-1/2" Installation Screws (L), see exploded view - sheet 1. Measure the base opening along center of shower curb as shown in figure 1, then trim Sill (B) to measurement obtained.
STEP 6 STEP 8 Towel Bar Installation Door Panel Installation Close Door Panels (inside Panel against shower head wall and outside Panel against opposite wall). See figures 7A and 7B. Note that both inner Brackets must be installed first. Do so at this time and secure to Panels with a #832 x 3/4" Towel Bar Screw (F). Now finish Towel Bar installation for each Door Panel as shown in exploded view and secure with a #832 x 1-1/4 Towel Bar Screw (K). Don't forget the Finger Pulls (E).