
Installation Guide


4
STEP 8 Towel Bar Installation
STEP 9 Leak Proof Installation
To insure a leak proof installation . . . Run a bead of clear mildew
resistant caulking down the full length of each Wall Jamb
outside where the Wall Jambs meet the walls. Now caulk the
crevise where the sill meets either Wall Jamb. Follow caulking
manufacturer's instructions before using shower. Installation is
now complete.
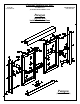
STEP 6 Door Panel Installation
Take what will be the inside Panel and stand it inside the shower
enclosure (make sure the Rollers are facing toward the inside of
the enclosure as shown in exploded view - sheet 1). Leave it
there temporarily.
Install the outside Door Panel (D) by Lifting the Panel up and into
the Header (A). Lower the Panel and engage the Rollers (I) with
the roller track.
Slide outside Door Panel into Wall Jamb located on wall opposite
of shower head.
Check Panel to make sure that it is parallel to the Wall Jamb. If
it is not, remove the Door Panel and adjust the rollers either up or
down by loosening the Roller Screws and sliding the Rollers.
When satisfied with outside Door Panel alignment, proceed with
inside Door Panel installation.
When installed, slide the inside Door Panel into the Wall Jamb
located on shower head wall and check for alignment with Wall
Jamb. Adjust Rollers as necessary.
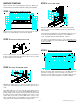
FIGURE 7A
(SHOWER HEAD ON LEFT)
FIGURE 7B
(SHOWER HEAD ON RIGHT)
Close Door Panels (inside Panel against shower head wall and
outside Panel against opposite wall). See figures 7A and 7B.
Note that both inner Brackets must be installed first. Do so at this
time and secure to Panels with a #832 x 3/4" Towel Bar Screw (F).
Now finish Towel Bar installation for each Door Panel as shown in
exploded view and secure with a #832 x 1-1/4 Towel Bar Screw
(K). Don't forget the Finger Pulls (E).
Finish Towel Bar installation by pealing the back off the metallic CI
logo (V) and installing it over the screw head on the Finger Pulls
(E) as shown in exploded view - front sheet.
STEP 7 Screw on Track Guide
To insure proper operation, Track Guide (P) must be centered on
Sill (B) when installed.
Open the shower door enclosure so that both Door Panels are up
against the same Wall Jamb.
Locate the center of Sill and position the Track Guide on the Sill,
making sure that the Door Panels are riding in their respective
tracks.
Using the holes on Track Guide as templates, secure Guide to the
Sill using two 638phpt Self Drilling Screws (W) as shown in figure
above.
When finished, closed Door Panels as before (inside panel toward
shower head wall, outside panel against opposite wall).