
Installation Guide

3
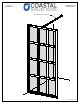
(GS) SHOWER SCREEN 02-09-2016
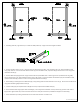
1. According with left / right selection, trim both CST 900 profiles 1/2” longer than Panel height and width.
2. Position Sill (B) on center of curb. Using the Sill’s pre-drilled holes as guides, mark and drill three 1-1/2” deep installation holes
using a 1/8” drill bit. Insert three Plastic Screw Anchors (D) into installation holes, reposition Sill (B) and secure it to curb using three
Installation Screws (E).
3. Position Wall Jamb (A) against wall. Align mitered ends then plumb Wall Jamb. Now using the Sill’s pre-drilled holes as guides,
mark and drill three 1-1/2” deep installation holes using a 1/8” drill bit. Insert three Plastic Screw Anchors (D) into installation holes,
reposition Wall Jamb (A) and secure it to curb using three Installation Screws (E).
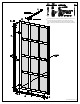
4. Place Panel (C) into Sill (B) and into Wall Jamb (A), firmly pushing Panel into Wall Jamb as far as it will go. Secure Panel to Wall Jamb
using three Self Drilling Adjustment Screws (F).
5. Install End Caps (G) into exposed ends of Sill (B) and at top of exposed end of Wall Jamb (A).
6. Secure Panel to Wall using Support Arm Assembly (H). Insert Support Arm Stabilizer into top of Panel (C), position other end of
Support Arm against back wall, mark its location and secure to wall (see instructions provided with Support Arm Assembly).
7. Finish Installation by caulking outside where unit meets wall and were unit meets curb.