
Instructions / Assembly

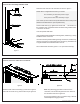
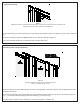
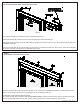
Table Of Contents

3
Legend Inline (hinged) 05-12-2015
Determine and mark the curb centerline as shown in figure 1.
Decide which configuration best suits your needs
door assembly on left / inline panel on right
OR
inline panel on left / door assembly on right
Your choice (of door location above) will determine which wall you will
attach the 404 Wall Jamb to (see exploded view).
Position Wall Jamb (A) up against the shower wall . . . and center it on
the centerline mark. Adjustment holes should be facing toward interior
of enclosure as shown.
Level and plumb Wall Jamb.
Using the Wall Jamb's installation holes as guides, drill three (3) 1" deep
installation holes on the wall.
Use a 3/16" masonry bit when drilling through ceramic tile, marble or any
masonry type surface. Insert Plastic Screw Anchors (F). Otherwise use
a regular 1/8 drill bit and discard Plastic Anchors.
Secure Wall Jamb with three (3) #8 x 1-1/2" pan head screws (E).
figure 1
STEP 1
Position Door Assembly Side Wall Jamb
figure 2
figure 2a
STEP 2
Position and secure CHSL-KIT on curb base
Measure width of Door Assembly (C) as shown in figure 2
and mark the CHSL-KIT (J) hole location as per figure 2a.
Note: Vinyl Bushing (j2) IS NOT centered on the
centerline, but is located tangent and to the outside of
the centerline as shown in figure 2a.
Secure Nylon Bushing (j2) to curb base using a #6 Flat
Head Phillips Screw (j1) provided.