
Installation Guide

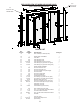


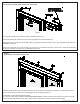

Table Of Contents

5
Legend Inline (hinged) 05-12-2015
Door Frame Assembly (C) should be pushed up against Wall Jamb (A).
Inline Panel Assebly (B) should in turn be pushed up against Door Frame Assembly (C).
Step inside shower enclosure and push Wall Jamb (D) up against the shower wall as shown. Secure Wall Jamb (D) with three
Installation Screws (E).
Next, secure Wall Jamb (A) to Door Assembly (C) using three (3) Adjustment Screws (G). Now, secure Inline Panel Assembly
(B) to Door Assembly (C) using three (3) Adjustment Screws (G).
figure 5
STEP 5
Insert Inline Panel Wall Jamb and Position Inline Panel
figure 6
Measure opening width at top of unit and trim Header (H) to 1/16 less then measurement obtained. Position Header (H) into
place as shown in figure and secure to unit utilizing three (3) self drilling screws (G).
TO ENSURE A LEAK PROOF INSTALLATION:
Run a bead of clear mildew resistant caulking around the outside of shower enclosure where shower unit meets the shower
base and where Wall Jambs meet the wall. Follow caulking manufacturer's instructions before using shower.
STEP 6
Install Header and Caulk outside of Unit.