
Installation Guide


3
Legend Neo 03-20-2012
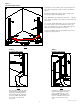
STEP 1
Positioning Wall Jambs
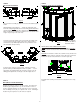
STEP 2
Installing Wall Jambs
Fig. 1
Fig. 2
Reposition Wall Jambs (A) against
shower walls. Re-align the Wall
Jamb holes with the installation
holes drilled in the shower walls.
Secure each Wall Jamb (A) with
three (3) #8 x 3/4" pan head
screws (F).
Lift Side Panel (B) onto base ledge
and slide Panel Expander Jamb
(b2) over Wall Jamb (A). Insure
that Expander Jamb adjustment
holes are toward the interior of the
shower. Repeat step for other
side.
Fig. 3
Determine the curb centerline, then offset and mark a line
3/8 of an inch toward the outside of shower as shown in
figure 1.
Separate the Wall Jambs (A) from their respective End
Panels (B) as shown in exploded view.
Place Wall Jambs (A) up against shower walls . . . aligning
their outside legs with the offset mark previously marked on
base ledge.
Use a level to plumb Wall Jambs (A). Then using a felt tip
pen, make a mark on the shower walls thru each of the
three (3) installation holes. Remove Wall Jambs (A) and
lightly center punch installation hole locations.
Using a 1/8" drill bit, drill 1" deep installation holes in the
locations previously marked.
STEP 3
Installing Side Panels