
Installation Guide


4
STEP 4
Door Frame Installation
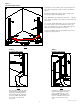
Center shower enclosure on base ledge. Using the Panel Ex-
pander Jamb's pre-drilled adjustment holes as guides . . . fasten
Side Panels (B) to Wall Jambs (A) using three (3) #8 x 1/2" self
drilling panel adjustment screws (G) as shown in figure above.
Place the Door Assembly (C) between the Panel Assemblies (B) as
shown.
Starting with the pivot side first . . . engage the full length of the
Panel Assembly
tongue with the Door Assembly groove channel as
shown in figure 5a. Snap the Door and Panel assemblies together.
Make sure that Door and Panel assemblies are secured their entire
length. Repeat step for the other side.
Secure the Panel Assemblies to the Door Frame Assembly using
one pan head screw (G) at strike side and one at pivot side as
shown below (a pre-drilled adjustment hole is provided for each
side to facilitate this procedure).
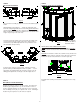
STEP 6
Caulk for a leak proof installation
Fig. 5b
Fig. 5a
Fig. 6
TO INSURE A LEAK PROOF INSTALLATION:
* First: Run a bead of clear mildew resistant caulking around the
outside of shower enclosure where shower unit meets the shower
base.
Second: from inside the shower unit, caulk the six (6) circled areas
indicated in figure 6 above (caulk the crevise where the horizontal
member meets the vertical member as shown in figure 6b).
Carefully follow caulking manufacturer's instructions before using
shower.
STEP 5
Bend, Brace and Install Header
Bend the Header into shape as shown in step 6. Now brace the
Header by pressing the braces (J) onto the header corners as
shown. Install the Header over the unit and secure to unit using
four self drilling screws (G), see explode view - sht 2. Trimming of
Header may be required, if so, trim ends as required.
CAULK ALL AROUND
WHERE UNIT MEETS
BASE AND WALLS.
Fig. 6b