
Instructions / Assembly

( 4 )
PARAGON_BI-FOLD_08/27/2015 * * * PATENTS PENDING
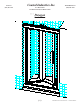
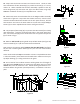
5. Before proceeding, determine which side you want your door to
strike (left or right, your choice). Now measure the opening width
between the two Wall Jambs (C) as shown in figure 3 and trim strike
side end of Sill Guide Track (B) to measurement obtained (always
trim the strike side end, never the hinge side end). With Guide Track’s
high lip toward exterior, snap Track (B) into place as shown. See also
exploded view - sheet 2.
6. Strike side was determined in step 5 . . . insert Strike Post (D) into
the appropriate Wall Jamb (C), magnet should be facing toward exte-
rior of enclosure, see exploded view - sheet 2.
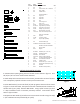
7. Before proceeding with Door Assembly installation, note that the
Door Assembly (E) must always fold in toward interior of shower en-
closure (see explode view - sheet 2). Position Door Assembly on floor
the way it will be installed on enclosure (remember, unit must fold
into enclosure). Install Bushings (J), Bushing Screw (K) and Set Screw
(L) onto top and bottom Slide Pieces (e6) as shown in figure 4. Before
proceeding, make sure Pivot Bushing (J) pieces are Assembled as shown
in exploded view - sheet 2.
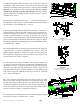
8. Install Magnet Holder Assembly (I) onto the bottom rail (e4) of the
“hinge side door” as shown in exploded view - sheet 2. Note that
Magnet Holder Assembly is installed as close to Center Hinge Pull
(e5) as possible. Magnet (i2) must face toward the outside of the
shower enclosure as shown in figure 5.
9. Clean bottom rails of Door Assembly with alcohol to remove any
oil. Failure to clean door rails prior to installation of Drip Rails (F) may
cause tape to release. Remove backing from tape and position Drip
Rails flush with edges of Hinge Stiles (e2) as shown in figure 6 and
flush with bottom of Door as shown in figure 7. Secure Drip Rails to
Door Panels using four 638phpt Screws (O) as shown in exploded
view - sheet 2 and figure 5.
10. Insert the Door Assembly’s Hinge Post (e1) into the Post from
which it is to swing. Bring the Hinge Post to rest atop the Guide Track
(B) and insert the Pivot Bushing (J) into the Guide Track cavity. Re-
member that regardless of whether the door strikes on the left side or
the on the right side, the Door Assembly must always fold in toward
interior of shower enclosure. Temporarily leave as is.
11. Attach the Door Handles (G) to the door using two(2) Door Handle
Screws (H) as shown in exploded view - sheet 2.
figure 5
(Snap Magnet Holder Assembly into bottom rail as
shown, see also exploded view - sheet 2)
figure 6
(figure shows from inside of unit looking out)
figure 4
(figure shows parts installed for a right hand strike
Door)
figure 3