
Instructions / Assembly

( 5 )
PARAGON BI-FOLD w/ Header 08/27/2015 * * * PATENTS PENDING
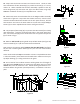
figure 7
figure 8
figure 9
figure 8a
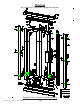
12. Step inside the shower enclosure and close the Door. Check to make
sure that bottom of Door Assembly (E) is parallel to the Sill (A). If it is not,
make it so. When satisfied that the Door Assembly is parallel to the Sill,
secure Hinge Post (e1) and Strike Post (D) to the Wall Jambs using six(6)
638PHPT Installation Screws (O) see exploded view - sheet 2.
13. Attach and center the Strike Plate face to the Magnet Holder Assembly
and shown in figure 8a. Step inside the shower enclosure, close the door
and mark the Strike Plate hole locations on the Sill. Open the Door , drill the
hole locations and secure the Strike Plate to the Sill with two(2) 638phpt
Screws (O) as shown exploded view sheet 2 and figure 8 below.
14. The purpose of Door Stop (Q) is to prevent the Door Panels from hitting
upon themselves. Using the pre-drilled pilot hole in the Guide Track’s bot-
tom, secure Door Stop (Q) to the Guide Track with one(1) Door Stop Screw
(R) as shown in fig 9.
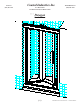
15. Measure wall to wall opening width at top of Wall Jambs (see figure 10)
and trim Header (S) to a 1/6” than measurement obtained.
Next measure the opening width between the two Wall Jambs (see figure
10) and trim remaining Track Guide (B) to 1/16” less than measurement
obtained.
Center Track Guide and snap it into Header as shown in exploded view sheet
2. Place the Header / Track Guide over the Wall Jambs. Make sure that your
top Nylon Bushing (J) is riding inside the track guide.
16. Run a bead of clear mildew resistant caulking down the full length of
each Wall Jamb outside where the Jambs meet the Walls. Now run a bead
outside where the Sill meets the curb. Follow caulking manufacturer’s in-
structions before using shower (normally 24 hours). Installation is now com-
plete.
figure 10