
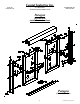
Installation Guide

3
PARAGON_BYPASS_09-05-01
BEFORE STARTING
Please check the box contents against the parts list. Make sure
that all material is accounted for before starting unit installation.
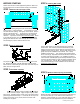
STEP 1 Measure base opening & cut Sill
Measure base opening along the center of the shower curb as
shown in step 1. Using a hacksaw . . . cut the Sill (B) to 1-3/16"
less than the base opening. With high lip to the exterior, position
Sill (B) on the shower curb . . . insuring that it is centered left to
right and front to back. When satisfied that Sill (B) is properly
centered . . . tape Sill to curb and pencil mark it's position. Check
to see that Sill has been cut to the proper length by temporarily
placing Wall Jambs at either end of Sill (B) (as shown in step 4)
and checking for proper fit. Remove Sill from curb.
STEP 2 Snap on Track Guide
MEASURE BASE OPENING
Turn Sill over and apply a bead of caulking the full length of
the Sill as shown in figure. Apply enough to slightly overfill
both corners. Reposition Sill on shower curb in the exact location
previously pencil marked in step 1. At this time the sill may be re-
taped to the shower curb to prevent drastic movement while
installing the wall jambs.
STEP 3 Caulk Sill & reposition
CAULKING
B
For proper operation, Track Guide (P) must be centered on Sill
(B). Measure the length of Sill (B) and pencil mark the center.
Now center the Track Guide (P) on the center mark and snap into
place as shown in figure above.
B
P
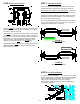
Measure the wall to wall opening at the top of the Wall Jambs (C)
and cut the Header (A) to 1/16" less than the measurement
obtained. Position Header (A) on top of the Wall Jambs (C) and
leave it there as we make preparations for panel installation.
MEASURE HEADER OPENING
C C
STEP 5 Measure Header opening & cut Header
STEP 4 Installing Wall Jambs
B
C
Position Wall Jambs (C) onto ends of Sill (B) and up against
shower walls. Use a level to plumb the Wall Jambs (C), then
make a pencil mark on the shower walls thru each of the six (6)
installation holes (three per jamb). Remove Wall Jambs (C) and
lightly center punch installation hole locations. Drill 1" deep
installation holes using a 3/16" masonry bit and Insert Plastic
Screw Anchors (M). Reposition Wall Jambs as before and secure
to shower walls using five (5) #8 x 1-1/2" Installation Screws (L).
Insure that both Jamb Bumpers (N) and Bumper Washers (U) are
secured to the Wall Jambs (C) using the center installation screw
(see exploded view). Use the #8 x 2" Flat Head Screw (T) to
secure Jamb Guide (R) to lower installation hole of Wall Jamb
attached to shower head wall.