
Owner's manual


Important: Always read and follow operating instructions. • 17
Performance Tires & Wheels • Mounting
Before beginning any of the mounting activities, review
all of the caution, warning and danger instructions asso-
ciated with mounting already listed in the early part of
the manual concerning tire/rim size match, inspect for
damage, etc.
14. Install or review condition of any pressure sensor
devices. This will prevent having to remount the tire
later.
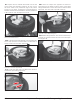
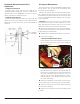
15. Begin the tire mounting process by lubricating
both tire beads and the rim if necessary (figure 34).
Figure 34 - Lubricate Tire Beads
16. For mounting the lower bead; position the tire at
an angle to the rim and mount (figure 35).
Figure 35 - Mount the Lower Bead
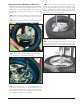
17. Next position the rim for the best mounting
by assuring the valve stem or sensor devices will not
prevent the upper bead from using the wheel’s full drop
center. Typically valves or sensor devices are positioned
at 90 degrees forward of the duckhead.
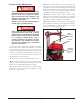
18. Position the valve stem 90 degrees clockwise in
front of the mount/demount tool for top bead mount-
ing. Lift the bead over the rear of the mounting head.
Use the helper tool to hold the bead in the drop center
(Figure 36). Rotate the wheel in short steps and apply
extra lubricant to mount upper bead.
Figure 36 - Mount Upper Bead, Use Helper
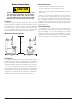
19. On extremely tight tire and wheel combinations,
it may be necessary to use the bottom of the helper
foot to flip the tire bead over the rim flange (Figure 37).
Figure 37 - Helper Foot to Flip Bead Over Rim Flange