COBALT RaQ™ XTR User Manual
©1998-2001 Cobalt Networks, Inc. All rights reserved. Part Number: Date: 070-00263-01 01-2001 The Cobalt logo, Cobalt Networks, Cube, Cobalt Qube, Qube, Cobalt RaQ, RaQ, Cobalt CacheRaQ, Cobalt NASRaQ, Cobalt StaQware and BlueLinQ are trademarks or registered trademarks of Cobalt Networks, Inc. Chili!Soft and Chili!Soft ASP are trademarks or registered trademarks of Chili!Soft, Inc. Linux is a trademark of Linus Torvalds. The RSA software and the RSA logo are trademarks of RSA Data Security Inc.
Important Safeguards For your protection, please read and understand all of the safety and operating instructions regarding your Cobalt RaQ XTR and retain for future reference. 1. Ventilation The Cobalt RaQ XTR’s bottom vents and fan openings protect the server from overheating. These openings must not be blocked or covered. This product should not be placed in a built-in installation unless proper ventilation is provided. 2.
Important Safeguards 3. Power Cord ! Caution: The power-supply cord is used as the main disconnect device. Ensure that the socket outlet is located or installed near the equipment and is easily accessible. ! Attention : Le cordon d’alimentation sert d’interrupteur général. La prise de courant doit être située ou installée à proximité du matériel et offrir un accès facile. ! Achtung: Zur sicheren Trennung des Gerätes vom Netz ist der Netzstecker zu ziehen.
Regulations and Information This equipment has been tested and found to comply with the limits for a Class A digital device, pursuant to Part 15 of the FCC Rules. These limits are designed to provide reasonable protection against harmful interference in a commercial environment. This equipment generates, uses and can radiate radio frequency energy and, if not installed and used in accordance with the instructions, may cause harmful interference to radio communications.
Important Safeguards vi Cobalt RaQ XTR User Manual
Preface List of chapters This user manual is for anyone who will set up the RaQ XTR network server appliance for a group of users. You should be familiar with Microsoft® Windows™, Macintosh® or other operating systems, and Netscape Navigator®, Microsoft® Internet Explorer or other Web browsers. This manual consists of the following chapters and appendices: Chapter 1 — “Introduction” includes an overview of the RaQ XTR’s features.
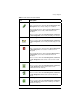
Preface Appendix F — “Disaster Recovery with Third-Party Software” explains how to configure the server software for the third-party backup and restore solutions. Appendix G— “Licenses” lists licensing information. Appendix H— “Glossary” provides a glossary of terms used in the RaQ XTR manual. Icons used on the UI and in the manual Table 1 describes the icons used by the browser-based User Interface (UI) and in this manual.
List of chapters Table 1. Icons used in the user interface Icon Description Modify In the “Virtual Site List” table under Server Management > Site Management; used to modify settings for a virtual site. In the “Bandwidth Limits” table under Server Management > Control Panel; used to modify a bandwidth limit for an IP address. In the “User List” table under Site Management () > User Management; used to modify the settings for a site user.
Preface Table 1. Icons used in the user interface Icon Description Secure POP (APOP) In the “User List” table under Site Management () > User Management; indicates that a Authentication POP is enabled for a site user. Suspension / Disabled In the “Virtual Site List” table under Server Management > Site Management; indicates that a virtual site has been suspended by the RaQ XTR Administrator.
Contents Important Safeguards iii Preface vii List of chapters Icons used on the UI and in the manual vii viii Contents xi 1 Introduction 1 Levels of user Organization of the user manual Site User Site Administrator RaQ XTR Administrator Alternate Administrator feature RaQ XTR Server Desktop Programs Personal Profile Site Management Server Management BlueLinQ RaQ XTR usage requirements 2 2 3 4 5 6 7 7 7 7 7 8 8 2 Setting up the RaQ XTR 9 General Front view of the RaQ XTR Rear view of the RaQ X
Contents Phase 1: Making the connection Installing the RaQ XTR Connecting to the network Connecting the power cord Powering on the RaQ XTR Configuring the RaQ XTR for the network Using the LCD console to configure the network Setting the configuration Phase 2: Setting up with the Web browser Support for RAID-0, RAID-1 and RAID-5 Active Assist — Online Help Configuring the RaQ XTR with the Setup Wizard License agreement System Settings RAID Setup Registration Completing configuration with the Setup Wizard 3
Contents Personal profile Account Modifying account information Email Forward Email To Vacation message Usage Data Viewing the usage data Backup Performing a backup Restore Performing a restore 4 Site Management Organization of the Site Management tab User management Setting defaults for a site user Modifying the default user settings Adding a site user Search and sort functions Searching a list of site users Sorting a list of site users Removing a site user Entering user email settings and aliases Mail Fo
Contents Mailing list management Adding a mailing list Modifying a mailing list Removing a mailing list Site settings Changing site settings Suspend a virtual site Soft suspension Suspend a site user FTP settings SSL settings Obtain an externally signed SSL certificate Enable SSL on a virtual site Generate a self-signed certificate SSL certificate for the main site Enable the administration server for SSL Submit the information to an external certification authority Receive the response from the external ce
Contents 5 Server Management Alternate Administrator feature Setting up an alteradmin account Approaches to RaQ XTR administration Definition of a virtual site Organization of the Server Management tab Organization of the BlueLinQ tab Site management Search and sort functions Searching a list of virtual sites Sorting a list of virtual sites Overview of virtual sites FrontPage Server Extensions Active Server Pages (ASP) ASP Administrative Server PHP embedded scripting Automatic configuration of DNS records
Contents Telnet server Simple Network Management Protocol (SNMP) agent ASP Administrative Server Domain Name System (DNS) server Network Bandwidth Bandwidth Limits table Applying a bandwidth limit Modifying a bandwidth limit Deleting a bandwidth limit Time Server Usage Network Web FTP Mail Backup and Restore Control Knox Arkeia Legato NetWorker Veritas NetBackup Maintenance Storage Adding a storage device Suspend a virtual site Hard suspension Reboot Shutdown System Information Support tools Active Monitor
Contents BlueLinQ Software Notification icon New Software Check availability of new software Install new software manually Updates Check availability of software update packages Install software updates manually Installed Software Settings 6 Services 178 178 179 180 181 182 183 184 185 186 189 Using email on the RaQ XTR Developing Web pages CGI scripts Server-side scripting languages Publishing Web pages using FTP Publishing Web pages with FrontPage for User Webs only A Using the LCD Console Locked LCD
Contents B Product Specifications Hardware Software General features System management Partner solutions Physical data Regulatory approvals C Upgrading the RaQ XTR Installing or removing a hard disk drive Installing additional memory Installing a PCI expansion card Replacing a fan D Advanced Information Removing the Cobalt Server Desktop UI Enabling Interbase 6.
Contents E Domain Name System Basic DNS Enabling the DNS server feature Configuring a primary DNS server Specifying a Forward Address (A) record Specifying a mail server (MX) record Specifying an alias (CNAME) record Configuring a secondary DNS server Adding a secondary domain Adding a secondary network Advanced DNS Network Mask Notation Conversion Delegating a subdomain Delegating a subnet Configuring server settings Start of Authority (SOA) configuration Name server (NS) Domain administrator email addres
Contents F Disaster Recovery with Third-Party Software How disaster recovery works Locking the UI databases General steps to perform disaster recovery General notes regarding backup services Knox Arkeia Tailoring the backup service Files associated with Knox Arkeia tailoring Backing up a RaQ XTR with Knox Arkeia Performing disaster recovery of a RaQ XTR with Knox Arkeia Preparing for disaster recovery Performing a disaster-recovery operation Legato NetWorker Tailoring the backup service Files associated wi
Contents G Contacting Cobalt Networks Customer Service and Technical Support General Cobalt information Cobalt Technical Support and Service Email contact Technical Support telephone numbers Further resources and information Solutions Cobalt Developer Network Discussion Groups The Knowledge Base Online technical papers Education Before contacting Cobalt Networks Technical Support H Licenses 283 283 283 283 283 284 284 284 284 284 285 285 285 286 287 The BSD Copyright GNU General Public License SSL Lice
Contents xxii Cobalt RaQ XTR User Manual
Chapter 1 Introduction The Cobalt RaQ™ XTR is a server appliance that provides a complete solution for hosting virtual sites, publishing Web pages, transferring files, hosting email and third-party applications, as well as offering new capabilities for high-traffic, complex Web sites and e-commerce applications. The RaQ XTR server appliance offers a full suite of Internet services with remote administration capabilities, pre-packaged in a single rack-unit (1RU) industry-standard enclosure.
Chapter 1: Introduction Levels of user The RaQ XTR server appliance has three levels of user: • the Site User has access to his or her account information and the programs • the Site Administrator manages a virtual site and the users on that site • the RaQ XTR Administrator manages the server appliance, and can manage all of the virtual sites and users as well Organization of the user manual This manual is organized according to the features that each level of user can access.
Levels of user Site User A Site User can send and receive email through the virtual site, use the integrated browser-based WebMail email client, upload and download files using the FTP service provided by the site, publish a personal Web page on the site, and back up and restore files and data located in the home directory. Site Users are added to a virtual site by the RaQ XTR Administrator or a Site Administrator.
Chapter 1: Introduction Site Administrator A Site Administrator manages a virtual site located on the RaQ XTR; the virtual site provides Web publishing, email and FTP services to the users of the site.
Levels of user Figure 2. Level of access for a Site Administrator RaQ XTR Administrator Virtual Site 1 Virtual Site 2 Virtual Site 3 Site Administrator Site Administrator Site Administrator - User A - User B - User C - ... - ... Virtual Site 4 Site Administrator - User A - User B - User C - ... - ... ... ... ... ... ... ... ... ... ... - User A - User B - User C - ... - ... Virtual Site n Site Administrator - User A - User B - User C - ... - ... - User A - User B - User C - ... - ...
Chapter 1: Introduction The RaQ XTR Administrator has the user name admin and has full control of the RaQ XTR; the RaQ XTR Administrator is a member of the main site (which uses the IP address shown on the LCD screen of the RaQ XTR). Alternate Administrator feature The Alternate Administrator (alteradmin) feature allows a person to have the same level of access to the server as the RaQ XTR Administrator (admin) but without having to use the user name admin and password to log in.
RaQ XTR Server Desktop RaQ XTR Server Desktop You access the RaQ XTR Server Desktop with a Web browser such as Microsoft Internet Explorer or Netscape Communicator.
Chapter 1: Introduction BlueLinQ The BlueLinQ™ Application Delivery Service is a Cobalt innovation that provides instant access to product updates and new services as they become available. For more information, see “BlueLinQ” on page 178. RaQ XTR usage requirements To use the RaQ XTR, you need: • A 10/100BaseTX Transmission Control Protocol/Internet Protocol (TCP/IP) -based local area network (LAN).
Chapter 2 Setting up the RaQ XTR This chapter guides you through the process of connecting and configuring the Cobalt RaQ XTR for your network and user community. A typical setup process takes less than 15 minutes, after which you can begin using all of the RaQ XTR services. If the RaQ XTR has been configured previously for a different network, refer to “Set up network” on page 196. General Figure 4 and Figure 5 show the controls, indicators and connectors on the RaQ XTR.
Chapter 2: Setting up the RaQ XTR Front view of the RaQ XTR Figure 4. RaQ XTR front view S E 1 2 3 4 5 1 1. Recessed Finger Holds allow you to pull out the front panel. 2. The Status Indicators signal ethernet, hard disk drive and Web activities. blinks when there is traffic on the network interfaces (labelled 1 or 2). glows steadily to indicate an active connection on the network interfaces (labelled 1 or 2). blinks when there is activity on a hard disk drive (labelled 1 through 4).
General Rear view of the RaQ XTR Figure 5. RaQ XTR rear view 1 2 3 4 5 6 7 8 1. The Power socket receives the AC cord that is provided. 2. The USB port provides a universal serial bus (USB) connection. 3. The PCI expansion slot provides space for adding a PCI card. 4. The Serial console port allows you to connect serial devices. 5. The Serial connector allows you to connect an uninterruptible power supply (UPS) to the serial port for Smart UPS support.
Chapter 2: Setting up the RaQ XTR Hard disk drive bay view Figure 6 shows the LEDs on the front panel of the hard disk drive. Figure 6. Disk drive front panel view 1 2 1. The Activity LED lights to indicate that the hard disk drive is powered up. 2. The Failure LED lights to indicate a defective hard disk drive. This LED also tells you when it is safe to remove the hard disk drive from the drive bay.
RaQ XTR setup RaQ XTR setup The setup process occurs in two phases. • “Phase 1: Making the connection” explains the physical connection of the RaQ XTR to a power source and the network. • “Phase 2: Setting up with the Web browser” explains the network integration process. It also allows the RaQ XTR Administrator to select services on the server and configure the level of RAID on the hard disk drives, using a computer with a valid Web browser.
Chapter 2: Setting up the RaQ XTR Attach the ears to the chassis with the eight mounting screws included with the server (see Figure 7). Now position the RaQ XTR in the equipment rack and attach the ears securely to the rack. Figure 7. Mounting ears for the RaQ XTR Connecting to the network Connect one end of a Category 5 ethernet cable to the 10/100 BaseT Network 1 interface on the RaQ XTR; see Figure 8. Connect the other end of the cable to an existing network socket. Figure 8.
Phase 1: Making the connection Connecting the power cord Connect the power supply cord to the RaQ XTR and to an electrical outlet (100-240 volts AC, 50/60 Hz; see “Physical data” on page 213). Powering on the RaQ XTR When the RaQ XTR is plugged into an electrical outlet, the “C” logo badge on the front panel lights up. Turn on the power by pressing and releasing the “C” logo badge. The hard disk drive(s) “spins up”, the fans turn on and the front LCD screen lights up.
Chapter 2: Setting up the RaQ XTR Using the LCD console to configure the network Figure 9 shows the LCD console for the RaQ XTR. The LCD screen on the front panel of the RaQ XTR displays two lines of text. The top line of the LCD presents instructions on data to enter; the bottom line displays the data already entered. Use the arrow buttons next to the LCD screen to enter the required network information manually.
Phase 1: Making the connection The arrow buttons function as follows: The Left arrow button moves the cursor to the left. The Right arrow button moves the cursor to the right. The Up arrow button increases the digit located at the cursor position. The Down arrow button decreases the digit located at the cursor position. S E The S (select) button displays the next option. The E (enter) button accepts the information entered or the options displayed.
Chapter 2: Setting up the RaQ XTR To configure the network manually: 1. When you see the prompt: PRIMARY IP ADDR: 000.000.000.000 use the arrow buttons on the LCD console to enter the IP address assigned to the RaQ XTR. 2. Press E to accept the IP address. If the IP address is valid, the next prompt appears: ENTER NETMASK: 255.000.000.000 3. Enter the netmask of your network. 4. Press E to accept the entry. If the netmask is valid, the following prompt appears: ENTER GATEWAY: 000.000.000.000 5.
Phase 2: Setting up with the Web browser After verifying and saving the information, the RaQ XTR server completes the boot process. The LCD screen shows several messages before displaying the IP address assigned to the RaQ XTR. Configuration is complete when the LCD screen displays the IP address assigned to the RaQ XTR, for example: IP Address: 192.168.25.77 Phase 2: Setting up with the Web browser The remainder of the setup process is performed through a Web browser on a computer on your network.
Chapter 2: Setting up the RaQ XTR Support for RAID-0, RAID-1 and RAID-5 ☞ Important: The RaQ XTR Administrator can set the level of RAID only through the Setup Wizard. Once the Setup Wizard process is complete, the level of RAID cannot be changed unless the system is returned to a factory-fresh state using an OS restore CD. Ensure that you have decided on the level of RAID that you want to implement before launching the Setup Wizard.
Phase 2: Setting up with the Web browser To use the browser to set up the RaQ XTR, follow these steps: 1. Launch a standard Web browser on a computer connected to the network. 2. Enter the IP address of the RaQ XTR (displayed on the LCD screen on the front panel of the RaQ XTR) in the URL field of your browser; for example: 3. Press Return (or Enter) on your keyboard. If you configured the RaQ XTR network settings successfully, the Cobalt Welcome screen appears; see Figure 10.
Chapter 2: Setting up the RaQ XTR Configuring the RaQ XTR with the Setup Wizard To configure the RaQ XTR, enter information into the fields on the Setup Wizard screens. These fields are described in the sections that follow. The Setup Wizard is a series of screens that guide you through the setup process. After completing each step, click on the right arrow at the bottom to apply the changes and move on to the next step. You can click on the left arrow to return to a previous screen.
Phase 2: Setting up with the Web browser License agreement You are presented with the Cobalt Network License Agreement screen. By clicking on the arrow button on this screen, you acknowledge receipt of and agreement with the terms and conditions set forth on the Warranty/Registration Card enclosed with your Cobalt RaQ XTR and with the License Agreement shown in Figure 11. Read through the License Agreement and, if you agree with its terms, click the right arrow at the bottom to signify your agreement.
Chapter 2: Setting up the RaQ XTR System Settings The System Settings screen appears; refer to Figure 12. On this screen, you enter information for the Network Settings, Administrator Settings and Time Settings for the server. Network Settings Enter the following network information: • Host name Assign a host name (for example, raqxtr) to the RaQ XTR. Domain name Enter your domain name.
Phase 2: Setting up with the Web browser Alternate Administrator feature The Alternate Administrator (alteradmin) feature allows a person to have the same level of access to the server as the RaQ XTR Administrator (admin) but without having to use the user name admin and password to log in.
Chapter 2: Setting up the RaQ XTR Time Settings Use the pull-down menus to enter the current date, time and time zone on the RaQ XTR. Once you have configured these settings, click the right arrow at the bottom to move to the next screen. Figure 12.
Phase 2: Setting up with the Web browser RAID Setup ☞ Important: The RaQ XTR Administrator can set the level of RAID only through the Setup Wizard. Once the Setup Wizard process is complete, the level of RAID cannot be changed unless the system is returned to a factory-fresh state using an OS restore CD. On this screen, you choose the type of RAID that you want to implement on the RaQ XTR server. If the RaQ XTR has only one hard disk drive, this screen does not appear.
Chapter 2: Setting up the RaQ XTR Figure 13. RAID setup A confirmation dialog asks you to confirm the type of RAID you have selected and warns you that this selection cannot be changed once you have completed the Setup Wizard. The RaQ XTR server takes a few minutes to initialize the RAID setup; see Figure 14. ! Caution: Do not interrupt this process. Interrupting this process can damage the data on your hard disk drives and potentially affect the operating system on the RaQ XTR. Figure 14.
Phase 2: Setting up with the Web browser Registration The Registration screen appears; see Figure 15. If you are connected to the Internet, you can register the RaQ XTR by completing the online registration. If you do not want to register online at this time, click the right arrow at the bottom to move to the next screen. A confirmation dialog confirms you do not want to register online. See Figure 16.
Chapter 2: Setting up the RaQ XTR Figure 16. Registration not sent Completing configuration with the Setup Wizard Once the RaQ XTR has been configured, the default home page of the RaQ XTR appears; see Figure 17.
Phase 2: Setting up with the Web browser Figure 17.
Chapter 2: Setting up the RaQ XTR 32 Cobalt RaQ XTR User Manual
Chapter 3 Site User This chapter describes the features available to a Site User on the RaQ XTR server appliance. • WebMail • Personal Profile A Site User can send and receive email through the virtual site, use the integrated browser-based WebMail email client, upload and download files using the FTP service provided by the site, publish a personal Web page on the site, and back up and restore files and data located in the home directory.
Chapter 3: Site User Figure 18. Level of access for the Site User RaQ XTR Administrator Virtual Site 1 Virtual Site 2 Virtual Site 3 Site Administrator Site Administrator Site Administrator - User A - User B - User C - ... - ... Virtual Site 4 Site Administrator - User A - User B - User C - ... - ... ... ... ... ... ... ... ... ... ... Virtual Site n Site Administrator - User A - User B - User C - ... - ... - User A - User B - User C - ... - ... 34 - User A - User B - User C - ... - ...
Overview of the Site User features Overview of the Site User features When you log on to the RaQ XTR as an individual user, the Server Desktop consists of two tabs at the top of the screen: Programs and Personal Profile. See Figure 19. • The Programs tab provides access to the WebMail feature. • The Personal Profile tab allows you to configure your personal settings on the RaQ XTR. ✍ Note: To reduce the number of steps in each procedure, the menu commands are grouped together and shown in bold type face.
Chapter 3: Site User Overview of WebMail ✍ Note: WebMail requires the IMAP service to be enabled and functioning. The Cobalt RaQ XTR provides you with an integrated email client called WebMail.
Accessing WebMail Compose To compose a message: 1. Click Compose and the screen shown in Figure 20 is displayed. Fill in the fields in the table as described in the following steps. a. To: This field is mandatory. You must enter the email address of a recipient. Separate multiple addresses with commas. b. CC: This field is optional. Enter the email addresses of the recipients to whom you want to send a copy of the message. Separate multiple addresses with commas. c. BCC: This field is optional.
Chapter 3: Site User Figure 20. Compose screen Figure 21.
Accessing WebMail Adding an attachment to a message You can attach a file to any message that you have composed, replied to, or forwarded. ✍ Note: The following example illustrates the screen as it appears when viewed with Netscape Navigator. The screen will change slightly when viewed with other browsers, but the basic functionality remains the same. To add an attachment to a message: 1. Click the green “plus document” icon next to the Attachments field in the “Compose” table.
Chapter 3: Site User Folder List You can review the messages in your folders. ✍ Note: To add or delete folders, see “Manage Folders” on page 45. There are two standard folders in WebMail. You can view these folders but not delete them. • “Inbox” contains the incoming messages to your RaQ XTR email account. • “Sent-mail” contains the outgoing messages from your RaQ XTR email account. If you have created any other folders, they are displayed in the list as well.
Accessing WebMail Above the table is a legend explaining the status icons: • A solid blue circle indicates that the message has not been read yet. • A hollow blue circle indicates that the message has been read. • A left-pointing blue arrow indicates the message has been replied to or forwarded (either by the Send, Reply, Reply All or Forward command). The table has five columns which are described from left to right as follows (refer to Figure 23): • Check box column.
Chapter 3: Site User Messages in a folder In each of the tables, you can • sort the messages according to different criteria; see “Sorting the messages” on page 41 • move a message between folders; see “Moving a message” on page 42 • delete a message; see “Deleting a message” on page 44 You can also perform a number of operations on a message. The subject line of each message is a hypertext link. Click on the link to open the message.
Accessing WebMail To move a message while viewing the message: 1. In the folder table, click the subject line of the message that you want to view. The browser window refreshes and the full message appears, with all the fields from the Compose section displayed. 2. From the “Move to...” pull-down menu above or below the message, select the folder to which you want to move the message. The message moves as soon as you select the folder. 3. The folder table refreshes, minus the moved message.
Chapter 3: Site User Forwarding a message To forward to a message: 1. In a folder, click on the subject line (a hypertext link) of the message. The browser window refreshes and the full message appears, with all the fields displayed (To, CC, Date, Subject, Message). 2. Click Forward. The “Forward” table appears and you can fill in the fields. For an explanation of these fields, see “Compose” on page 37. 3.
Accessing WebMail Manage Folders In the Manage Folder section, you can add or delete any number of personal folders within your WebMail account. Figure 24 shows a sample list of folders. There are two standard folders in WebMail. As a user, you cannot delete these folders: a. Inbox contains the incoming messages to your RaQ XTR email account. b. Sent-mail contains the outgoing messages from your RaQ XTR email account. Figure 24. Manage Folders screen Adding a folder To add a folder: 1.
Chapter 3: Site User Figure 25. Add Folder table Modifying a folder To modify a folder: 1. Click Manage Folders on the left. The “Folder List” table appears with the two standard folders and any others that you have created. 2. Click on the green pencil icon next to the folder that you want to modify. The “Modify Folder - ” table appears. 3. Enter the new folder name in the field. 4. Click Save. The “Folder List” table refreshes with the renamed folder.
Personal profile Personal profile The Personal Profile section allows you to view your user account information. On the Server Desktop, click on the Personal Profile tab. The menu items for your account appear on the left: • Account • Email • Usage Data • Backup • Restore Account In the Account section, you can change the name on your account and change your password. Modifying account information To modify your account information: 1. Click Personal Profile > Account.
Chapter 3: Site User Figure 26. Modify User table Email There are two options available in the Email section: Forward Email To and Vacation Message. Forward Email To The Forward Email To feature allows you to forward incoming messages to another email address. To forward your email automatically: 1. Click Personal Profile > Email. The “Email Settings” table appears; see Figure 27. 2. In the Forward Email To section of the table, enter an email address in the format in the field.
Personal profile To disable the email forwarding feature: 1. Click Personal Profile > Email. The “Email Settings” table appears; see Figure 27. 2. In the Forward Email To section of the table, delete the email address from the field. 3. Click Save Changes. Vacation message The Vacation Message feature allows you to enter a vacation-reply message that is automatically sent to each person who sends you email.
Chapter 3: Site User Usage Data In the Usage Data section, you can view the amount of hard-disk-drive space in use, the amount of space available on the hard disk drive, the amount of space allowed and the percentage of hard-disk-drive space in use. Viewing the usage data To view the Usage Data statistics: 1. Click Personal Profile > Usage Data. The “Disk Usage” table appears with the usage statistics; see Figure 28.
Personal profile Backup The Backup feature allows you to back up the data in your account to a personal computer through your browser. The backup captures the files and subdirectories in the home directory of your RaQ XTR account. The extension for a backup file is .tgz. Performing a backup To perform a backup: 1. Click Personal Profile > Backup. The “Personal Data Backup” table appears; see Figure 29. The table displays the name of the backup file and the estimated size of the file in megabytes (MB). 2.
Chapter 3: Site User Restore The Restore feature allows you to restore the files and subdirectories in your home directory from a .tgz backup file. For more information, see “Backup” on page 51. ! ! Caution: The system does not merge the current data and backed-up data. When data is restored, any changes made to files in your home directory since the last backup are lost. Caution: Be careful not to interrupt the restore operation as data could be corrupted.
Personal profile To perform a restore: 1. Click Personal Profile > Restore. The “Personal Data Restore” table appears; see Figure 30. • Existing Archives (.tgz) You can choose to restore backup archive files (.tgz) that have already been uploaded to your home directory. Select an archive file from the pull-down menu. • Upload an Archive The server saves backed-up data in an archive file with a .tgz extension. Use the Browse button to select the .
Chapter 3: Site User Figure 30.
Chapter 4 Site Management This chapter describes the features available to a Site Administrator on the RaQ XTR server appliance. A Site Administrator manages a virtual site located on the RaQ XTR; the virtual site provides Web publishing, email and FTP services for the users of the site.
Chapter 4: Site Management Figure 31. Level of access for a Site Administrator RaQ XTR Administrator Virtual Site 1 Virtual Site 2 Virtual Site 3 Site Administrator Site Administrator Site Administrator - User A - User B - User C - ... - ... Virtual Site 4 Site Administrator - User A - User B - User C - ... - ... ... ... ... ... ... ... ... ... ... - User A - User B - User C - ... - ... Virtual Site n Site Administrator - User A - User B - User C - ... - ... - User A - User B - User C - ... - .
If you are the RaQ XTR Administrator, you can also access the Site Management functions as the by selecting Server Management > Site Management. The “Virtual Site List” table appears, listing all of the virtual sites on the RaQ XTR. Click the green pencil icon next to the virtual site you want to administer. The Site Management screen appears; the name of the site is displayed on the tab at the top. From this screen, you can access the Site Management functions.
Chapter 4: Site Management Figure 32.
Organization of the Site Management tab Organization of the Site Management tab The following functions are available under the Site Management () tab on the Server Desktop. These functions are described later in the chapter. 1. User Management (see “User management” on page 60) a. Users b. File Import/Export 2. List Management (see “Mailing list management” on page 74) 3. Site Settings (see “Site settings” on page 78) 4. a. General b. FTP c.
Chapter 4: Site Management User management The User Management section on the Site Management screen allows you to perform administrative functions related to site users: setting the site user defaults, adding or removing users; entering and modifying user names and passwords; managing users’ space allocations on the hard disk drive; telnet access and email aliases; and importing or exporting lists of users by text file.
User management Modifying the default user settings To modify the default settings for a site user: 1. Select Site Management > User Management > Users. The “User List” table appears. 2. Click Set User Defaults. The “User Defaults” table appears. 3. Enter the information for the site.
Chapter 4: Site Management Adding a site user You can add or remove site users for a virtual site, and assign a Site Administrator for the site. Figure 34 shows the screen for adding a site user or Site Administrator. Figure 34.
User management To add a site user or Site Administrator: 1. Select Site Management > User Management > Users. The “User List” table appears. 2. Click Add User. The “Add New User” table appears. 3. Enter the information for the site user. • site user’s full name • site user’s user name (this is generated by the system, but the Site Administrator can edit this field) • password (enter the password twice for confirmation) ✍ Note: The RaQ XTR supports long passwords through the UI.
Chapter 4: Site Management Search and sort functions The “User List” table offers a search function and a sort function. See Figure 32. These functions are useful if you have a large number of site users on your virtual site and you want to restrict the display to certain site users.
User management Searching a list of site users To search the list of site users: 1. In the first field of the Search User List window, select “User Name”, “Full Name” or “Email Alias” from the pull-down menu. 2. In the second field, select “is”, “contains” or “does not contain” from the pull-down menu. 3. In the third field, enter the string of characters for which you want to search. 4. Click Search. The screen regenerates and displays the results in a table with the same five columns.
Chapter 4: Site Management Entering user email settings and aliases Mail Forwarding and Vacation Reply ✍ Note: Site users can edit the Mail Forwarding and Vacation Reply settings through the Personal Profile tab. See “Personal profile” on page 47. Individual site users can choose to have their RaQ XTR email forwarded to another email account. Site users can also choose to enable a vacation-reply message that is automatically sent to each person who sends the user an email.
User management For example, the Site Administrator of abc.com can give Mary Brown the username ; her email address is mary@abc.com. The Site Administrator of xyz.com (on the same RaQ XTR server) can give Mary Smith the username ; the Site Administrator can then set up an email alias mary@xyz.com for Mary Smith. The alias points Mary Smith’s incoming messages to the unique username of at xyz.com. A site user can have several email aliases that point to a unique username.
Chapter 4: Site Management Changing user settings Modify settings for a site user To modify the settings for a site user (to change the name, password, amount of space allocated on the hard disk drive or telnet access for an existing user, to enable FrontPage web use or Secure POP3 [APOP], to make an existing user the Site Administrator or to suspend a site user), click the green pencil icon. 1. Select Site Management > User Management > Users. The “User List” table appears. 2.
User management Modify email options for a site user To set up or modify the email options for a site user (to enter a forwarding email address, email aliases and an automatic vacation reply), click the envelope icon next to the site user. These options are described in “Entering user email settings and aliases” on page 66. 1. Select Site Management > User Management > Users. The “User List” table appears. 2. Click the envelope icon for the site user. The “Email Settings - ” table appears.
Chapter 4: Site Management Figure 36. Email Settings table Catch-all email account A catch-all email account receives email messages addressed to former users or non-existent users on a virtual site. For example, if an email is addressed to mary@xyz.com but the user name “mary” does not exist on that domain, the email is routed to the catch-all account. A RaQ XTR Administrator or a Site Administrator can create a catch-all email account.
Importing and exporting site users Importing and exporting site users As Site Administrator, you can import a list of users to a virtual site by uploading a specially formatted text file containing the names of the users and their settings. You can also export the list of users on the virtual site to a text file that is compatible with the import function. These two functions allow you to rapidly create and maintain accounts for large numbers of site users.
Chapter 4: Site Management Importing a list of users To import a list of users: 1. Select Site Management > User Management > File Import/Export. The “Import User List” and “Export User List” tables appear. 2. In the “Import User List” table (see Figure 37), select whether you would like to download the user list through HTTP from a remote URL or upload the user list from your local machine. Enter the URL in the URL field or click Browse to locate the file. 3. Click on Import Users.
Importing and exporting site users Exporting site users to a text file You can export the list of users on the virtual site to a text file that is compatible with the Import feature described above. The file is downloaded to the your local machine. Passwords for users are stored in an encrypted format that does not allow for the recovery of the actual password. Therefore, you have two options for the creating a temporary password for each exported user. Exporting a list of users To export a list of users: 1.
Chapter 4: Site Management Mailing list management In the List Management section of the Site Management screen, you can create and manage mailing lists for the virtual site. A mailing list allows a discussion by email between a group of people; the email addresses of the people in the group make up the list. The mailing list is given a name, for example monterey_project. The mailing list can include users on the RaQ XTR as well as external users.
Mailing list management Adding a mailing list To add a mailing list on the RaQ XTR: 1. Select Site Management > List Management. The “Mailing Lists” table appears. 2. Click Add Mailing List. The “Add Mailing List” table appears. See Figure 39. 3. Enter a name for the mailing list in the Mailing List Name field. You can only use lowercase English letters, numbers, and the hyphen (-) and underscore (_) characters. There is no limit on the number of characters in the name. 4.
Chapter 4: Site Management 8. Add local subscribers to the mailing list. To add an existing RaQ XTR user, select a name in the “Users Not Subscribed” text window and click the left arrow to move the subscriber to the “Users Subscribed” text window. To remove an existing RaQ XTR user from the mailing list, select a name in the “Users Subscribed” text window and click the right arrow to move the subscriber to the “Users Not Subscribed” text window.
Mailing list management Modifying a mailing list To modify a mailing list: 1. Select Site Management > List Management. The “Mailing Lists” table appears. 2. Click the green pencil icon next to the mailing list you want to modify. The “Modify Mailing List” table appears. See Figure 40. 3. Modify the information as necessary (see the procedure for adding a new mailing list for the options). 4. Click Confirm Modify. Figure 40 shows the “Modify Mailing List” table in the List Management section.
Chapter 4: Site Management Site settings ✍ Note: Only the RaQ XTR Administrator can modify the virtual site settings. For Site Administrators who are not the RaQ XTR Administrator, the Site Settings section is a read-only status page. Services in the “Site Settings” table appear as enabled (a blue check mark icon) or disabled (a red X icon). For an explanation of the fields on the Site Settings table, see“Overview of virtual sites” on page 120. For a view of the Site Settings table, see Figure 41.
Site settings Changing site settings To change the settings for a particular virtual site, click the green pencil icon. ✍ Note: Only the RaQ XTR Administrator can modify the settings for a virtual site. For Site Administrators who are not the RaQ XTR Administrator, the Site Settings section is a read-only status screen. Figure 41 shows the read-only status screen for the site settings of a virtual site. Figure 41.
Chapter 4: Site Management To change settings for a particular site: 1. Select Site Management > Site Settings. The “Site Settings” table appears. 2. In the “Site Settings” table, you can set the values of the fields or enable the services: a. IP address b. Host name c. Domain name ✍ Note: For the RaQ XTR Administrator, the IP address, host name and domain name appear as hypertext links in the “Site Settings” table.
Site settings Common gateway interface (CGI) allows users to have Web sites run programs that dynamically generate HTML pages in response to specific user inputs. CGI scripts can be created on a user’s desktop computer and then transferred to the RaQ XTR with a file transfer protocol (FTP) application (as explained in Chapter 6, “Services”). CGI scripts must have a .pl or .cgi filename extension. If “Email server aliases” are entered, site users can retrieve email at the aliases specified.
Chapter 4: Site Management Suspend a site user The Site Administrator or RaQ XTR Administrator can suspend a site user on a virtual site. The site user is denied access to telnet, FTP, POP3/IMAP/APOP services, as well as Web access to their files. The site user account however still receives email. To suspend a site user: 1. Select Site Management > User Management > Users. The “User List” table appears. 2. Click the green pencil icon next to the site user you want to suspend.
SSL settings To change the FTP settings for your virtual site: 1. Select Site Management > Site Settings > FTP. The “FTP Settings” table appears. 2. Enter the settings you want. You can specify the number of megabytes (MB) of incoming files to accept and the number of simultaneous users. 3. Click Save Changes. To download files by anonymous FTP, log on to the virtual site with the user name guest or anonymous—you do not need to enter a password.
Chapter 4: Site Management At a higher level, a server’s certificate is “signed” by a trusted external authority that the browser knows about, such as VeriSign. This is the authentication part of the secure connection. The server information (country, state, city, organization) is encoded into the certificate and certificate request. The external authority signs your request and guarantees that your server information is legitimate.
SSL settings Enable SSL on a virtual site ☞ ✍ Important: The RaQ XTR Administrator can enable SSL on only one name-based virtual site on an IP address. The UI does not allow the administrator to enable SSL on a second name-based virtual site that shares the same IP address. Note: Only the RaQ XTR Administrator can modify the virtual site settings. For Site Administrators who are not the RaQ XTR Administrator, the SSL Settings section is a read-only status page. To enable SSL on a virtual site: 1.
Chapter 4: Site Management Generate a self-signed certificate Once the RaQ XTR Administrator has enabled SSL, the Site Administrator must now create a self-signed certificate. The self-signed certificate can be signed later by an external authority. 1. Under the Site Management () tab, select Site Settings > SSL on the left side. The “Certificate Subject Information” table appears. See Figure 42. 2.
SSL settings Figure 42 shows the certificate subject information table for an SSL certificate. Figure 42.
Chapter 4: Site Management Figure 43 shows the processed information of a self-signed SSL certificate. Figure 43.
SSL settings SSL certificate for the main site If the browser prompts you for your username and password, you have enabled SSL on the main site of the RaQ XTR. The browser prompts you since this secure connection is in fact a new connection to the RaQ XTR. Generating a certificate for the main site is a special case and causes three things to happen: 1. SSL is enabled for all RaQ XTR management screens (both server management and site management). 2.
Chapter 4: Site Management Receive the response from the external certification authority The certification authority either sends you a certificate by email or returns the information on the browser screen. Enter the information from the external certification authority 1. Under the Site Management () tab, select Site Settings > SSL on the left side. The “Certificate Subject Information” table appears. 2. Highlight and remove the information currently in the “Certificate” window.
SSL settings The browser screen refreshes and the externally signed certificate appears. Figure 44 shows a sample of an externally signed certificate. Figure 44.
Chapter 4: Site Management Delete an SSL certificate ! ✍ Caution: If you delete the SSL certificate, you delete the private key as well. If you delete the private key, you will need to purchase a new SSL certificate from the external certification authority. Note: Deleting the certificate from the main site removes the certificate from the virtual sites to which the certificate has been propagated. In addition, it removes the secure connection to the administration server (it reverts from https: to http:).
Usage statistics Usage statistics The Usage Statistics section allows you to view overall usage statistics for the virtual site. ✍ Note: For the Server Usage feature under the Server Management tab, see “Server Usage” on page 151. As the Site Administrator, you can generate server-usage reports for a selected range of dates.
Chapter 4: Site Management • Requests by Domain—This graphically represents the domains from which Web traffic originated, broken down by domain and, if available, by sub-domain; see Figure 46 for a sample. Sub-domains are indented under their parent domains; the values for the sub-domains are subsumed within, and add up to, the value for the parent domain. ✍ Note: For this report to contain resolved domain names (for example, .com, .edu or .
Usage statistics Figure 45 shows a sample summary of Web usage reports on a virtual site. Figure 46 shows a sample of a Web usage – Requests by Domain report. Figure 45. Sample summary of Web usage reports Figure 46.
Chapter 4: Site Management FTP To view the statistics for FTP traffic on the virtual site: 1. Select Site Management > Usage Statistics > FTP. If a report has been generated, the “FTP Usage Summary Statistics” table appears. See Figure 47. If a report has not yet been generated, the “FTP Usage Summary Statistics” table does not appear. To generate a report, see Step 3 below. 2.
Usage statistics Figure 47 shows a sample summary of FTP usage reports on a virtual site. Figure 47.
Chapter 4: Site Management Mail To view the statistics for email traffic on the virtual site: 1. Select Site Management > Usage Statistics > Mail. If a report has been generated, the “Mail Usage Summary Statistics” table appears. See Figure 48. If a report has not yet been generated, the “Mail Usage Summary Statistics” table does not appear. To generate a report, see Step 3 below. 2.
Usage statistics Figure 48 shows a sample summary of Mail usage reports on a virtual site. Figure 49 shows a sample of a Mail usage – By Email Received report. Figure 48. Sample summary of Mail usage reports Figure 49.
Chapter 4: Site Management Disk To view the statistics on hard-disk-drive usage on the virtual site, select Site Management > Usage Statistics > Disk. Two tables appear: • “Site Disk Usage - ” provides information on hard-disk-drive usage for the entire virtual site • “Users Disk Usage” breaks down the information on hard-disk-drive usage by site user. Figure 50 shows a sample summary of hard-disk-drive usage on a virtual site. Figure 50.
Backup Backup The Backup feature allows you to back up the data in a virtual site to a personal computer through the browser. The extension for a backup file is .tgz. Caution: A backup operation captures data only (for example, email messages stored on the server or Web files). It does NOT back up the settings for a virtual site or site users. ! To perform a backup: 1. Select Site Management > Backup. The “Scheduled Site Web Data Backup” table appears. See Figure 51. 2.
Chapter 4: Site Management • Backup Interval Select how frequently to back up the data: daily weekly or monthly. • Day The day of the week needs to be set only for weekly or monthly backup intervals. For weekly backups, select the day of the week on which the backup takes. For monthly backups, select the day of the month. ✍ • 3. Note: Keep in mind that not all months have 31 days. If you select “Monthly” as the backup interval and select Day 31, your backup occurs only in months that have 31 days.
Backup Figure 51 shows the “Scheduled Site Web Data Backup” table for a virtual site. Figure 51.
Chapter 4: Site Management Backup file locations ☞ Important: For all methods of backup, ensure that the target location is available and has enough space on the hard disk drive to hold the backup archive. Failure to do this may result in zero-length or truncated archives.
Restore Restore The Restore feature allows you to restore backed-up data from a backup archive file to the RaQ XTR server. You can restore files only to their own site, and you must restore data from the same computer on which the data was backed up. ! Caution: A restore operation restores data only (for example, email messages stored on the server or Web files). It does NOT restore the settings for a virtual site or site users. ! Caution: The system does not merge the current data and backed-up data.
Chapter 4: Site Management To perform a restore: 1. Select Site Management > Restore. The “Site Data Restore” table appears. See Figure 52. 2. Fill in the following fields: • Existing Archives (.tgz) You can choose to restore backup archive files (.tgz) that have already been uploaded to the RaQ XTR. Select an archive file from the pull-down menu. Once an archive file has been successfully restored, it is be deleted to conserve space on the hard disk drive.
Restore Figure 52 shows the “Site Data Restore” table for a virtual site. Figure 52. Site Data Restore table Disaster recovery The RaQ XTR server supports the use of third-party solutions for performing disaster recovery. This is different from the backup and restore features within the Site Management section. If you are the RaQ XTR Administrator, you can configure the client-side software for the disaster-recovery solutions supported on the RaQ XTR.
Chapter 4: Site Management Server management If you are the RaQ XTR Administrator, you can return to the RaQ XTR Server Management screen by clicking the Server Management tab at the top. For more information on managing the RaQ XTR server, see Chapter 5, “Server Management”. Developing and publishing Web pages For information on developing Web pages, see “Developing Web pages” on page 190.
Chapter 5 Server Management This chapter describes the functions that the RaQ XTR Administrator normally performs. The RaQ XTR Administrator accesses these functions under the Server Management tab of the Server Desktop. The RaQ XTR Administrator is the person who controls and manages the RaQ XTR server appliance. This person sets up the RaQ XTR, sets up virtual sites, and sets access privileges and provides services for the Site Administrators and site users.
Chapter 5: Server Management Figure 53. Level of access for a RaQ XTR Administrator RaQ XTR Administrator Virtual Site 1 Virtual Site 2 Virtual Site 3 Site Administrator Site Administrator Site Administrator - User A - User B - User C - ... - ... Virtual Site 4 Site Administrator - User A - User B - User C - ... - ... ... ... ... ... ... ... ... ... ... Virtual Site n Site Administrator - User A - User B - User C - ... - ... - User A - User B - User C - ... - ...
Alternate Administrator feature Alternate Administrator feature The Alternate Administrator (alteradmin) feature allows a person to have the same level of access to the server as the RaQ XTR Administrator (admin) but without having to use the user name admin and password to log in.
Chapter 5: Server Management Approaches to RaQ XTR administration As the RaQ XTR Administrator, you can decide how many of the server functions he or she wants to manage directly and how much to delegate. • Full control. If you want to control all the functions on the RaQ XTR, you can create virtual sites without assigning any virtual Site Administrators. You are responsible for managing the main site and all the virtual sites. (See “Definition of a virtual site” on page 113.) • Hybrid control.
Approaches to RaQ XTR administration Definition of a virtual site Whereas industry uses the term “virtual host”, Cobalt Networks uses the term “virtual site”. In Cobalt’s definition, a virtual site consists of a Domain Name System (DNS) domain with Web, FTP and email services. Each virtual site contains its own list of site-user accounts. Each site-user account has its own Web page, FTP directory, email spool and any number of email aliases.
Chapter 5: Server Management Organization of the Server Management tab The following functions are available under the Server Management tab on the Server Desktop. These functions are described later in the chapter. 1. 2. 3. 4. 114 Site Management (see “Site management” on page 116) a. Set default settings for a virtual site b. Add a virtual site c. Manage a virtual site (clicking the green pencil takes you to the Site Management screen for that virtual site) d.
Organization of the BlueLinQ tab 5. 6. Maintenance (see “Maintenance” on page 165) a. Storage b. Reboot c. Shutdown d. System Information Active Monitor (see “Active Monitor” on page 172) Organization of the BlueLinQ tab The following functions are available under the BlueLinQ tab on the Server Desktop. For more information on these functions, see “BlueLinQ” on page 178. 1. New Software 2. Updates 3. Installed Software 4.
Chapter 5: Server Management Site management The RaQ XTR is designed to host multiple virtual sites. A virtual site is an individual location on the Internet, such as www.abc.com or www.xyz.com. Each virtual site can have a unique set of users who can send and receive email, publish Web pages, or upload and download files through FTP. A virtual site can also provide anonymous FTP access and SSL. ✍ Note: A virtual site can be name-based or IP-based.
Site management The “Virtual Site List” table has three columns which display information about the site, and allow you to manage or remove a site. • the virtual sites are displayed by host name in ascending order • The first column displays the host name of the virtual site. The host name appears as a hypertext link. If you click on the link, a separate browser window opens and displays the home page for that site. • The second column displays the IP address of the virtual site.
Chapter 5: Server Management The screen regenerates and the results of the search are displayed in a table with the same three columns. The heading of the table now states “Search Results ( Virtual Sites found). To return to the full list of virtual sites, click Site Management on the left. ✍ Note: Suspended sites are included in the search results.
Site management Sorting a list of virtual sites To sort the list of virtual sites: 1. To sort according to Host Name, click on the green triangle icon in the heading of the Host Name column. To sort according to IP Address, click on the green triangle icon in the heading of the IP Address column. 2. To sort in ascending (up-triangle icon) or descending order (down-triangle icon), click on the green triangle icon so that it points in the correct direction.
Chapter 5: Server Management Overview of virtual sites The RaQ XTR supports both name-based and IP-based virtual hosting. As the RaQ XTR Administrator, you can set up the virtual sites, as described in “Adding a virtual site” on page 129. The following list of information is helpful when creating a site. • IP address—To use the RaQ XTR, you require an IP address or range of IP addresses. ✍ Note: The RaQ XTR supports name-based virtual sites allowing many sites to share a single IP address.
Site management • Web server aliases—You can add aliases for Web servers; you are not restricted to receiving web requests only on the domain name entered in the site settings. For the virtual site, enter additional host names or domain names for which to accept web requests. For example, enter the aliases domain.com and www.domain.com. This allows the same site to be accessed by the URLs http://domain.com and http://www.domain.com. Separate multiple entries with a comma.
Chapter 5: Server Management • Maximum allowed disk space (MB)—You can set the amount of space on the hard disk drive that a virtual site can use, and can change this value at any time. The value is in megabytes (MB) and must be a whole number greater than zero. You can choose where to store a new virtual site. In the “Add New Virtual Site” table, in the Maximum allowed disk space (MB) parameter, a pull-down menu lists in alphabetical order the available disk storage devices.
Site management • Enable SSL—The RaQ XTR provides an optional secure sockets layer (SSL) for web access. See “SSL settings” on page 83. Only the RaQ XTR Administrator can enable SSL on a virtual site. ✍ Note: A virtual site can be name-based or IP-based. If there are several name-based virtual sites on an IP address, only one name-based virtual site can use SSL service. • Enable Active Server Pages (ASP)—The RaQ XTR supports ASP scripting language.
Chapter 5: Server Management • Enable common gateway interface (CGI) scripts—You can enable this virtual site and all the site users to have CGI-based dynamic Web content on the RaQ XTR. CGI allows a user to have a Web site run programs that dynamically generate hypertext markup language (HTML) pages in response to specific user inputs. CGI scripts can be created on a user’s desktop computer and then transferred to the RaQ XTR with a file transfer protocol (FTP) application.
Site management Each virtual site has a separate webmaster account and a unique webmaster password. Once the webmaster has authenticated through the FrontPage client, he or she can: • modify Web content • manage FrontPage site Root Web subwebs • add, modify or remove additional FrontPage user accounts • change the webmaster password ✍ Note: User webs cannot manage subwebs or FrontPage user accounts.
Chapter 5: Server Management ASP Administrative Server The ASP Administrative Server allows you to configure your ASP service through a separate browser-based UI. It does not need to be turned on to allow site users to serve ASP pages; this interface runs on port 5100. You can access the ASP Administrative Server screen from the Server Management screen. The ASP Administrative Server user interface includes a link to the ASP HTML documentation files.
Site management Automatic configuration of DNS records This feature is disabled by default.
Chapter 5: Server Management Setting defaults for a virtual site There are many advantages for setting defaults for the virtual sites. For example, since multiple sites can share an IP address, a default IP address can be set for all new virtual sites added. Also, since it is common for many sites to share a common domain name, it can be desirable to set a default domain name for your virtual sites.
Site management Modifying the default site settings To modify the default settings for a virtual site: 1. Select Server Management > Site Management. The “Virtual Site List” table appears. 2. Click Site Defaults. The “Virtual Site Defaults” table appears. 3. Enter the information for the site. Click the check boxes to enable (check mark) or disable (no check mark) a particular service. See the descriptions in “Overview of virtual sites” on page 120. 4. Click Save Changes.
Chapter 5: Server Management To add a virtual site: 1. Select Server Management > Site Management. The “Virtual Site List” table appears. 2. Click Add Site. The “Add New Virtual Site” table appears. 3. Enter the information for the site; information from the virtual site default settings is displayed here. Click the check boxes to enable (check mark) or disable (no check mark) a particular service. For an explanation of the fields in this table, see “Overview of virtual sites” on page 120. 4.
Site management If the Web and email server aliases have the same domain name as this site, DNS records are created for these aliases as well. ✍ Note: This feature does not register the new site name with a top-level domain name registrar. The RaQ XTR Administrator must register the new site name. Visit the Internet Corporation for Assigned Names and Numbers (ICANN) at http://www.icann.org. for a list of accredited domain-name registrars.
Chapter 5: Server Management RaQ XTR Administrator Caution: Be sure to remember the password you enter here — otherwise, you will need to reset it (See “Reset password” on page 206). ! In the “Administrator Settings” table under Personal Profile > Account, you can modify the user settings for the RaQ XTR Administrator — including user name, password and, optionally, an email address where system alerts for failed services and problems are sent.
RaQ XTR Administrator Figure 58. Administrator Settings with alteradmin account not enabled Figure 59.
Chapter 5: Server Management Changing the RaQ XTR Administrator password To change your RaQ XTR Administrator password: 1. Select Personal Profile > Account. The “Administrator Settings” table appears. 2. Enter the password twice to ensure that you have entered it as intended. The RaQ XTR supports long passwords through the UI. For guidelines on choosing a password, see “Password guidelines” on page 25. 3. Click Save Changes.
Control panel Services Figure 60 shows the “Service Settings” table under Server Management > Control Panel > Services. Figure 60. Service Settings table To manage the settings for the RaQ XTR services: 1. Select Server Management > Control Panel. The “Service Settings” table appears. 2. To enable any of the services (except Web server, which is always on), click the check box next to that service. The services are described in the sections that follow. 3. Click Save Changes.
Chapter 5: Server Management Web server This service is always on. It allows site users to access Web content You can modify the parameters for the Web server. 1. Select Server Management > Control Panel. The “Service Settings” table appears. 2. Click the green pencil icon next to Web server. The “Web Server Parameters” table appears; see Figure 61.
Control panel Figure 61 shows the “Web Server Parameters” table. Figure 61. Web Parameters table Email server The RaQ XTR supports email for each virtual site on the host. It also supports email for entire domains (for example, www.mydomain.com). By default, each registered user has an email account created on the RaQ XTR server. The RaQ XTR supports multiple client and server email protocols but does not implement virtual email users.
Chapter 5: Server Management For the RaQ XTR to receive email, you or your network administrator must enter a mail server host name in your organization’s DNS server to designate the RaQ XTR as the mail server for a domain. Email service depends on DNS, so the IP address of a DNS server must be entered in the network settings for the RaQ XTR; if not, the SMTP protocol will not work. For more information, see “Network” on page 145.
Control panel Configuring the email parameters To configure the email parameters: 1. Select Server Management > Control Panel. The “Service Settings” table appears. 2. Click the green pencil icon next to Email Server. The “Email Parameters” table appears; see Figure 62. 3. Fill in the fields in the “Email Parameters” table. The following paragraphs explain these fields. 4. Click Save Changes in the “Email Parameters” table.
Chapter 5: Server Management Email relaying Simple Mail Transfer Protocol (SMTP) service is different from Post Office Protocol (POP), telnet and file transfer protocol (FTP) services in that SMTP does not try to authenticate a user when an SMTP connection is made. Every email server on the Internet has to be able to deliver email to you, so the email servers must be able to connect freely to send and receive email.
Control panel Enabling email relaying To enable email relaying, add the IP addresses (or domain names, or both) of the machines which use your RaQ XTR as the SMTP server. 1. Select Server Management > Control Panel. The “Service Settings” table appears. 2. Click the green pencil icon next to Email Server. The “Email Parameters” table appears; see Figure 62. One field is labeled “Relay for the following hosts/domains”. The following paragraphs explain how to fill in this field. 3.
Chapter 5: Server Management File transfer protocol (FTP) server Using the file transfer protocol, site users can upload and download files on the RaQ XTR server. Users can transfer files with FTP client software such as Fetch or WS-FTP. You can enable or disable the FTP server. 1. Select Server Management > Control Panel. The “Service Settings” table appears. 2. Click to enable (check mark) or disable (no check mark) the check box next to File Transfer Protocol (FTP) Server. 3. Click Save Changes.
Control panel Simple Network Management Protocol (SNMP) agent If the SNMP agent is enabled, you can use SNMP software to remotely monitor server information such as CPU utilization and network traffic. You can enable or disable the Simple Network Management Protocol (SNMP) agent: 1. Select Server Management > Control Panel. The “Service Settings” table appears. 2. Click to enable (check mark) or disable (no check mark) the check box next to Simple Network Management Protocol (SNMP) agent. 3.
Chapter 5: Server Management ASP Administrative Server To access the ASP Administrative Server UI: 1. Select Server Management > Control Panel. The “Service Settings” table appears. If the ASP Administrative Server service is disabled, the pencil icon is grayed-out. 2. Click to enable the check box next to ASP Administrative Server. 3. Click Save Changes. The screen refreshes and the pencil icon is now enabled (a green pencil). 4. Click the green pencil icon for ASP Administrative Server.
Control panel Domain Name System (DNS) server Domain Name System (DNS) is a vital and integral part of the Internet. Setting up DNS correctly on your RaQ XTR server is very important. For this reason, we have created an appendix solely for explaining DNS. See Appendix E, “Domain Name System”.
Chapter 5: Server Management Figure 65 shows the settings tables of the Network section. Figure 65. Settings tables in the Network section Bandwidth The RaQ XTR allows you to set an output bandwidth limit for each IP address that you assign on a RaQ XTR server. The bandwidth limit applies to all of the name-based virtual sites associated with an IP address. ✍ Note: The Bandwidth feature does not regulate input traffic.
Control panel Bandwidth Limits table When you select the bandwidth-limit option, the “Bandwidth Limits” table appears; see Figure 66. If you have not applied a bandwidth limit to any IP addresses, the table is blank.
Chapter 5: Server Management Applying a bandwidth limit To apply a bandwidth limit to an IP address: 1. Select Server Management > Control Panel > Bandwidth. The “Bandwidth Limits” table appears. 2. Click Add Limit. The “Add Bandwidth Limit” table appears. See Figure 67. ✍ Note: If each of the IP addresses on the RaQ XTR already has a bandwidth limit assigned to it, an error message at the bottom of the screen alerts you to this fact.
Control panel Modifying a bandwidth limit To modify a bandwidth limit applied to an IP address: 1. Select Server Management > Control Panel > Bandwidth. The “Bandwidth Limits” table appears. 2. In the table, locate the IP address for which you want to modify the bandwidth limit. 3. Click the green pencil icon next to that IP address. The “Modify Bandwidth Limit” table appears. The first row of the table displays the IP address. 4. In the second row, enter the new value of the bandwidth limit in kb/s.
Chapter 5: Server Management Time You can configure the correct time, date and time zone for the RaQ XTR. 1. Select Server Management > Control Panel > Time. The “Time Settings” table appears. See Figure 68. 2. Select the time and date with the pull-down menus. 3. Select the correct time zone by clicking in the Region, Country and Locale/ Zone fields. 4.
Server Usage Server Usage The Server Usage section allows you to view overall usage statistics for the RaQ XTR server. ✍ Note: For the Usage Statistics feature under the Site Management tab, see “Usage statistics” on page 93. You can generate server-usage reports for a selected range of dates. The reports allow you to monitor the amount of bandwidth consumed by network, Web, FTP and email traffic generated by the virtual sites.
Chapter 5: Server Management • Historical Use—This graphically represents the total network traffic broken down by specific day, week or month during the report period. These statistics can help you determine the busiest specific day, week or month for network traffic on your RaQ XTR server. • Download log file—This allows you to download the current network traffic log file. You can then analyze the log file with external analysis software. 3. To generate a report, click Customize.
Server Usage Figure 69. Network Usage Summary Statistics table Figure 70. Sample of a Network Usage – Use by IP report Figure 71.
Chapter 5: Server Management Web To view the statistics for Web traffic on the server: 1. Select Server Management > Server Usage > Web. If a report has been generated, the “Web Usage Summary Statistics” table appears. See Figure 72. If a report has not yet been generated, the “Web Usage Summary Statistics” table does not appear. To generate a report, see Step 3 below. 2.
Server Usage • Requests by Type of File—This graphically represents the Web traffic broken down by type of file requested. • Download log file—This allows you to download the current Web traffic log file. You can then analyze the log file with external analysis software. 3. To generate a report, click Customize. The “Configure Reporting Options” table appears; see Figure 74. You can generate a new report for a selected range of dates. 4. From the pull-down menus, choose a start date and end date. 5.
Chapter 5: Server Management Figure 73. Sample of a Web Usage – Periodic Report Figure 74.
Server Usage FTP To view the statistics for FTP traffic on the server: 1. Select Server Management > Server Usage > FTP. If a report has been generated, the “FTP Usage Summary Statistics” table appears. If a report has not yet been generated, the “FTP Usage Summary Statistics” table does not appear. To generate a report, see Step 3 below. 2. The “FTP Usage Summary Statistics” table displays a number of rows of information concerning FTP usage, including the dates for which the report was generated.
Chapter 5: Server Management Figure 75 shows the “Configure Reporting Options” table. Figure 75. Configure Reporting Options table Mail To view the statistics for email traffic on the server: 1. Select Server Management > Server Usage > Mail. If a report has been generated, the “Mail Usage Summary Statistics” table appears. See Figure 76. If a report has not yet been generated, the “Mail Usage Summary Statistics” table does not appear. To generate a report, see Step 3 below. 2.
Server Usage • Historical Use—This graphically represents the total email traffic broken down by specific day, week or month during the report period. This statistic can help you determine the busiest specific day, week or month for email traffic on your RaQ XTR server. • Download log file—This allows you to download the current email traffic log file. You can then analyze the log file with external analysis software. 3. To generate a report, click Customize.
Chapter 5: Server Management Backup and Restore The RaQ XTR server supports third-party backup and restore solutions from three companies: • Knox Arkeia • Legato NetWorker • Veritas NetBackup Under the Server Management > Backup and Restore tab, the RaQ XTR Administrator can configure the RaQ XTR server to use one of these solutions. ✍ Note: This section explains how to enable the backup clients for these solutions on the RaQ XTR server.
Backup and Restore To configure the control options: 1. Select Server Management > Backup and Restore > Control. The “Backup System Control” table appears. See Figure 78. 2. To lock the Server Desktop UI, click to enable the check box Locked. 3. To stop all services currently running on the server (except for any configured backup programs), click to disable (no check mark) the check box Active. 4. Click Save Changes. The table refreshes and displays the new configuration.
Chapter 5: Server Management Knox Arkeia To configure the Knox Arkeia backup and restore solution: 1. Select Server Management > Backup and Restore > Knox Arkeia. The “Knox Arkeia Backup Settings” table appears. See Figure 79. 2. Enter the following information: • Enable Client—Click to enable the check box to enable the Knox Arkeia backup client. • Backup Server Name—Enter the fully qualified domain name of the Knox Arkeia backup server.
Backup and Restore Legato NetWorker To configure the Legato NetWorker backup and restore solution: 1. Select Server Management > Backup and Restore > Legato NetWorker. The “Legato NetWorker Backup Settings” table appears. See Figure 80. 2. Enter the following information: 3. • Enable Client—Click to enable the check box to enable the Legato NetWorker backup client. • Legato Server Hostnames—Enter the fully qualified domain names of Legato NetWorker backup servers.
Chapter 5: Server Management Veritas NetBackup To configure the Veritas NetBackup backup and restore solution: 1. Select Server Management > Backup and Restore > Veritas NetBackup. The “Veritas NetBackup Backup Settings” table appears. See Figure 81. 2. Enter the following information: 3. • Enable Client—Click the check box to enable the Veritas NetBackup backup client. • Master Veritas Server—Enter the fully qualified domain name of Veritas NetBackup master backup server.
Maintenance Maintenance In the Maintenance section under the Server Management tab, you can add new storage media, reboot the server and access system information, such as running a diagnostic test for trouble shooting problems on the server. Storage The RaQ XTR server can hold up to four internal hard disk drives. If your server has less than four drives, you can add another hard disk drive. See Appendix C, “Upgrading the RaQ XTR” for installing an internal hard drive.
Chapter 5: Server Management Figure 82 shows the “Storage in Use” table. Figure 82. Storage in Use table Adding a storage device To add a hard disk drive through the UI: 1. Select Server Management > Maintenance. The “Storage in Use” table appears. See Figure 82. 2. Click Add Storage. A list of available hard disk drives appears. By default, if more than one hard disk drive is available, all of the drives are selected to be added. To de-select a drive, click the box beside that device.
Maintenance When adding a new virtual site to the RaQ XTR, the RaQ XTR Administrator can choose the hard disk drive on which to store the new site. In the “Add New Virtual Site” table, next to the Maximum allowed disk space (MB) parameter, a pull-down menu lists in alphabetical order the available hard disk drives. The drive with the most available space is chosen by default. For more information, see “Adding a virtual site” on page 129.
Chapter 5: Server Management Reboot Rebooting the RaQ XTR can sometimes cure problems with certain services and is required to recover from RAID failures. The Active Monitor software recommends when a reboot is necessary. To reboot the RaQ XTR through your browser: 1. Select Server Management > Maintenance > Reboot. The “Reboot Cobalt Server” table appears. See Figure 83. 2. A warning is displayed in the table that rebooting the Cobalt server will make it unavailable to the network for a few minutes.
Maintenance Shutdown ! Caution: To prevent the potential loss of data, it is important to follow the proper power-down procedure before turning off the RaQ XTR. The RaQ XTR can only be shut down from the LCD console located on the front panel of the server. Refer to “Powering down” on page 208. Selecting Server Management > Maintenance > Shutdown displays the “Cobalt Server Shutdown Procedure” screen; see Figure 84. Shutting down may take as long as a few minutes. Figure 84.
Chapter 5: Server Management System Information For more information on the RaQ XTR server, select Server Management > Maintenance > System Information. The “Server Configuration Information” table appears. See Figure 85. This table displays: • the amount of RAM • the size of the hard disk drive • the version of the Cobalt OS • Cobalt Networks trademark information The table also contains four hypertext links: • Product Registration allows you to register the RaQ XTR server online.
Maintenance Support tools The Support Tools feature assists Cobalt Networks Technical Support in diagnosing problems on a RaQ XTR unit. On the Server Diagnostics screen, the RaQ XTR Administrator can create and download a data dump of the configuration files on the RaQ XTR. This data dump can then be mailed to diagnostics@cobalt.com. A member of the Technical Support team can then evaluate the condition of your RaQ XTR before providing you with corrective action, either by telephone or email.
Chapter 5: Server Management 4. Click Download Diagnostic File. This creates the diagnostic dump of your configuration files. A file window appears and prompts you to enter a location on you computer where you want to store the file created. 5. If you are familiar with Linux, you can open this file and look through it to determine the problem. You can also email the file as an attachment to diagnostics@cobalt.com.
Active Monitor Active Monitor status table To view the Active Monitor status of a system component or a service: 1. Select Server Management > Active Monitor. The status tables appear; see Figure 86. 2. The status of each of the items is indicated by a green, yellow, red or grey circle beside each item. The colors have the following significance: 3. • Grey—No information is available or the service is not enabled. • Green—The services and components are functioning normally.
Chapter 5: Server Management Figure 86.
Active Monitor RAID failure For a failed hard disk drive, Active Monitor indicates with a graphic (see Figure 87) the particular drive that has failed. If a drive in a RAID-0 configuration fails, the RaQ XTR server fails. If a drive in a RAID-1 or RAID-5 configuration fails and the server is still operating, the system indicates the non-RAID status in three ways: • An email is sent to the RaQ XTR Administrator. • Under Server Management > Active Monitor, the Disk Integrity (RAID) circle changes to red.
Chapter 5: Server Management If the RaQ XTR has been configured for RAID-0 and a hard disk drive fails, all data is lost. If the RaQ XTR has been configured for RAID-1 and a single hard disk drive fails, the server can continue to operate. To restore the RAID-1 configuration (disk mirroring), you must replace the failed hard disk drive and reboot the RaQ XTR server. If the RaQ XTR has been configured for RAID-5 and a single hard disk drive fails, the RaQ XTR cannot operate.
Active Monitor You can verify that the server is re-integrating the replacement disk drive through Active Monitor. 1. Select Server Management > Active Monitor. The status tables for the system components and services appear. The status for “Disk Integrity (RAID)” should be yellow. 2. Click the green magnifying-glass icon to see the detailed view of the re-integration process.
Chapter 5: Server Management BlueLinQ The BlueLinQ™ Application Delivery Service is a Cobalt innovation that gives you instant access to product updates and new services as they become available. Using Cobalt’s BlueLinQ technology, the RaQ XTR informs you when new software is available. When you log into the RaQ XTR as admin or alteradmin, the BlueLinQ tab appears in the top menu bar of the Server Desktop.
BlueLinQ New Software To install new software through BlueLinQ: 1. Select BlueLinQ > New Software. The “Available New Software List” table appears; see Figure 89. The table displays the name of the software, the version number, the vendor, a short description of the software and green magnifying-glass icon to view the installation details. The first column displays either a solid or hollow blue circle. • A solid blue circle indicates that you have not seen this new software package before.
Chapter 5: Server Management Figure 90. Install Software table 3. Click Install. If a License Agreement has been included in the software package, a License screen appears. You can either accept or decline the license. If you click Decline, you return to the “Available New Software List” table. If you click Accept, a status table appears. The first field indicates the state of the software package during the operation; the second field indicates the progress of the upload with a percentage bar.
BlueLinQ Install new software manually You can install new software manually if you know the location of the software package. 1. Select BlueLinQ > New Software. The “Available New Software List” table appears. 2. Click Install Manually. The “Install Manually” table appears; see Figure 91. 3. To specify the location of the software package, do one of the following: • Click the URL radio button.
Chapter 5: Server Management Updates To install a software update through BlueLinQ: 1. Select BlueLinQ > Updates.The “Available Software Updates List” table appears; see Figure 92. The table displays the name of the software, the version number, the vendor, a short description of the software and green magnifying-glass icon to view the installation details. The first column displays either a solid or hollow blue circle.
BlueLinQ Figure 93. Install Software table 3. Click Install. If a License Agreement has been included in the software package, a License screen appears. You can either accept or decline the license. If you click Decline, you return to the “Available Software Updates List” table. If you click Accept, a status table appears. The first field indicates the state of the software package during the operation; the second field indicates the progress of the upload with a percentage bar.
Chapter 5: Server Management Install software updates manually You can install software update packages manually if you know the location of the software update package.s 1. Select BlueLinQ > Updates. The “Available Software Updates List” table appears. 2. Click Install Manually. The “Install Manually” table appears; see Figure 94. 3. To specify the location of the software package, do one of the following: • Click the URL radio button.
BlueLinQ Installed Software On the RaQ XTR server, the package Cobalt OS is installed on the RaQ XTR at the factory. ✍ Note: You cannot un-install the default packages. To view the software installed on the RaQ XTR: 1. Select BlueLinQ > Installed Software. The “Installed Software” List table appears; see Figure 95. The columns show the name of the software, the version number, the vendor and a short description of the software. 2.
Chapter 5: Server Management Settings To view or modify the settings for the BlueLinQ feature: 1. Select BlueLinQ > Settings. The “BlueLinQ Settings” table appears; see Figure 96 for the Basic settings and Figure 97 for the Advanced settings. The active tab is a light-grey color. Figure 96. BlueLinQ Settings - Basic table Figure 97.
BlueLinQ 2. Configure the fields in the “BlueLinQ Settings” tables. Basic settings: • Query Schedule—Specify how frequently the RaQ XTR checks the BlueLinQ server for new or updated software packages: daily, weekly, monthly or never. • Software Notification Light—Specify the type of software that activates the Software Notification Light and, if applicable, the type of new software that appears in notification email messages. You can select “all software” or “updates only”.
Chapter 5: Server Management 188 Cobalt RaQ XTR User Manual
Chapter 6 Services This chapter includes information on configuring your email client, and on creating and uploading Web pages. Using email on the RaQ XTR To use all of the email capabilities on the RaQ XTR, the email parameter settings must be correct; see “Email server” on page 137. You must also configure your email application to send and retrieve email from the RaQ XTR. Ensure the following information is entered into your email program: 1. Email address The format is: @hostname.
Chapter 6: Services 4. IMAP server The format is hostname.domainname (for example, raqxtr.cobalt.com). 5. APOP server The format is hostname.domainname (for example, raqxtr.cobalt.com). ✍ Note: Occasionally, an email application asks for an incoming mail server. The incoming mail server is the POP3 server. Developing Web pages You can create complex Web pages using any of the standard HTML editors and the HTML publishing capabilities of many popular desktop productivity applications.
Publishing Web pages using FTP Server-side scripting languages The RaQ XTR supports both the Active Server Pages (ASP) and PHP scripting languages. These features are enabled on a per-site basis (see the “Site Settings” table under the Site Management > Site Settings tab). Like CGI scripts, you can develop ASP and PHP scripts on your desktop machine and then transfer them to the RaQ XTR by means of an FTP-based application.
Chapter 6: Services By default, the files you upload using an FTP-based application are stored in your personal directory; the directory path is: /home/sites//users/ where is the fully qualified domain name of your virtual site and is your user name. ✍ Note to the Site Administrator: To post Web pages for your site, you must upload to the directory /home/sites//web. Only Site Administrators or the RaQ XTR Administrator can upload to this directory.
Publishing Web pages with FrontPage for User Webs only Publishing Web pages with FrontPage for User Webs only If FrontPage Server Extensions are enabled on a site, a Site Administrator can enable FrontPage User Webs. To publish a Web page using FrontPage: 1. Using FrontPage Explorer on a personal computer, select Open Web. 2. In the Folder Name field, enter the following: http:///~/ For example, the user Jason Paez would enter http://raqxtr.cobalt.com/~jpaez/ 3.
Chapter 6: Services 194 Cobalt RaQ XTR User Manual
Appendix A Using the LCD Console During startup, the liquid-crystal-display (LCD) screen on the front panel of the RaQ XTR displays status information about the boot process itself. When setting up the RaQ XTR, you use the LCD console to enter network configuration information for the RaQ XTR. Once the RaQ XTR is running, the LCD console serves several purposes.
Appendix A: Using the LCD Console Locked LCD panel The RaQ XTR offers a security feature that allows you to lock the LCD panel with a “password” consisting of a sequence of arrow buttons. This prevents unauthorized tampering with the server if people have physical access to it. For any of the LCD functions, if the LCD panel is locked, you will be prompted to enter the key sequence before you can access the functions. Enter the sequence of arrow buttons and press the E (enter) button.
Set up network 5. Enter the Netmask using the arrow buttons. 6. Press the 7. Enter the Gateway using the arrow buttons. 8. Press the 9. Use the arrow buttons to toggle the cursor between [S]ave and [C]ancel. 10. Press the E E E button. button. button. If you select the Save option, the RaQ XTR reboots using the new network configuration. If you select Cancel, you return to step 1 of this procedure.
Appendix A: Using the LCD Console Configure UPS The are two options for configuring the RaQ XTR for a UPS: as the master or as a slave. The master communicates directly to the UPS through the serial port. The slave (or slaves) communicates with a master (not a RaQ XTR server) over the network to verify the status of the power supply. ✍ Note: The RaQ XTR server cannot act as a master for other machines. Allowing slave access by arbitrary machines would pose a security risk.
Configure UPS To configure the RaQ XTR for the UPS, first connect the UPS unit and the RaQ XTR, and then configure the RaQ XTR through the LCD panel. (Refer to the UPS manual for more information on connecting the devices.) 1. Plug the UPS into the wall socket. 2. Turn on the UPS. 3. Plug the RaQ XTR units into the UPS power sockets. 4. Connect the UPS serial cable to the UPS unit and the serial port on the RaQ XTR that will serve as the master. See Figure 98. ☞ 5.
Appendix A: Using the LCD Console 12. If you choose [S]lave, the LCD screen prompts you for the IP address of the device configured as the master. Enter the IP address using the arrow buttons. The left and right arrow buttons move the cursor position to the left or right. The up and down arrow buttons increase or decrease the digit at the cursor position. 13. Press the E button. The LCD screen returns to the host name and IP address. The LCD screen does NOT prompt you to save the changes.
Rebooting Rebooting To reboot the RaQ XTR server through the LCD console: 1. On the LCD console, hold down the 2 seconds. S button for approximately The LCD screen displays: SELECT: SETUP NETWORK 2. Press the S button until REBOOT appears in the LCD screen: E button. SELECT: REBOOT 3. Press the 4. Use the arrow buttons to toggle the cursor between [Y] and [N]. Select [Y] to reboot the system. 5. Press the ✍ E button. Note: You can also reboot the RaQ XTR through the Server Desktop UI.
Appendix A: Using the LCD Console Panel This feature allows you to lock the LCD panel with a “password” consisting of a sequence of arrow buttons. When the LCD panel is locked, you must enter the correct sequence to access the functions on the LCD panel. This prevents unauthorized tampering with the server if people have physical access to it. The default sequence to lock the LCD panel is blank. ✍ Note: When you unlock the LCD panel to use the LCD functions, the lock on the LCD panel remains in place.
Panel 3. Press the E button. The LCD screen displays: SELECT: LOCK PANEL 4. Press the S button until SET SEQUENCE appears in the LCD screen: SELECT: SET SEQUENCE 5. Press the E button. The LCD displays Enter Sequence: 6. Enter the sequence of arrow buttons and press the E button. The LCD screen asks you to confirm the sequence: Sequence Again: 7. Enter the sequence again and press the E button.
Appendix A: Using the LCD Console Lock panel If the LCD panel is currently unlocked, you can lock it. To lock the LCD panel on the RaQ XTR server: 1. On the LCD console, hold down the 2 seconds. S button for approximately The LCD screen displays: SELECT: SETUP NETWORK 2. Press the S button. E button. SELECT: PANEL 3. Press the The LCD screen displays: SELECT: LOCK PANEL 4. Press the E button. The LCD screen displays: Enter Sequence: 5. Enter the sequence of arrow buttons.
Panel Unlock panel If the LCD panel is currently locked, you can unlock it. To unlock the LCD panel on the RaQ XTR server: 1. On the LCD console, hold down the 2 seconds. S button for approximately The LCD screen displays: Enter Sequence: 2. Enter the sequence of arrow buttons. An asterisk appears for each arrow button you press. 3. Press the E button.
Appendix A: Using the LCD Console Reset password If you simply want to change the password for the RaQ XTR Administrator, you can do so through the Server Desktop. For more information, see “Changing the RaQ XTR Administrator password” on page 134. If you forget the password for the RaQ XTR Administrator, you can reset the password. This is done in two steps: a. Clear the password through the LCD console. b. Enter a new password for the admin account through the Server Desktop.
Reset password 4. Use the arrow buttons to toggle the cursor between [Y]ES and [N]O. 5. If you choose [N]O, the LCD screen returns to the host name and IP address. 6. If you choose [Y]ES, the LCD screen displays. Resetting admin password... The LCD screen then displays the host name and IP address again. ! Caution: This function resets RaQ XTR Administrator password to blank. After you clear the password, enter a new one as soon as possible to protect the security of the RaQ XTR.
Appendix A: Using the LCD Console Powering down ! ✍ Caution: To prevent the potential loss of data, it is important to follow the proper power-down procedure before turning off the RaQ XTR. Note: You can power down the RaQ XTR server remotely, but you cannot power up the server remotely. Someone must physically power up the server. For more information, see “Powering down the RaQ XTR server remotely” on page 238. You power down the RaQ XTR server through the “C” logo badge on the front panel.
Powering down 6. Use the arrow buttons to toggle the cursor between [Y]ES and [N]O. Select [Y]ES. 7. Press the E button. The RaQ XTR shuts down the services currently running and powers down. Server not responding ! Caution: Powering down the server in the following manner is not recommended. It is the equivalent of unplugging the server from the power supply. If you cannot use the arrow buttons to choose options on the LCD screen, you can force the RaQ XTR to power down.
Appendix A: Using the LCD Console 210 Cobalt RaQ XTR User Manual
Appendix B Product Specifications Hardware The RaQ XTR has the following hardware components: • x86-compatible processor • Four memory slots supporting up to 2 GB SDRAM using 32 MB to 512 MB SDRAM DIMM modules (modules must be 168 pin, 3.
Appendix B: Product Specifications • PHP 4 support • Support for Server Side Includes (SSI) • Perl scripting • Email protocol support: Simple Mail Transfer Protocol (SMTP), Internet Message Access Protocol (IMAP4), Post Office Protocol (POP3), Authentication Post Office Protocol (APOP) • File transfer protocol (FTP), anonymous FTP access • Telnet access • Domain Name System (DNS) server • 128-bit Secure Sockets Layer (SSL) • FrontPage 2000 server extensions • NTP client support • Cobalt B
Physical data • Advanced management using telnet • Web-based performance and usage reporting • Browser-based backup and restore utility • Browser-based software upgrade (BlueLinQ) Partner solutions • E-commerce • Database • Backup • Analysis and usage statistics Physical data The RaQ XTR has the following physical characteristics: • Dimensions: 17.50 in. x 22.75 in. x 1.75 in (44.5 cm x 57.8 cm x 4.
Appendix B: Product Specifications • • • Operating environment: • 32oF to 95oF (0oC to 35oC) • 10% to 90% humidity (non-condensing) Non-operating environment: • 14oF to 122oF (-10oC to 50oC) • 5% to 93% humidity (non-condensing) Light-emitting diodes (LEDs): Power, Transmit/Receive (2), Link (2), Disk Activity (4), Web Activity Regulatory approvals • FCC-A • VCCI-A • TUV (United States and Canada) • CE (on European models only) • Austel 214 Cobalt RaQ XTR User Manual
Appendix C Upgrading the RaQ XTR Your RaQ XTR can be serviced or upgraded in the field in the following areas: • add a memory module (DIMM) • add a PCI expansion card • replace the hard disk drives • replace the fans The hard disk drives can be removed and replaced while the RaQ XTR is in an equipment rack. If you wish to add memory or an expansion card, or replace a fan, you must remove the RaQ XTR from the equipment rack in order to gain access to the interior components.
Appendix C: Upgrading the RaQ XTR Installing or removing a hard disk drive The RaQ XTR can contain up to four hard disk drives. The drives are mounted on drive “sleds” that allow them to be easily removed and installed. Before you replace or add a disk drive to the RaQ XTR, read all of the following Notes and Warnings . Warning: Do not swap hard disk drives from one RaQ XTR to another. Also, do not install a drive, that was previously partitioned for RAID, in a RaQ XTR as an additional (non-RAIDed) drive.
Installing or removing a hard disk drive Remove and replace a hard disk drive as follows: 1. Grasp the front panel by inserting a finger in the indentation at each end, and gently pull the front panel towards you (see Figure 99). Figure 99. WIthdrawing the front panel 2. When the front panel reaches the end of its travel, rotate it up or down 90 degrees (see Figure 100). Figure 100.
Appendix C: Upgrading the RaQ XTR 3. Insert your index finger into the front plate of the drive sled and verify that the Failure LED lights, or remains lit if it was already on (see Figure 101). Warning: If the Failure LED does not light, or goes out when you insert your finger in the front plate, DO NOT remove the drive. Wait a few seconds for the drive to complete the operation in progress, and check the LED again. Figure 101. Disk Drive Failure LED Activity LED Failure LED 4.
Installing or removing a hard disk drive Figure 102. Withdrawing a drive sled 5. Remove the four mounting screws from the bottom of the drive sled (see Figure 103). Figure 103. Drive sled and disk drive Disk Drive Power Connector Data Connector Drive Sled Front Plate Mounting Screws (4) 6. Lift the disk drive slightly away from the drive sled and gently unfasten the power and data connectors from the rear of the drive. 7.
Appendix C: Upgrading the RaQ XTR 10. Re-insert the drive sled into the disk drive bay. Ensure that the track, on the bottom of the drive sled, is correctly aligned with the track in the drive bay (see Figure 104). Figure 104. Re-inserting a drive sled Drive Bay Track 11. Push the drive sled into the bay until you feel it “snap” into place. 12. Rotate the front panel back to its original position. 13. Slide the front panel back into the chassis.
Installing additional memory Installing additional memory ! ✍ Caution: The chassis contains electrostatic-sensitive components. Observe proper ESD precautions whenever the RaQ XTR’s cover is removed. Note: Before attempting to install additional memory, ensure that the DIMM to be installed is less than 0.158 inches (4.0 mm) thick. Contact Cobalt Technical Support to receive a listing of approved memory vendors and the appropriate part numbers. 1.
Appendix C: Upgrading the RaQ XTR Figure 106. Removing the cover 7. Locate the DIMM sockets at the right, rear corner of the chassis. 8. Ensure that the eject lever, at each end of the DIMM socket, is released (see Figure 107). ! 9. 222 Caution: Observe proper ESD precautions and follow the manufacturer’s instructions when handling the DIMM. Insert the DIMM in the target socket and use your thumbs to seat it. Note that the DIMM’s edge connector is keyed and can only be inserted one way.
Installing additional memory Figure 107. Installing a DIMM DIMM Eject Levers 10. Re-install the cover and mounting brackets, and return the RaQ XTR to the equipment rack.
Appendix C: Upgrading the RaQ XTR Installing a PCI expansion card ✍ Note: The PCI expansion slot accommodates the PCI standard short-card form factor. The PCI card must be less than 6.875 inches (174.63 mm) long. The PCI slot provides the following voltages: • +5V @ 1A • +12V @ 0.5A • -12V @ 0.1A Ensure that the card that you are installing is compatible with the power budget of the PCI slot. ! Caution: The chassis contains electrostatic-sensitive components.
Installing a PCI expansion card 4. Unfasten the eight screws that attach the cover to the RaQ XTR chassis (three screws on each side and two screws at the rear of the chassis). ✍ Note: Ensure that the front panel is completely slid back into the chassis before attempting to remove the cover. 5. Working from the rear of the chassis, slide the cover back approximately three inches (see Figure 109). 6. Lift up the rear of the cover first and then remove the cover from the chassis. Figure 109.
Appendix C: Upgrading the RaQ XTR 7. Working from the rear of the chassis, loosen the screw holding the PCI Retainer and rotate the retainer clockwise to release the PCI Cover (see Figure 110). Figure 110. Releasing the PCI cover Cobalt Networks and Cobalt trademarks RaQ are of Cobalt Networks, www.cobalt.c Inc. om P/N 550-00200-0 1 PCI Cover PCI Retainer Retainer Mounting Screw 8. Carefully withdraw the PCI Cover out through the interior of the chassis (see Figure 111).
Installing a PCI expansion card 9. Unpack the PCI expansion card and remove any protective connector covers. ! Caution: Observe proper ESD precautions and follow the manufacturer’s instructions when handling the card. 10. Insert the expansion card’s edge connector into the PCI connector on the system card (see Figure 112). Figure 112. Installing the PCI expansion card Cobalt Networks and Cobalt trademarks RaQ are of Cobalt www.cobalt.Networks, Inc.
Appendix C: Upgrading the RaQ XTR 13. Follow the manufacturer’s instructions for the PCI card regarding any additional cabling or configuration. 14. Re-install the cover and mounting brackets, and return the RaQ XTR to the equipment rack. Replacing a fan ! Caution: The chassis contains electrostatic-sensitive components. Observe proper ESD precautions whenever the RaQ XTR’s cover is removed.
Replacing a fan Figure 114. Identifying the defective fan 4. Power down and remove the RaQ XTR from the equipment rack by reversing the installation procedure in Chapter 2. 5. Place the RaQ XTR on a stable, flat surface. 6. Remove the mounting brackets from each side of the chassis. Each bracket is attached to the chassis with four screws (see Figure 115). Figure 115. Mounting brackets and cover fasteners Cobalt Networks and Cobalt trademarks RaQ are of Cobalt Networks, Inc. www.cobalt.
Appendix C: Upgrading the RaQ XTR Figure 116. Removing the cover 10. Working from the rear of the chassis, remove the six fan connectors from the motherboard (see Figure 117).
Replacing a fan Figure 117. Disconnecting the fans Fan Connections (6) Cobalt Networks and Cobalt trademarks RaQ are of Cobalt Networks, www.cobalt.co Inc. m P/N 550-00200-01 11. Unfasten the two screws securing the fan assembly (see Figure 118). Figure 118. Removing the fan assembly Fan Assembly Mounting Screws (2) Cobalt Networks and Cobalt trademarks RaQ are of Cobalt Networks, www.cobalt.co Inc. m P/N 550-00200-01 Fan Assembly 12.
Appendix C: Upgrading the RaQ XTR Figure 119. Removing the fan assembly Fan Assembly Fan Holder Mounting Tabs (4) Fan Holder Individual Fan 15. Note the orientation of the defective fan and how its wires are routed. Remove the defective fan and replace it with an equivalent model. Ensure that the replacement fan is installed with the same orientation as the original. Check the fan wiring for areas that are pinched or kinked. 16.
Appendix D Advanced Information ! Caution: The features described in this appendix are intended for advanced users who want to run shell scripts or use shell commands. An advanced user is someone who is proficient in the internal workings of the Unix operating system. You can adversely affect the operation of your RaQ XTR if you modify system configuration files. Check your warranty card for details. ! Caution: Direct root logins are not allowed on the RaQ XTR.
Appendix D: Advanced Information ☞ Important: Turning off the Server Desktop UI is a permanent action. You cannot toggle the UI on and off. If you turn off the Server Desktop UI and then want to re-enable it, you will have to rebuild the RaQ XTR with an OS restore CD; this returns the server to a factory-fresh state. To turn off the Server Desktop UI: 1. Telnet in to the RaQ XTR server and log in as the user admin or alteradmin. 2.
Enabling Interbase 6.0 InterBase offers a number of database features—triggers, stored procedures, blobs, event alerters, user-defined functions, multi-dimensional arrays, two-phase commit, referential integrity, constraints and a flexible set of transaction options. To enable the InterBase 6.0 database server: ! Caution: You can seriously affect your RaQ XTR if you modify the system configuration files. Only advanced users of Linux should undertake these changes.
Appendix D: Advanced Information Serial console port You can connect a console terminal to the DB-9 connector on the back panel of the RaQ XTR. The terminal can be either an ASCII terminal or a PC running terminal software. The console terminal should have the following communications parameters—115 200 baud, 8 data bits, no parity and one stop bit.
Initializing the RaQ XTR through the serial console port To initialize the RaQ XTR through the serial console port: 1. Connect a null modem serial cable to the serial console port on the back panel of the RaQ XTR. See the following figure. USB port 2. Serial console port Serial port Network connectors Configure your terminal software to the following parameters: • 115 200 Baud • 8 data bits • no parity • 1 stop bit 3. Power on the RaQ XTR with the power switch on the back panel.
Appendix D: Advanced Information 8. Another prompt is displayed: [S]AVE / [C]ANCEL. Enter “S” to save the configuration. The message Verifying and saving... appears. 9. Once the configuration is saved, the terminal screen displays the normal boot status messages. Continue administration of the RaQ XTR through your Web browser. Powering down the RaQ XTR server remotely ! ✍ ✍ Caution: This feature requires you to access the RaQ XTR server through a telnet session.
Removing a lock from the LCD panel Removing a lock from the LCD panel ! Caution: This feature requires you to access the RaQ XTR server through a telnet session. Only advanced users should perform this operation. You can adversely affect the operation of your RaQ XTR if you modify system configuration files. Check your warranty card for details. ! ✍ Caution: If you have forgotten both the RaQ XTR Administrator password and the sequence of arrow keys, you will not be able to access the server.
Appendix D: Advanced Information Development tools The RaQ XTR provides a collection of utilities to support applications development and server administration.
Configuration files Configuration files If necessary, you can change some of the configuration files for the RaQ XTR services for development purposes, but this may void your warranty. Please read your warranty card before making any changes. ! Caution: Changing any of the following configuration files can dramatically affect the operation of the services configured by means of the RaQ XTR’s Web-based administration service or the administration service itself.
Appendix D: Advanced Information Directory structure The hard disk drive on the RaQ XTR is partitioned into four segments. Most of the available space on the disk drive is on the partition mounted from /home. It is recommended to do most of your work under this partition. By default, quotas are turned on in this partition and are used extensively by the system software.
Directory structure Customized error Web pages The RaQ XTR Administrator or a Site Administrator can replace the default error Web pages for a virtual site on the RaQ XTR server with customized error pages for four common Web server errors. The errors the RaQ XTR server specifically handles with custom files for a virtual site are: • 401: Authorization Failed—This error page is displayed when you have protected a directory with an .htaccess file and the user does not authenticate correctly.
Appendix D: Advanced Information Site user home page When a user on the main site is added through the Server Desktop UI, the home directory for that site user is created in: /home/sites/home/users/username/web The content of their Web pages can be viewed at http:///users// or http:///~ / When a user on a virtual site is added through the Server Desktop UI, the home directory for that site user is created in: /home/sites//users/ The user’s
Appendix E Domain Name System Basic DNS The Internet uses a distributed naming system called the Domain Name System (DNS). DNS allows us to refer to computers by host names as well as by Internet Protocol (IP) addresses. IP addresses are hard to remember and are inconvenient to use. DNS allows us to use host names and domain names which can resolved to IP addresses. DNS servers translate host names and domain names (for example, www.cobalt.com) to an associated IP address (for example, 192.168.1.10.
Appendix E: Domain Name System Enabling the DNS server feature ☞ Important: Always click Save Changes after modifying DNS records. If you do not, the changes will not take effect. To enable the DNS server on the RaQ XTR: 1. Select Server Management > Control Panel. The “Service Settings” table appears. 2. Click the check box to enable the Domain Name System (DNS) Server (if it is not already enabled). 3. Click Save Changes.
Basic DNS 6. Enter the IP address (for example, 192.168.10.10) and network mask (for example, 255.255.255.0). The network mask, or subnet size, is specified by an IP address in dot-quad notation. See Table 2 on page 251 to convert between dot-quad and network mask bit-count notations. 7. Enter the host name and domain name you want to serve (for example, www and mydomain.com). 8.
Appendix E: Domain Name System Specifying a mail server (MX) record To specify a mail server (MX) record: 1. Select Server Management > Control Panel. The “Service Settings” table appears. 2. Click the green pencil icon next to the DNS service in the “Service Settings” table. The “DNS Settings for ” table appears. 3. Select Mail Server (MX) from the Add... pull-down menu. 4. Enter the domain name (for example, mydomain.com) to be served by the mail server. 5.
Basic DNS Specifying an alias (CNAME) record This feature allows you to alias one host name to another. The target host name does not need to be a member of the local domain. For example, you can create an alias record from “news.domain.com” to “uucp.isp.net”. ! Caution: Do not use an Alias (CNAME) Record to cause a domain name to resolve to a host name. For example, do not create an Alias (CNAME) Record for mydomain.com that resolves to www.mydomain.com.
Appendix E: Domain Name System Adding a secondary domain To add a secondary name-server authority for a domain: 1. Select Server Management > Control Panel. The “Service Settings” table appears. 2. Click the green pencil icon next to the DNS service in the “Service Settings” table. The “DNS Settings for ” table appears. 3. Select Secondary Name Service for Domain from the Add... pull-down menu. 4. Enter the domain name to be serviced and the IP address of the primary DNS server. 5.
Advanced DNS Advanced DNS Network Mask Notation Conversion Use Table 2 to convert between dot-quad and network mask bit-count notations. Table 2. Network Mask Notation Conversion Dot-Quad Bit count 255.0.0.0 8 255.128.0.0 9 255.192.0.0 10 255.224.0.0 11 255.240.0.0 12 255.248.0.0 13 255.252.0.0 14 255.254.0.0 15 255.255.0.0 16 255.255.128.0 17 255.255.192.0 18 255.255.224.0 19 255.255.240.0 20 255.255.248.0 21 255.255.252.0 22 255.255.254.0 23 255.255.255.0 24 255.255.
Appendix E: Domain Name System Table 2. Network Mask Notation Conversion Dot-Quad Bit count 255.255.255.240 28 255.255.255.248 29 Delegating a subdomain ☞ Important: Always click Save Changes after modifying DNS records. If you do not, the changes will not take effect. DNS servers are organized hierarchically. You can delegate the name-server authority for subdomains of any domain served by the RaQ XTR to other name servers. For example, domain.
Advanced DNS Delegating a subnet You can delegate the name-server authority for a network to a remote DNS server. To delegate the subnet naming authority to a remote DNS server: 1. Select Server Management > Control Panel. The “Service Settings” table appears. 2. Click the green pencil icon next to the DNS service in the “Service Settings” table. The “DNS Settings for ” table appears. 3. Select the parent network from the Select Domain or Network... pull-down menu. 4.
Appendix E: Domain Name System 5. A zone transfer allows another DNS server to download the complete list of hosts maintained by your DNS server. By default, zone transfers are unrestricted. However, you can restrict zone transfers if you want. Enter IP addresses or network addresses in the Zone Transfer Access field; this automatically causes zone transfers to become restricted. Now, only the IP addresses or network addresses listed in this field are able to perform zone transfers. 6. Click Save Changes.
Advanced DNS Name server (NS) The primary name server defaults to the host name of the RaQ XTR. You can specify the fully qualified domain name of the secondary DNS server for that domain in the Secondary Name Server (NS) host name field. Some top-level domain registration organizations require that the secondary name server record be defined. Domain administrator email address The email address defaults to the user name admin of the RaQ XTR.
Appendix E: Domain Name System Sample setup of DNS service ✍ Note: Cobalt recommends that you enable the Automatic DNS Configuration feature on a virtual site to create the DNS records. For more information, see “Automatic configuration of DNS records” on page 127. This sample setup assumes that you have already done two things: 1. You have registered your domain name. For more information on registering a domain name, visit the Internet Corporation for Assigned Names and Numbers (ICANN) at http://www.
Sample setup of DNS service These records allow anyone on the Internet to type either “mydomain.com” or “www.mydomain.com” in order to access your Web site. To set up these records, go to the DNS server settings on the Server Desktop user interface (UI). 1. Select Server Management > Control Panel. The “Service Settings” table appears. 2. Click the check box to enable the Domain Name System (DNS) Server (if it is not already enabled). 3. Click Save Changes. The browser screen refreshes. 4.
Appendix E: Domain Name System Forward Address (A) record Next, create a Forward Address (A) record. 1. 2. Select Forward Address (A) Record from the Add... pull-down menu. The “Add New Forward Address (A) Record” table appears. • Leave the Host Name field blank. • In the Domain Name field, enter mydomain.com. • In the IP address field, enter 192.168.10.10. Click Save. The “DNS Settings” table regenerates and displays www.mydomain.com and mydomain.com, as in Figure 122. Figure 122.
Sample setup of DNS service Mail Server (MX) record Finally, create a Mail Server (MX) record. 1. Select Mail Server (MX) Record from the Add... pull-down menu. The “Add New Mail Server (MX) Record” table appears. • Leave the Host Name field blank. • In the Domain Name field, enter mydomain.com. • In the Mail Server field, enter www.mydomain.com. • Under the Delivery Priority pull-down menu, leave the Delivery Priority as Very High. 2. Click Save.
Appendix E: Domain Name System To edit another domain, select another domain from the Select Domain or Network... pull-down menu. You can select any domain that you have configured for the DNS server. To add a new domain, use the Add... pull-down menu again. In the Domain Name field, replace the default domain name with the new domain name that you want to create. Further information For further information, refer to the following: • In the Cobalt Knowledge Base, search on “DNS”. • http://www.dnswiz.
Brief history of the Domain Name System (DNS) DNS is a distributed database that allows local administration of the segments on the overall database. Data in each segment of the database are available across the entire network through a client-server scheme consisting of name servers and resolvers. What is a DNS record? People are much more comfortable dealing with names rather than strings of numbers. A domain name such as “cobalt.
Appendix E: Domain Name System To determine which primary name server contains your domain name: 1. The local name server (the DNS resolver/browser machine) contacts the root-level name server maintained by several Internet root server authorities. 2. The root-level name server returns the IP address of the primary name server responsible for the requested domain name. 3. The local name server contacts the primary name server. 4.
Appendix F Disaster Recovery with Third-Party Software The RaQ XTR server supports the use of third-party backup solutions for performing disaster recovery. The supported backup solutions are: • Knox Arkeia • Legato NetWorker • Veritas NetBackup Each of these solutions requires customization to correctly recover the two Cobalt configuration databases in the RaQ XTR (the databases in Postgres and Cobalt Configuration Engine [CCE]).
Appendix F: Disaster Recovery with Third-Party Software The backup makes copies of the archives: /var/cobalt/backups/cce.tar /var/cobalt/backups/cobalt.sql When the backup is complete, the post-backup script cobalt_postbackup deletes the archives. During the disaster-recovery process, the entire RaQ XTR server must be restored. This restores the archives to the directory /var/cobalt/backups. When the backup is complete, you must reboot the RaQ XTR; the server does not reboot automatically.
General steps to perform disaster recovery General steps to perform disaster recovery The general procedure for performing disaster recovery is as follows: 1. Perform an OS restore to wipe the hard disk drive and return the RaQ XTR to a factory-fresh state. 2. Configure the RaQ XTR through the Setup Wizard and return it to the network. The RaQ XTR must be able to communicate with the backup server. 3.
Appendix F: Disaster Recovery with Third-Party Software Knox Arkeia Tailoring the backup service Server-side tailoring is required for Knox Arkeia. Specifically, you must add a pre-command and post-command to the tree options for each RaQ XTR being backed up. Arkeia performs backups with groups of clients called savepacks; you need to create a savepack, add your RaQ XTR to the savepack and tailor the savepack for the backup.
Knox Arkeia 9. In the box “command before tree”, enter: hostname:/usr/local/sbin/cobalt_prebackup where hostname is the client name of the RaQ XTR you are backing up. 10. In the box “command after tree”, enter: hostname:/usr/local/sbin/cobalt_prebackup where hostname is the client name of the RaQ XTR you are backing up. 11. Click the check box to close the window.
Appendix F: Disaster Recovery with Third-Party Software Backing up a RaQ XTR with Knox Arkeia With Knox Arkeia, you start backups with the Arkeia UI. As indicated previously, this is done by running a savepack. To start an interactive backup using the arkx GUI program on the Arkeia server: 1. In the arkx UI, select Backup > Interactive Backup. 2. Click the check box to start the backup immediately. A window showing the progress appears. During the backup, you can see the cobalt.sql and cce.
Knox Arkeia 5. Click Save. 6. Select Backup and Restore > Control. The “Backup System Control” table appears. 7. • Lock the UI by clicking the check box Locked (check mark). • Turn off the services by disabling the check box Active (no check mark). Click Save Changes. Performing a disaster-recovery operation After completing the preparation steps in the previous section, the RaQ XTR is now ready to be restored. In the arkx UI on the backup server: 1. Select Restoration > Restoration Options. 2.
Appendix F: Disaster Recovery with Third-Party Software 12. Reboot the RaQ XTR. ☞ Important: Disaster recovery is not complete until you reboot the RaQ XTR. 13. After the RaQ XTR server has rebooted, ensure that the CCE and Cobalt databases were recovered. Inspect the directory /var/cobalt/backups/ for files. If cce.tar and cobalt.sql exist and do not have a ‘restored’ prefix, then you need to run the command: /etc/rc.d/init.d/cobalt_restore start as the root user and reboot the RaQ XTR again.
Legato NetWorker Legato NetWorker Tailoring the backup service No server-side tailoring is required for NetWorker other than adding the client to the backup server. Before creating a new backup client, ensure that the client does not already exist in the server. NetWorker allows more than one instance of a client, so ensure that you do not create additional instances unless you are certain that is what you want to do.
Appendix F: Disaster Recovery with Third-Party Software Files associated with Legato NetWorker tailoring /.nsr These are directives for handling RaQ XTR file systems. /var/lib/pgsql/.nsr These are directives for handling the cobalt postgres database. /usr/bin/postgresasm This is an Application Specific Module (ASM) for postgres databases. /usr/bin/cceasm This is an Application Specific Module (ASM) for the CCE database.
Legato NetWorker Performing disaster recovery on a RaQ XTR with Legato NetWorker Preparing for disaster recovery Prepare your RaQ XTR for disaster recovery by performing the following steps: 1. Perform an OS restore to wipe the hard disk drive and return the RaQ XTR to a factory-fresh state. 2. Configure the RaQ XTR through the Setup Wizard and return it to the network. The RaQ XTR must be able to communicate with the backup server. 3.
Appendix F: Disaster Recovery with Third-Party Software Performing a disaster-recovery operation After completing the preparation steps in the previous section, the RaQ XTR is now ready to be restored. 1. Telnet to the RaQ XTR and become the root user. 2. Execute the command: $ /usr/bin/recover -s server -iY -a /var > /var/cobalt/ recover.log 2>&1 where -s server indicates the NetWorker backup server (for example, -s legato.cobalt.
Legato NetWorker Technical notes If the root directory / is recovered before the directory /var, a postgresasm error occurs in the log, indicating that the password is invalid. During the restore process, a new random admin password is created for postgres. This password is stored in the file /etc/cobalt/.meta.id, which is restored with the / file system. The Cobalt database is restored with the /var file system and uses the password stored in this file.
Appendix F: Disaster Recovery with Third-Party Software Veritas NetBackup Tailoring the backup service No server-side tailoring is required for Veritas NetBackup. Pre- and post-backup scripts are already installed and are run automatically by the NetBackup client (see “Files associated with Veritas NetBackup tailoring” on page 278 for a list of files). Basic instructions for performing a backup with Veritas NetBackup Veritas NetBackup uses Policies to perform backups of groups of clients.
Veritas NetBackup 9. Click to enable (check mark) the check box Back up all local drives. 10. Select the type of backup: Full Backup, Incremental Backup or Differential Backup. Click Next. 11. Use the default schedules. Click Next. 12. Use the default start times. Click Next. 13. Click Finish. Backing up a RaQ XTR with Veritas NetBackup To start a backup: 1. On the NetBackup server, open the Backup Policy Management program and select your group. 2. Select Class > Manual Backup from the menu bar. 3.
Appendix F: Disaster Recovery with Third-Party Software Files associated with Veritas NetBackup tailoring /opt/openv/netbackup/bin/bpstart_notify This script is started automatically by NetBackup before a backup runs. It calls the script cobalt_prebackup. /opt/openv/netbackup/bin/bpend_notify This script is started automatically by NetBackup after a backup runs. It calls the script cobalt_postbackup.
Veritas NetBackup Performing disaster recovery on a RaQ XTR with Veritas NetBackup Preparing for disaster recovery Prepare your RaQ XTR for disaster recovery by performing the following steps: 1. Perform an OS restore to wipe the hard disk drive and return the RaQ XTR to a factory-fresh state. 2. Configure the RaQ XTR through the Setup Wizard and return it to the network. The RaQ XTR must be able to communicate with the backup server. 3.
Appendix F: Disaster Recovery with Third-Party Software Performing Disaster Recovery After completing the preparation steps in the previous section, the RaQ XTR is now ready for disaster recovery. The following instructions may be used to perform the recovery using the text-based UI on the RaQ XTR itself. 1. Telnet to the RaQ XTR and become the root user. 2. Run the following command: # /opt/openv/netbackup/bin/bp 3. Select “r” for restore. 4. Select “b” to restore from backup. 5.
Veritas NetBackup 13. Reboot the RaQ XTR. ☞ Important: Disaster recovery is not complete until you reboot the RaQ XTR. 14. After the RaQ XTR server has rebooted, ensure that the CCE and Cobalt databases were recovered. Inspect the directory /var/cobalt/backups/ for files. If cce.tar and cobalt.sql exist and do not have a ‘restored’ prefix, then you need to run the command: /etc/rc.d/init.d/cobalt_restore start as the root user and reboot the RaQ XTR again. The restore is initiated at this point.
Appendix F: Disaster Recovery with Third-Party Software 282 Cobalt RaQ XTR User Manual
Appendix G Contacting Cobalt Networks Customer Service and Technical Support For Cobalt product information, visit the support section of the Cobalt Web site at http://www.cobalt.com/support/. The site includes a Knowledge Base that customers can query; a list of Frequently Asked Questions (FAQs) that provide additional information is also available through the Knowledge Base. General Cobalt information In the U.S.A., call (888) 70-COBALT or (888) 702-6225, or send email to info@cobalt.com. Outside the U.
Appendix G: Contacting Cobalt Networks Technical Support telephone numbers In the United States, call (800) 266-4378. In Europe, Middle East and Africa, call +31 (71) 565-7070 (The Netherlands). Customers in Japan can send email to support-japan@cobalt.com. Further resources and information Cobalt also offers the following additional resources and information.
Further resources and information New discussion groups are added periodically. The current groups include: • an announcement list concerning Cobalt products • an information list for developers working on Cobalt products • a user list for sharing information between users of Cobalt products • a security list for users to address network security issues on Cobalt products The Knowledge Base Cobalt offers access to its online database of common installation and configuration problems and solutions.
Appendix G: Contacting Cobalt Networks Before contacting Cobalt Networks Technical Support ✍ Note: To receive Technical Support, you must first register your Cobalt product. First, make an effort to resolve the problem on your own. Take note of all actions you perform and any error messages so that, if necessary, you can describe them to a member of the Technical Support team.
Appendix H Licenses The BSD Copyright Copyright ©1991, 1992, 1993, 1994 The Regents of the University of California. All rights reserved. Redistribution and use in source and binary forms, with or without modification, are permitted provided that the following conditions are met: 1. Redistributions of source code must retain the above copyright notice, this list of conditions and the following disclaimer. 2.
Appendix H: Licenses GNU General Public License Version 2, June 1991 Copyright (C) 1989, 1991 Free Software Foundation, Inc. 59 Temple Place - Suite 330, Boston, MA 02111-1307, USA TERMS AND CONDITIONS FOR COPYING, DISTRIBUTION AND MODIFICATION 0. This License applies to any program or other work which contains a notice placed by the copyright holder saying it may be distributed under the terms of this General Public License.
GNU General Public License 2. You may modify your copy or copies of the Program or any portion of it, thus forming a work based on the Program, and copy and distribute such modifications or work under the terms of Section 1 above, provided that you also meet all of these conditions: a. You must cause the modified files to carry prominent notices stating that you changed the files and the date of any change. b.
Appendix H: Licenses 3. You may copy and distribute the Program (or a work based on it, under Section 2) in object code or executable form under the terms of Sections 1 and 2 above, provided that you also do one of the following: a. Accompany it with the complete corresponding machine-readable source code, which must be distributed under the terms of Sections 1 and 2 above on a medium customarily used for software interchange; or, b.
GNU General Public License 5. You are not required to accept this License, since you have not signed it. However, nothing else grants you permission to modify or distribute the Program or its derivative works. These actions are prohibited by law if you do not accept this License.
Appendix H: Licenses 8. If the distribution and/or use of the Program is restricted in certain countries either by patents or by copyrighted interfaces, the original copyright holder who places the Program under this License may add an explicit geographical distribution limitation excluding those countries, so that distribution is permitted only in or among countries not thus excluded. In such case, this License incorporates the limitation as if written in the body of this License. 9.
GNU General Public License NO WARRANTY 11. BECAUSE THE PROGRAM IS LICENSED FREE OF CHARGE, THERE IS NO WARRANTY FOR THE PROGRAM, TO THE EXTENT PERMITTED BY APPLICABLE LAW. EXCEPT WHEN OTHERWISE STATED IN WRITING, THE COPYRIGHT HOLDERS AND/OR OTHER PARTIES PROVIDE THE PROGRAM “AS IS” WITHOUT WARRANTY OF ANY KIND, EITHER EXPRESSED OR IMPLIED, INCLUDING, BUT NOT LIMITED TO, THE IMPLIED WARRANTIES OF MERCHANTABILITY AND FITNESS FOR A PARTICULAR PURPOSE.
Appendix H: Licenses SSL License Copyright (c) 1998-1999 Ralf S. Engelschall. All rights reserved. Redistribution and use in source and binary forms, with or without modification, are permitted provided that the following conditions are met: 1. Redistributions of source code must retain the above copyright notice, this list of conditions and the following disclaimer. 2.
Appendix I Glossary The entries in this glossary are for your information. Not all of the concepts, technologies and protocols apply to the RaQ XTR server. 10/100 BaseTX An Ethernet connection over twisted-pair cables with a throughput of 10 Mb/s or 100 Mb/s. 10BaseT A 10-Mb/s baseband Ethernet specification using two pairs of twisted-pair cabling (Category 3, 4, or 5): one pair for transmitting data and the other for receiving data. 10BaseT (part of the IEEE 802.
Appendix I: Glossary APOP See Authentication Post Office Protocol (APOP). AppleShare A file-sharing protocol in Apple system software that allows sharing of files and network services through a file server in the Apple Macintosh environment. ASP See Active Server Page (ASP).
Common gateway interface (CGI) A set of rules that describe how a Web server communicates with another application running on the same computer and how the application (called a CGI program) communicates with the Web server. Any application can be a CGI program if it handles input and output according to the CGI standard. Collision In an ethernet network, a collision is the result of two devices attempting to transmit data at exactly the same time.
Appendix I: Glossary Domain name The location of an organization or other entity on the Internet. For example, the address www.cobalt.com locates an Internet address for the domain name “cobalt.com” at a particular IP address and a particular host server named “www.” Domain Name System (DNS) The Internet service responsible for translating a human-readable host name such as cobalt.com into a numeric IP address (111.123.45.67) for TCP/IP communications. DSL See Digital Subscriber Line (DSL).
ETRN ETRN (Extended Turn) is an extension to the Simple Mail Transfer Protocol (SMTP) that allows an SMTP server to send a request to another SMTP server to send any email messages it has. Typically, SMTP is used with two other protocols, Post Office Protocol 3 (POP3) or Internet Message Access Protocol (IMAP), to request messages from a server; SMTP by itself cannot request mail to be sent by another server. ETRN is designed for use by anyone who is traveling and wants to access their email.
Appendix I: Glossary HTTP See HyperText Transfer Protocol (HTTP). HyperText Markup Language (HTML) A set of “markup” symbols or tags inserted in a text file intended for display on a World Wide Web browser. The markup tags tell the Web browser how to display a Web page’s content, words, and images. HTML is a subset of Standardized Generalized Markup Language (SGML).
Integrated Services Digital Network (ISDN) A system of digital telephone connections. This system allows data to be transmitted simultaneously across the world using end-to-end digital connectivity. With ISDN, voice and data are carried by bearer channels (B channels) occupying a bandwidth of 64 kb/s (some switches limit B channels to a capacity of 56 kb/s). A data channel (D channel) handles signaling at 16 kb/s or 64 kb/s, depending on the type of service.
Appendix I: Glossary Internet Message Access Protocol (IMAP) Internet Message Access Protocol is a standard protocol for accessing email from your local server. IMAP is a client/server protocol in which email is received and held for you by your Internet server. You (or your email client) can view just the heading and the sender of the letter and then decide whether to download the mail from the server.
Kernel The essential center of a computer operating system, the core that provides basic services for all other parts of the operating system. A kernel can be contrasted with a shell, the outermost part of an operating system that interacts with user commands. Kernel and shell are terms used more frequently in UNIX. See also Shell. LAN See local area network (LAN). Leased IP address An IP address assigned by the Dynamic Host Configuration Protocol (DHCP) to an unrecognized computing device.
Appendix I: Glossary Media access control (MAC) address A standardized data-link-layer address that is required for every port or device that connects to a LAN. Other devices in the network use these addresses to locate specific ports in the network, and to create and update routing tables and data structures. MAC addresses are six bytes long and are controlled by the IEEE. Also known as a hardware address, a MAC-layer address and a physical address.
Packet The unit of data that is routed between an origin and a destination on the Internet or any other packet-switched network. The packet includes a header containing control information and (usually) user data. Packets are most often used to refer to network layer units of data. PCI See Peripheral Component Interface (PCI).
Appendix I: Glossary Point-to-Point Protocol over Ethernet (PPPoE) A specification for connecting multiple computer users on an ethernet to a remote site through common customer-premises equipment such as a modem and similar devices. PPPoE can be used to allow an office or building full of users share a common digital subscriber line (DSL), cable modem or wireless connection to the Internet.
Redundant Array of Independent Disks (RAID) A redundant array of independent disks is a way of storing the same data in different places (thus, redundantly) on multiple hard disks. A RAID appears to the operating system to be a single virtual disk drive. Redundancy means that there is protection against the failure of any single hard disk drive.
Appendix I: Glossary Secure Sockets Layer (SSL) Secure Sockets Layer is a program layer created by Netscape Communications for managing the security of message transmissions in a network. Netscape’s idea was that the programming for keeping your messages confidential ought to be contained in a program layer between higher-level protocols (such as HTTP or IMAP) and the TCP/IP layers of the Internet.
Server A system program that awaits requests from client programs in the same computer or across a network, and services those requests. A server can be dedicated, in which case this is its sole function, or non-dedicated, where the system can be used in other ways, such as a workstation.
Appendix I: Glossary Small Computer System Interface (SCSI) A parallel interface standard used by PCs, some Apple Macintosh computers and many Unix systems for attaching peripheral devices to computers. SCSI interfaces provide for faster data transmission rates (up to 160 Mb/s) than standard serial and parallel ports. In addition, you can attach many devices to a single SCSI port, so that SCSI is really an input/output bus rather than simply an interface. SMB See Server Message Block (SMB).
Virtual host See Virtual site. Virtual memory A concept that, when implemented by a computer and its operating system, allows programmers to use a very large range of memory or storage addresses for stored data. Virtual site Whereas industry uses the term virtual host, Cobalt Networks uses the term virtual site. In Cobalt’s definition, a virtual site consists of a Domain Name System (DNS) domain with Web, FTP and email services. Each virtual site contains its own list of site-user accounts.
Appendix I: Glossary 312 Cobalt RaQ XTR User Manual