
User manual


Chapter 4
102
Generate a self-signed certificate
Once the RaQ 3 Administrator has enabled SSL, the user must now
create a self-signed certificate. The self-signed certificate can be signed
later by an external authority.
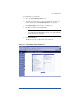
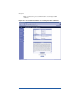
1. On the Site Management screen, click SSL Settings on the left
side. The Certificate Subject Information screen appears. See
Figure 35.
2. Enter the following information:
Country Enter the two-letter country code (for example, AU for
Australia or US for United States).
State Enter the name of the state (for example, New South Wales
or California).
Locality Enter the city or locality (for example, Sydney or
Toronto).
Organization Enter the name of the organization (for example,
The Widgets Corporation).
Organizational Unit As an option, enter the name of a department
(for example, Hardware Engineering).
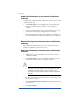
3. Select Generate self-signed certificate from the pull-down menu
at the bottom.
4. Click Save Changes.
The RaQ 3 processes the information and regenerates the screen
with the new self-signed certificate in the Certificate Request and
Certificate windows. See Figure 36.