
User manual


Setting up the RaQ 3
27
After setup has been completed, the Services page in the Control Panel
has a “Parameters” column which enables further configuration. Refer
to “Control panel” on page 47 for additional information.
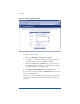
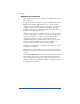
Entering the time settings
In the Time Settings table, select the time and date with the pull-down
menus. See Figure 12.
Select the correct time zone by clicking in the Region, Country and
Locale/Zone fields.
Completing configuration with the Setup Wizard
When you have entered the information in the Setup Wizard, click Save
Changes.
The RaQ 3 performs automatic checks on the information entered and
alerts you if an illegal value or a problem is encountered. If the
information is correct, the RaQ 3 enters the information in its
configuration files.
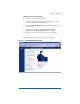
Registering the RaQ 3 online
The RaQ 3 displays an online product registration page; see Figure 13.
Note: If you are not connected to the Internet, you cannot
register online.
IMPORTANT: If you leave blank either the DNS or the Gateway
fields in the Setup Wizard, you cannot register the RaQ 3 online
because you will not be able to send email. In this case, if you
attempt to register the RaQ 3 online, you receive an error
message, stating that you cannot register online because you
did not fill in the DNS and Gateway fields.