Colour Control8 Order Code: Control8 www.cobrainternational.
User Manual COBRA Colour Control 8 Dear Customer, Thank you for purchasing the COBRA Colour Control 8. Cobra is one of the leading manufacturers of professional equipment and has decades of experience in design and production. To meet all your requirements, this unit has been designed and built to the highest standards so you can be assured you have made a good investment. Please read this manual fully for your safety and to take full advantage of the COBRA Colour Control 8 features.
Protection from Injury & Damage: 1. Never try to modify this unit. 2. Always install the unit in a suitable location where vibrations to the unit are avoided. 3. Check this unit matches the mains voltage and frequency before plugging it in to your mains socket. 4. If any liquids or objects have entered the unit, switch it off immediately and consult a qualified engineer. 5. If the unit malfunctions or there is damage to the mains cable disconnect immediately and consult a qualified engineer. 6.
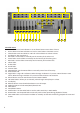
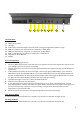
1 2 3 15 14 5 6 7 8 9 10 11 12 16 17 13 18 19 4 20 21 22 23 24 Controller Front: 1. Fixture buttons and LED indicators 1-8: Use fixture button 1-8 to select a fixture. 2. Scenes buttons and LED indicators 1-8: Push a scene button to activate a scene. 3. Chase buttons and LED indicators 1-8: Push a chase button to activate a chase. 4. Aux buttons: AUX 1 and AUX 2. 5. Red Fader: Use the fader to manually set the intensity of the colour red. 6.
25 26 27 28 29 30 31 32 33 Controller Rear: 25. DMX OUT. 26. DMX Polarity Switch. 27. USB Light. 28. Audio Input: This RCA accepts a line level audio input signal ranged from 100mV to 1Vpp. 29. MIDI Thru: MIDI port for connection to a sequencer or MIDI device. 30. MIDI Out: MIDI port for connection to a sequencer or MIDI device. 31. MIDI In: MIDI port for connection to a sequencer or MIDI device. 32. DC power DC 9-12V 800mA. 33. ON/OFF. First Time Operation: 1. Remove all packaging materials. 2.
Record a Scene: 1. Press and hold the Record button for 3 seconds to enter Program Mode. 2. Select the fixture you want to program by pressing the desired Fixture button. 3. Set the faders to the desired values. 4. Decide what page of scenes you are going to save on. You can select Page 1 or 2. 5. Press the Record button and then press the desired Scene button you want to save to. All LEDs will flash. 6. Press and hold the Record button for 3 seconds to exit Program Mode.
Manual: 1. Press the Mode button until the LED in front of Manual lights up green. 2. With Tap Sync you can manually go through the chase steps. Delete a chase: 1. Deselect all fixtures, scenes and chases. 2. Enter Record Mode by pressing the Record button for about 3 seconds. 3. Select the correct Page by pressing the Page button. 4. Press and hold the Tap Sync button. Now press the corresponding Chase button that you want to delete. 5. Exit Record Mode by pressing the Record button.
Channel Assignment: 1. Press and hold the Patch/Down button for 3 seconds. The Patch LED will light up red. 2. Choose channel range with the SPEED fader. Example: 1, 17, 33, 49 etc. Range 17: Start at 17 and stop at 32. 3. Choose a DMX channel with the FADE fader. 4. Press the fixture button you desire. The Fixture LED will light up blue. You can choose 8 different fixtures. 5. Now press and release the flash button from the fader you want to patch the DMX channel to.
MIDI Function: 1. Press and hold the MIDI button for 3 seconds to enter MIDI Mode. 2. Use the Speed fader to set the MIDI channel. You can choose CH1-16. 3. Press and hold the MIDI button for 3 seconds to exit Midi Mode. The MIDI function can be used to link 2 LED commanders together or use a MIDI keyboard to control the playback of the LED commander. AUX Button: 1. In Patch Mode the AUX button can be patched to any DMX value from 1-66. 2. The AUX button can be used in scenes and chases. 3.