
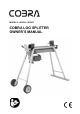
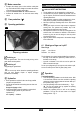
Operation Manual


L
Never try to fo
rce the splitting of the log by maintaining
the pressure for several seconds. This can lead to damage to
the machine.
Reposition the log on the main frame and repeat the splitting
process, or put the log to one side.
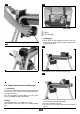
How to release a jammed log?
1. Loos
e the operating lever as well as the operating
pushbutton that the log ram can go back.
1. Place a triangular wooden chock under the log, then move
the log ram forward so that it pushes the chock under the
jammed log.
2. If the log is not released, keep repeating this procedure,
using larger chocks, until the log is released.
Never use a hammer to release a jammed log, and keep
your hands away from the log.
Do not enlist the aid of a second person - this is a one-man
job.
Do not try to release the log by using a hammer, since this
may break the motor block.
Finishing work:
Wait for the log ram has go back to its initial
starting / basic position.
Then remove the plug from the power socket.
Close the bleed screw. Fig. 5
Follow the care and maintenance instructions.
C
C
a
a
r
r
e
e
a
a
n
n
d
d
m
m
a
a
i
i
n
n
t
t
e
e
n
n
a
a
n
n
c
c
e
e
Remo
ve the plug from the power socket before
starting any maintenance or cleaning work.
Wear protecti
ve gloves in order to avoid injury to the
hands.
L
Observ
e the following in order to keep the log splitter in
good working order:
Clean the machine thoroughly after you have finished
usi
ng it.
Remove any resin remains on the machine.
Oil the piston rod (Fig. 1) regularly with an
environmentally friendly spray oil.
Check the oil level and change the oil as necessary.
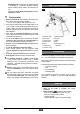
Sharpening the splitting wedge
After ex
tended periods of use, or if the splitting performance is
reduced, sharpen the splitting wedge with a file (and remove
any burrs). Fig. 8
Fig. 8
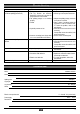
How do I check the oil level?
1. The log r
am must be in its starting position.
2. Stand the log splitter on end, with the filler opening at the
top. Fig
9
A second pe
rson will be required to up-end and
hold the log splitter.
3. Unscrew the dipstick – Fig. 10. Do not drop or lose the oil
seal when removing the dipsti
ck.
4. Clean the dipstick and the oil seal.
5. Replace the dipstick fully into the oil reservoir.
6. Now remove the dipstick again, and read off the oil level.
If the oil
level is between the two marking on the
dipstick, there is sufficient oil in the reservoir.
If the oi
l level is below the lower marking, more oil
should be added with the aid of a clean funnel.
lower marking upper marking
7. Check th
e oil seal and replace it if it is damaged in any
way.
8. Repl
ace the dipstick and screw it firmly into place.
Caution! Do not tighten the screw too tightly, since this may
damage the oil seal or the thread in the cylinder cover.
Oil seal
Sharpen wedge
6